Phase 1: Planning Your Perfect Irrigation System
Garden sprinkler installation transforms lawn care, saving you from dragging hoses or forgetting to water. A well-planned system saves water, increases property value, and maintains a healthy lawn with less effort.
Quick Installation Overview:
- Plan your system: Measure water pressure, map your yard, and create zones.
- Connect to water supply: Tap your main line and install a backflow preventer.
- Dig trenches: Create paths 6-12 inches deep for pipes.
- Install components: Lay pipe, attach sprinkler heads, and flush the system.
- Wire the controller: Connect valves and program your watering schedule.
Most homeowners complete a basic two-zone system in 16-20 hours. A DIY project costs $1,500-$4,500 for materials, while professional installation runs $3,000-$9,000. Success hinges on proper planning: knowing your water pressure (PSI) and flow rate (GPM) is essential to avoid dry spots or weak spray.
I’m Tommy Randall, and since 2006, my team at Randall Landscaping has installed hundreds of irrigation systems across Massachusetts and New Hampshire. We know how to help homeowners achieve a lush lawn and avoid costly mistakes.

Garden sprinkler installation glossary:
This phase is your blueprint for an efficient, effective system. A little effort now saves major headaches later.
Safety First: Before You Dig
Before digging, safety is the top priority. Always call 811, the national “Call Before You Dig” hotline, a few days before you start. This free service dispatches local utilities to mark underground gas, power, water, and communication lines. Hitting a line can cause serious injury and costly repairs.
Also, check with your local building department in towns like Andover, Boxford, or Salem for permits required for garden sprinkler installation. Some municipalities require a plumbing permit, especially when connecting to a main water line. A helpful site preparation guide offers more insight.
Calculating Water Pressure and Flow Rate
Your system’s performance depends on your home’s water supply. You must measure water pressure and flow rate to design an effective system.
- Measure Static Water Pressure (PSI): Attach a pressure gauge to an outdoor spigot (with all other water off) and turn it on fully. A typical reading is 40-70 PSI; irrigation systems generally need 40-65 PSI. High pressure may require a reducer, while low pressure may need a booster pump (a job for a pro).
- Calculate Flow Rate (GPM): Time how long it takes to fill a 5-gallon bucket from the same spigot. To get Gallons Per Minute (GPM), use this formula: (5 / seconds) * 60. For example, if it takes 30 seconds: (5 / 30) * 60 = 10 GPM. This number determines how many sprinkler heads can run in a single zone.
If you’re unsure, our residential landscaping services include expert irrigation design.
Designing Your Layout and Zones

- Sketch Your Property: On graph paper, draw a scaled map of your yard, including the house, driveway, walkways, and plant beds. Note sun exposure and slopes.
- Divide into Zones: Group areas with similar watering needs (sun, soil, plant type) into separate zones, each controlled by its own valve. This practice, called “hydrozoning,” is key to water efficiency.
- Plan Head Placement: Use the “head-to-head coverage” principle, where the spray from one sprinkler reaches the next. This overlap ensures uniform watering and prevents dry spots. Rotors are for large areas, while spray heads work for smaller, irregular spaces.
For help, consider Rain Bird’s free design worksheet or a professional design service.
Choosing the Right Sprinkler Heads
Select heads based on the area and plant type. Never mix different head types (e.g., rotors and sprays) in the same zone, as their different water delivery rates cause uneven watering.
- Rotor Heads: A rotating stream of water for large lawns (25-45 ft. radius). They use more water (3-5 GPM each).
- Spray Heads (Pop-Up): A fan-shaped spray for smaller, irregular areas (5-15 ft. radius). They use less water (1-3 GPM each).
- Drip Irrigation: Delivers water directly to the roots of garden beds, shrubs, and trees, minimizing evaporation. It can cut water use by 50% for non-turf areas. Learn more about drip irrigation misters.
Selecting Your Pipe: PVC vs. Poly Pipe
Pipe choice is crucial for longevity, especially in the cold climates of Merrimack Valley and Southern New Hampshire.
| Feature | PVC Pipe | Poly Pipe (Polyethylene) |
|---|---|---|
| Material | Rigid polyvinyl chloride | Flexible polyethylene plastic |
| Durability | Very durable, resistant to crushing | Durable, but can be damaged by sharp objects |
| Flexibility | Rigid, requires fittings for every turn | Highly flexible, can be curved without fittings |
| Connections | Solvent cement (glue) and primer | Barbed fittings and clamps (usually stainless steel) |
| Best Use | Main supply lines (constant pressure), warmer climates | Lateral lines (after valves), colder climates (freeze-resistant) |
| Recommendation | Recommended for main lines due to strength and reliability. Schedule 40 is a heavier gauge pipe suitable for sprinkler systems. | Excellent for lateral lines due to flexibility and freeze resistance, but Rain Bird does not recommend it for main lines. |
In our region, poly pipe is often used for lateral lines due to its freeze resistance. For the main supply line under constant pressure, we recommend Schedule 40 PVC for its superior durability.
Step-by-Step Garden Sprinkler Installation Guide
With the planning done, it’s time to get your hands dirty. This section breaks down the installation into five manageable steps.

Step 1: Connect the Water Supply and Assemble the Valve Manifold
This step creates the heart of your system. You’ll tap into your home’s water and build the control center for your zones.
- Connect to Water Supply: You can connect to an outdoor spigot for a simple setup or tap into your home’s main water line for a permanent, high-performance system. We strongly advise hiring a licensed plumber for main line connections, as mistakes can be costly.
- Install Backflow Preventer: This device is non-negotiable and often required by code in towns like Methuen or Plaistow. It prevents contaminated irrigation water from flowing back into your drinking water. Ensure it’s installed to meet local regulations.
- Assemble Valve Manifold: Dig a hole for the valve box and line it with gravel for drainage. Assemble your zone control valves on a manifold, using Teflon tape on all threaded connections. Place the assembled manifold in the valve box, leaving space for future maintenance.
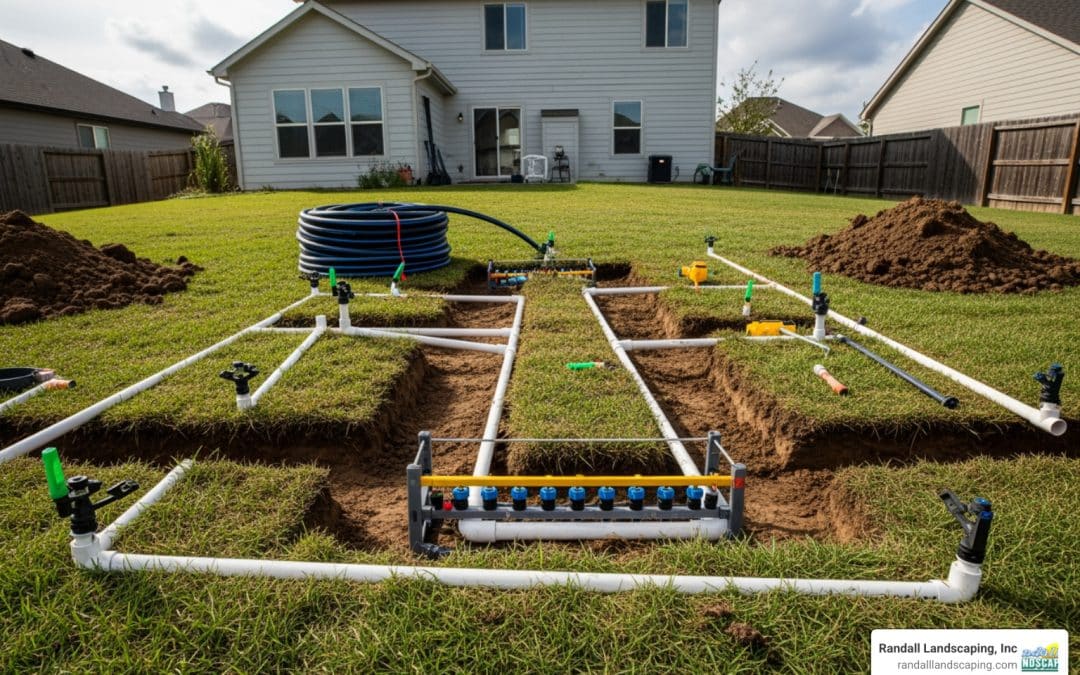
Step 2: Dig Trenches and Lay Pipe
This is the most physically demanding part of the garden sprinkler installation.
- Mark Your Layout: Use landscape flags or spray paint to mark the planned locations of pipes and sprinkler heads on your lawn.
- Dig Trenches: In Massachusetts and New Hampshire, dig main line trenches 12-18 inches deep and lateral line trenches 6-12 inches deep to protect against frost. A trenching shovel works for small jobs, but renting a power trencher or pipe-pulling machine is highly recommended for larger yards.
- Run Pipe Under Walkways: To avoid demolishing hardscapes, use water pressure to “jet” a tunnel under walkways or driveways. For more on working around existing features, see our information on hardscaping projects.
- Lay the Pipe: Carefully lay your main and lateral lines in the trenches according to your design, ensuring they are flat and free of kinks.
Step 3: Assemble and Flush the System
Before installing sprinkler heads, you must flush the pipes to prevent clogs.
- Connect Pipes and Fittings: For PVC, use primer and cement to create a strong bond. For poly pipe, use barbed fittings secured with stainless steel clamps. Heating the end of poly pipe can make inserting fittings easier.
- Flush the System: With the pipe ends open, turn on the water and open each zone valve one at a time. Let water run for a few minutes until it is clear of any dirt or debris that entered the pipes during installation.
Step 4: Installing and Adjusting Sprinkler Heads
Now it’s time to install the heads and fine-tune your coverage.
- Install Sprinkler Heads: Attach heads to the lateral lines using flexible swing joints, which allow for easy height adjustment and prevent breakage. Install pop-up heads so they sit flush with the ground when retracted to avoid damage from lawnmowers.
- Adjust for Optimal Coverage: Turn on each zone and observe the spray pattern. Adjust the arc (spray angle) and radius (spray distance) of each head to achieve head-to-head coverage and avoid spraying on driveways, walkways, or your house. You may need to swap nozzles to get the perfect pattern.
If you need help achieving perfect coverage, consider our professional sprinkler system installation services.
Step 5: Wiring and Programming the Controller
This final step automates your system.
- Mount the Controller: Install the controller (timer) in a protected location like a garage or shed, away from direct sun and extreme temperatures.
- Run Low-Voltage Wire: Run multi-strand, low-voltage irrigation wire from the controller to the valve manifold.
- Connect Valve Wires: At the manifold, connect one wire from each zone valve to a corresponding terminal on the controller. A single “common” wire connects to all valves and runs to the common terminal on the controller. Use waterproof wire connectors for all outdoor connections.
- Program the System: Follow the manufacturer’s instructions to set start times, run times, and watering days for each zone. We recommend deep, infrequent watering in the early morning (4-7 AM) to minimize evaporation. Run a test cycle to ensure everything works correctly.
For more programming tips, see our guide on garden irrigation systems with timers.
System Maintenance and Smart Upgrades
An installed system is a great start, but ongoing care and modern upgrades will keep it running efficiently for years.
Seasonal Care: How to Winterize Your System
In the Merrimack Valley and Southern New Hampshire, winterizing your system is essential to prevent burst pipes from freezing temperatures.
- Shut Off Water Supply: In the fall, before the first hard freeze, turn off the main water supply to your irrigation system.
- Blow Out the System: Use an air compressor (50-100 PSI) to force all remaining water out of the pipes. Connect the compressor to a blow-out port, open the furthest zone valve, and slowly introduce air. Work zone by zone, from farthest to nearest, until only air comes out of the heads. Caution: Using too much pressure can damage components. If unsure, hire a professional.
- Drain and Insulate: Ensure all drain valves are open and insulate any exposed pipes, backflow preventers, or valves. Set your controller to “off” or “rain” mode for the winter.
Smart Upgrades: Controllers and Rain Sensors
Modern technology can make your garden sprinkler installation even more efficient.
- Smart Controllers: These Wi-Fi-enabled controllers use local weather data to automatically adjust watering schedules. They prevent overwatering and can lead to water savings of 20-30% compared to traditional timers.
- Rain Sensors: This simple device detects rainfall and automatically pauses your watering schedule during and after a storm, preventing water waste.
Routine Sprinkler System Maintenance
Regular checks will keep your system in top condition.
- Check for Leaks: Look for wet spots or unusually green patches in your lawn, which can indicate an underground leak.
- Clean Nozzles: Periodically clean sprinkler nozzles and internal filters to remove dirt or mineral deposits that cause clogs.
- Adjust Heads: Check and adjust the spray pattern of your heads to ensure they still provide optimal coverage and aren’t watering pavement.
- Inspect the Valve Box: Open the valve box to check for leaks, corrosion, or insect damage.
- Annual Professional Check-Up: We recommend a professional inspection every 2-3 years. Our team can perform a comprehensive audit as part of our landscape maintenance services to ensure peak efficiency.
Common Mistakes and When to Call a Pro
Knowing what to avoid and when to ask for help can save you time, money, and frustration during your garden sprinkler installation.
Common Mistakes During Garden Sprinkler Installation
Avoid these frequent DIY missteps:
- Incorrect Trench Depth: Digging too shallow in our climate can lead to freeze damage and vulnerability to lawnmowers.
- Mixing Head Types in One Zone: Different heads have different watering rates, which creates wet and dry spots.
- Poor Head Spacing: Failing to ensure “head-to-head” coverage results in brown patches.
- Forgetting to Flush: Skipping this step clogs new sprinkler heads with debris from the pipes.
- Ignoring Local Codes: Not getting permits or installing a proper backflow preventer can lead to fines and shutdowns, a problem we’ve seen in towns like Georgetown and Dracut.
- Overloading Zones: Putting too many heads on one zone reduces water pressure, resulting in weak, ineffective spray.
DIY vs. Professional Installation: Making the Choice
While a DIY installation can save money on labor, it’s a significant commitment.
- DIY: Best for those with 16-20+ hours to spare, a knack for plumbing, and a willingness to do physical labor. The main pro is cost savings on labor.
- Professional: Recommended for complex yards, those uncomfortable with plumbing or electrical work, or anyone who wants the peace of mind that comes with a warranted, expertly designed system.
For more on costs, explore the average cost of inground sprinkler system information.
Understanding the Cost of Garden Sprinkler Installation
Costs vary based on yard size, complexity, component quality, and whether you DIY or hire a professional.
- DIY Cost: Expect to spend $1,500 to $4,500 on materials like pipes, heads, valves, and a controller. Tool rental is an additional cost.
- Professional Installation Cost: A professionally installed system typically ranges from $3,000 to $9,000. This includes design, labor, materials, and a warranty.
Key Cost Factors:
- Yard size and number of zones
- Quality of components (smart controllers, durable heads)
- Complexity of the water source connection
- Local permit fees in areas like North Andover or Atkinson
Disclaimer: Please note that these are average costs based on internet data and should be used for general estimation purposes only. They are not actual costs for Randall Landscaping, Inc. For a precise quote custom to your property, we encourage you to contact us for a consultation.
Frequently Asked Questions about Garden Sprinkler Installation
Here are answers to some of the most common questions we hear about garden sprinkler installation.
How deep should sprinkler lines be buried?
In the Merrimack Valley and Southern New Hampshire, depth is key to preventing freeze damage. We recommend burying main supply lines 12-18 inches deep. Lateral lines that run to the heads can be shallower, at 6-12 inches deep. This helps protect the system, even with proper winterization.
How many sprinkler heads can be on one zone?
This depends entirely on your home’s water pressure (PSI) and flow rate (GPM). First, calculate your available GPM. Then, add up the GPM ratings for all heads you plan for a single zone. The total GPM of the heads must not exceed your available GPM. As a general rule, a zone can support fewer rotor heads (which use more water) than spray heads (which use less).
Is a permit required for installing a sprinkler system?
Yes, a permit is often required, and rules vary by town. Always check with your local building department in places like North Reading or Hampton, NH, before starting. A permit is almost always necessary for installing a backflow prevention device, as it connects to your home’s potable water supply. This work may also need to be performed by a licensed plumber and pass an inspection.
Achieve a Healthy, Beautiful Lawn with the Right Sprinkler System
A well-planned garden sprinkler installation is a valuable home improvement that saves time, conserves water, and ensures your landscape thrives. By following these steps, you can create an efficient irrigation system that delivers the satisfaction of a lush, green lawn without the daily hassle. If the project feels overwhelming, or you prefer an expert touch, the team at Randall Landscaping, Inc. is here to help. We bring our commitment to quality and reliability to every project, ensuring your lawn gets the professional installation it needs to flourish. Contact us today for a consultation and achieve the vibrant landscape you’ve always dreamed of.