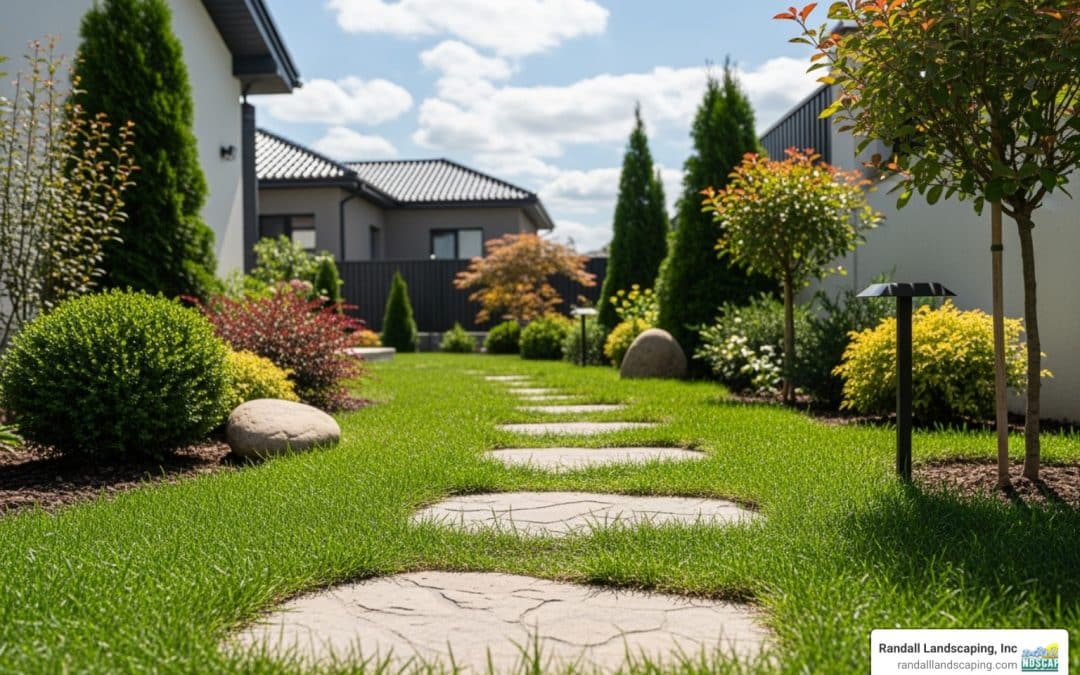
Why Stepping Stone Walkways Transform Your Outdoor Space
Walkways with stepping stones offer the perfect blend of beauty and function for any yard. These paths guide foot traffic while protecting your lawn, create visual interest in your landscape, and provide a stable surface for walking even in wet conditions.
Key Benefits of Stepping Stone Walkways:
- Cost-effective – An affordable way to upgrade your yard’s functionality and curb appeal.
- Easy to install – A great beginner project with simple tools.
- Low maintenance – Requires minimal upkeep compared to other walkways.
- Versatile design – Works with any landscape style from formal to natural.
- Lawn protection – Reduces wear patterns from foot traffic.
A well-installed stepping stone path is the finishing touch to a proper landscape design, allowing you to steer your yard with ease while adding visual appeal. From natural flagstone to modern geometric pavers, these walkways offer endless possibilities for customization.
I’m Tommy Randall, owner of Randall Landscaping, Inc. Since 2006, my team and I have created hundreds of beautiful walkways with stepping stones for homeowners across Massachusetts and New Hampshire, from simple garden paths to elaborate curved designs that complement our hardscape and landscape projects.
, Functionality (guides foot traffic and provides stable walking surface), Permeability (allows water drainage and reduces runoff), and DIY-Friendly (simple installation with basic tools and affordable materials) - walkways with stepping stones infographic")
Why Choose a Stepping Stone Path?
Walkways with stepping stones offer more than just a practical purpose; they add a touch of charm, guiding you through your garden. Great landscaping needs to look amazing and be functional, and stepping stone paths deliver on both fronts. They are cost-effective, DIY-friendly, and require very low maintenance once in place.
These paths are also natural lawn protectors, preventing grass from being trampled into muddy ruts. They guide foot traffic, improve drainage by letting water flow around each stone, and help define different spaces in your yard without walls or fences.
Whether you’re looking to improve your landscape design or simply need a practical solution for muddy pathways, stepping stones offer the perfect blend of form and function. For more creative ideas, check out these 12 Stepping Stone & Garden Path Ideas that showcase the incredible versatility of this timeless design element.
Improved Curb Appeal and Garden Design
Thoughtful details create visual interest that makes a home stand out. Walkways with stepping stones are one such detail, instantly lifting a yard from ordinary to extraordinary. Their beauty lies in their versatility. For a natural look, irregular flagstones nestled into moss create a perfect cottage garden vibe. For a more structured feel, formal patterns using geometric pavers provide clean lines that complement modern architecture.
Stepping stone paths create informal paths that invite exploration, leading visitors on a gentle journey through your garden. These paths naturally complement plants by creating defined edges that make your flower beds look more intentional and polished. Think of stepping stones as the finishing touch that ties your entire landscape together. For visual inspiration, browse this collection of Stepping Stone Walkway – Photos & Ideas to see how others have transformed their outdoor spaces.
Practical Benefits for Your Yard
Walkways with stepping stones are a smart investment for several practical reasons. They guide foot traffic along designated routes, preventing shortcuts that damage your lawn and helping your grass stay green and healthy. This eliminates lawn wear patterns and provides a solid path in wet conditions, keeping feet dry.
A proper stone path means no more muddy shoes. Rain or shine, you’ll have a stable, clean surface to walk on. As a bonus, well-placed stepping stones help direct water flow around your property, preventing pooling. These practical benefits make stepping stone walkways a rare home improvement that genuinely makes daily life easier while looking fantastic.
Planning Your Project: Materials, Design, and Costs
Successful walkways with stepping stones projects start with good planning. This is where you make key decisions about materials, design, and budget to create your perfect path.

Choosing Materials for Your Walkways with Stepping Stones
The world of stepping stones offers something for every taste and budget. Here are the most popular options:
| Material Type | Cost (per piece/sq ft) | Durability | Aesthetics | Maintenance |
|---|---|---|---|---|
| Natural Stone | $$$-$$$$ | Excellent (very long-lasting, weather-res) | Organic, unique, rustic, timeless | Low (occasional cleaning) |
| Concrete Pavers | $$-$$$ | Very Good (durable, uniform) | Versatile (colors, shapes, textures), modern | Low (occasional cleaning, sealing) |
| Wood Slices | $-$$ | Moderate (prone to rot, insects) | Rustic, natural, unique | High (regular sealing, replacement) |
| Rubber Pavers | $-$$ | Good (flexible, slip-resistant) | Casual, often recycled look | Low (easy to clean) |
Natural stone like flagstone, bluestone, and sandstone offers unique character with varied colors and patterns. While pricier upfront, these stones are incredibly durable, handle New England winters well, and require almost no maintenance.
Concrete pavers are versatile workhorses, available in countless shapes, sizes, and colors. They can mimic natural stone at a lower cost or provide perfect geometric shapes for a modern look. Ensure pavers are at least 1.5 inches thick and 18 to 24 inches wide for durability.
Wood slices create charming, rustic paths but are high maintenance. They require regular sealing and eventual replacement due to rot and insects.
Rubber pavers, often made from recycled materials, are lightweight, slip-resistant, and practical for high-traffic areas where safety is a priority.
Don’t forget the base material! A 2-inch layer of sand, fine gravel, or stone dust keeps your stones stable. Sand is a reliable choice. For more paver inspiration, check out our driveway pavers options.
Designing Your Path: Layout and Spacing
Designing your walkways with stepping stones balances function and beauty. A standard 36-inch path width is common, but 48 inches allows two people to walk side-by-side. Straight paths offer a formal look, while curved paths create a more relaxed, natural feel. Use a garden hose to experiment with curves before you dig.
The key to spacing is to match a natural walking stride. Place the center of each stone about 20-24 inches apart, which usually results in 3 to 6 inches between stone edges. Lay out your stones and walk the path several times to test the spacing before installation.
For the gaps between stones, mulch creates a soft, natural look. Gravel offers excellent drainage and a crisp appearance. Ground cover plants like creeping thyme turn the gaps into living art. Want to see how these principles work in larger outdoor spaces? Take a look at our patio design services for inspiration.
Understanding the Cost of a Stepping Stone Walkway
Walkways with stepping stones are one of the most budget-friendly yard upgrades. The total cost depends on your material choices, project size, and whether you DIY or hire a professional.
Please note: The following costs are national averages based on industry data and do not reflect the specific pricing of Randall Landscaping, Inc. For an accurate quote in the Andover, MA area, please contact us.
Average Project Costs:
- DIY Project: $100 – $500+
- Professional Installation: $500 – $2,500+
For DIY projects, costs are mainly for materials. Factoring in stones, base materials like sand or gravel, and tool rental, a DIY project has a wide cost range. Professional installation includes expertise in ground preparation, drainage, and long-term stability, ensuring a path that lasts for decades.
To keep costs down, reuse materials like old bricks, start small, and source locally from landscape supply companies, which often have better prices on bulk materials than big box stores.
Step-by-Step Guide to Installing Walkways with Stepping Stones
Installing walkways with stepping stones is a satisfying weekend project that can transform your yard. This guide will walk you through each step to ensure your path looks professional and lasts.

Step 1: Outline and Prepare the Ground
Getting the layout right from the start is crucial for a path that flows naturally. Use a garden hose or string to lay out your desired walkway shape. Walk the proposed route to ensure it feels natural. Once you’re happy, mark it with spray paint.
Call 811 before you dig to have underground utility lines marked. This free service is essential for safety. Finally, clear away any turf and debris from your marked path using a flat-bladed shovel. If you’re planning a larger renovation, consider our new lawn installation services.
Step 2: Excavate the Path
For each stone, excavate a hole deep enough for the stone’s thickness plus a 2-inch base layer. For example, if your stones are 2 inches thick, dig each hole about 4 inches deep. Use a shovel or spade to dig individual holes slightly larger than each stone.
Focus on creating level trenches, using a torpedo level to check that the bottom of each hole is flat. Keep a wheelbarrow nearby for soil disposal.
Step 3: Add and Level the Base
This step is critical for creating a stable path that won’t shift or wobble. The base is the foundation for your walkway. Pour about 2 inches of paver sand or fine gravel into each excavated hole. This layer distributes weight and provides stability.

Use a hand tamper to compact the sand firmly, removing air pockets. Then, use a leveling board (a straight piece of scrap wood works) to smooth the base. Pro tip: create a slight slope for drainage (about 1/4-inch per foot of stone length) to direct water away from structures.
Step 4: Set the Stepping Stones
Setting the stones requires patience and attention to detail. Place each stone carefully onto its prepared base and wiggle it gently to settle it into the sand. Use a rubber mallet to tap the stone down firmly until you hear a solid thud.
Use a level on top of each stone to ensure it sits flat. If a stone rocks or is at the wrong height, lift it and adjust the sand underneath. Check for stability by stepping on each stone; it should feel rock-solid. Aim to set your stones flush with ground level or just slightly above to allow for minor settling and prevent tripping hazards.
Finishing Touches and Long-Term Maintenance
With the hard work done, it’s time for the finishing touches that will transform your good path into a stunning landscape feature. A little regular care will keep your walkways with stepping stones looking their best. Our landscape maintenance services can help keep your entire yard in top shape.
Securing and Maintaining Your Walkways with Stepping Stones
These final steps ensure your path is stable, integrated, and built to last.
- Fill Gaps: Use polymeric sand, which hardens to lock stones in place and deter weeds. Fine gravel is great for drainage, while soil can be used if you plan to plant ground cover.
- Install Edging: Metal, plastic, or brick edging gives your path a clean, defined border and prevents loose materials from shifting.
- Add Plants or Mulch: Low-growing ground covers or a fresh layer of mulch will frame your walkway and provide a polished look.
For long-term care, sweep your path regularly to remove debris. Pull any weeds promptly. Clean the stones with a stiff brush and water, or a pressure washer for tougher stains, to prevent slippery buildup. After winter, check for any stones that have shifted and adjust them as needed.
When to Hire a Professional Landscaper
While a DIY stepping stone path is a rewarding project, sometimes it’s best to call in professionals.
- Complex designs: Intricate patterns, curves, or integrated lighting require professional expertise.
- Steep slopes: These present unique challenges for drainage, grading, and stability that professionals are equipped to handle.
- Poor drainage issues: An improperly installed path can worsen water problems. A pro can assess and solve drainage issues correctly.
- Large-scale projects: Professionals can complete long or interconnected walkways much more efficiently.
- Lack of time or tools: If you’re short on time or don’t have the right equipment, hiring a pro ensures the job is done right the first time.
For a durable, professionally installed walkway in areas like Salem, NH or Methuen, MA, the expert team at Randall Landscaping, Inc. ensures a perfect result with 100% reliability. We have the experience and equipment to build beautiful walkways with stepping stones that last for decades.
Frequently Asked Questions about Stepping Stone Paths
We’ve helped hundreds of homeowners create beautiful walkways with stepping stones, and certain questions come up often. Here are the answers to the most common ones to help you create a path that’s both gorgeous and functional.
How far apart should you place stepping stones?
The ideal spacing places the center of each stone about 20-24 inches apart, matching a natural walking stride. This typically leaves a 3 to 6-inch gap between stone edges. Before digging, always lay out the stones and walk the path to test the spacing for comfort.
Do stepping stones need a base?
Yes, a base is essential. A 2-inch layer of compacted paver sand or fine gravel is needed under each stone. This base provides stability, prevents the stones from sinking or shifting, and improves drainage, which is crucial for preventing frost damage in winter.
What is the best material to put between stepping stones?
The best material depends on your desired style and maintenance level. Decorative gravel or pebbles offer excellent drainage and low maintenance. Mulch provides a softer, natural look but needs to be refreshed annually. Walkable ground covers like creeping thyme or moss create a beautiful living path but require time to establish.
Let’s Pave Your Way to a Beautiful Landscape
We hope you’re excited about the transformative possibilities of walkways with stepping stones. These paths are more than just a way to avoid muddy shoes; they are a key element of your landscape. A well-designed walkway improves your property’s beauty while solving practical problems like guiding foot traffic and completing your landscape design.
You have options that fit your comfort level and budget. A DIY stepping stone path can be incredibly rewarding if you enjoy weekend projects. With basic tools and patience, you can create something that adds value and charm to your property for years to come.
On the other hand, if you’re considering a complex design, dealing with challenging terrain, or simply prefer to leave it to the experts, that’s where our team shines. We’ve been creating stunning walkways with stepping stones throughout the Merrimack Valley and Southern New Hampshire since 2006, and we know how to handle everything from drainage to intricate designs.
At Randall Landscaping, Inc., we pride ourselves on quality work and 100% reliability. When we promise a beautiful, durable result, that’s exactly what you’ll get. There’s something deeply satisfying about seeing a homeowner’s face light up when they see their finished walkway – it never gets old for us.
If you’re ready to transform your landscape with a stunning and durable path that reflects your style and stands the test of time, we’d love to help make it happen. Explore our professional walkway installation services to get started on your own beautiful journey.