Transform Your Garden with Mulch: Nature’s Secret Weapon
Garden bed mulching is the practice of applying a protective layer of material over your soil to improve plant health, suppress weeds, and improve the overall appearance of your landscape. For busy homeowners who want beautiful, low-maintenance gardens, proper mulching is essential.
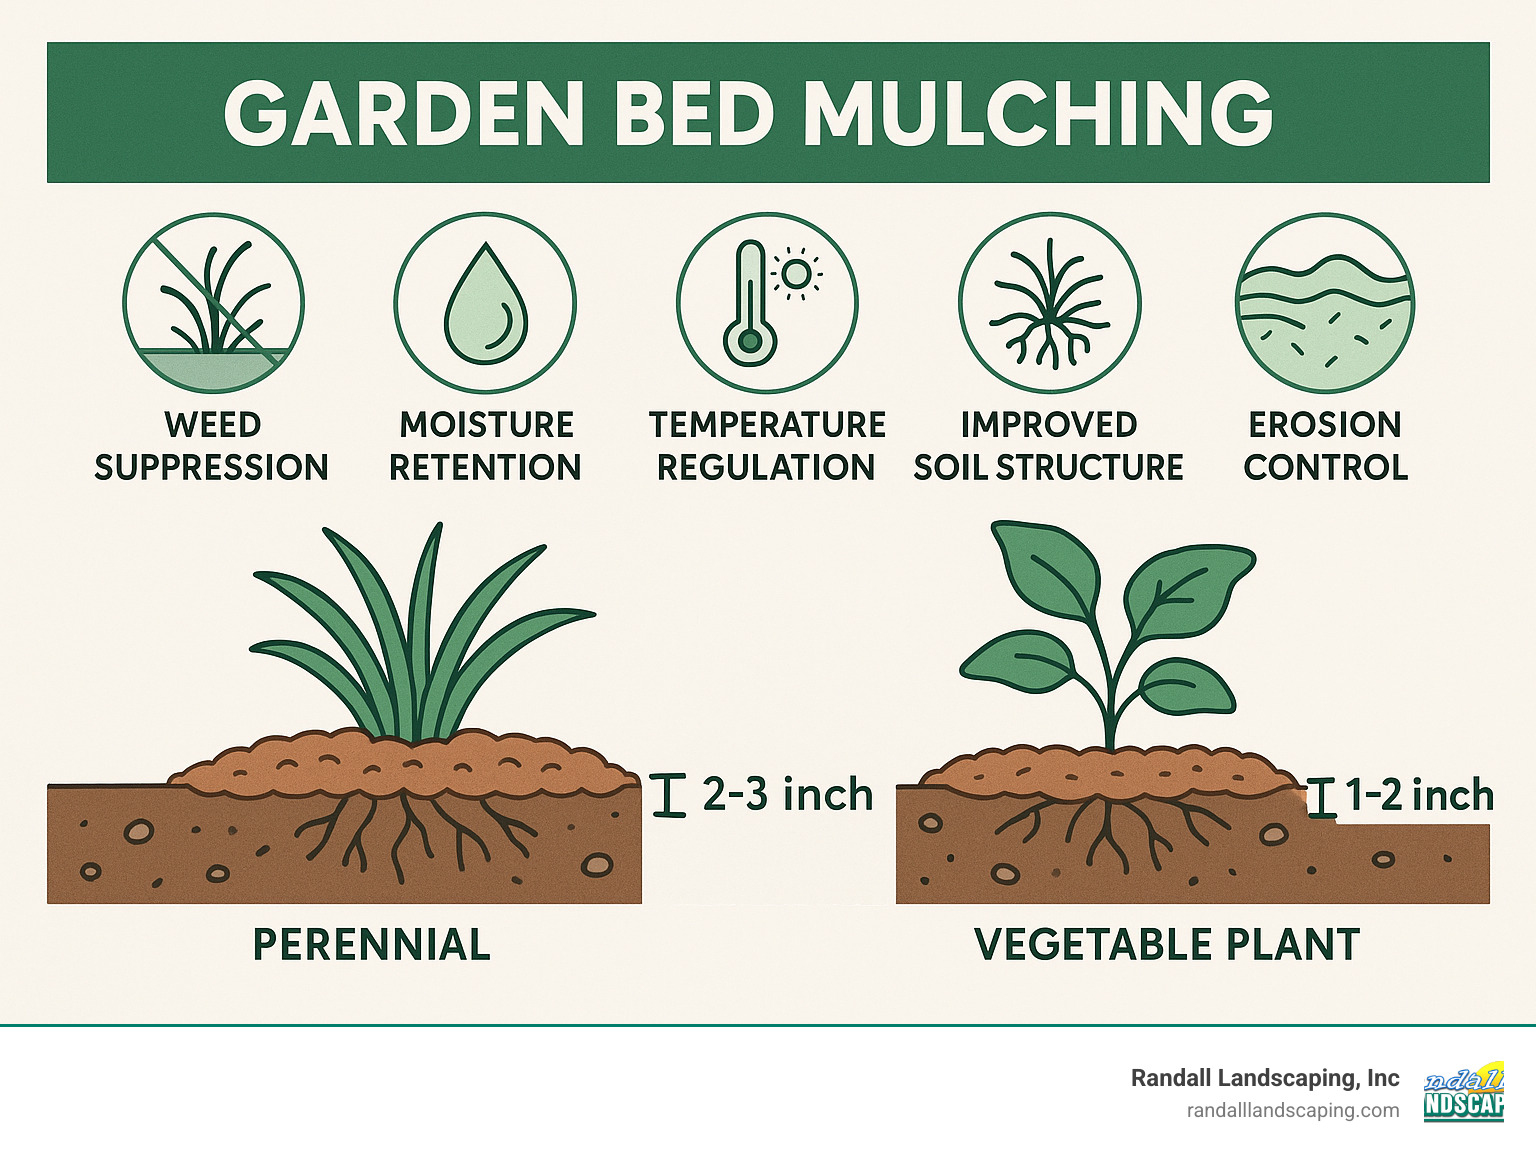
Quick Guide to Garden Bed Mulching:
– Best Depth: 2-3 inches for most garden beds, 1-2 inches for vegetable gardens
– When to Apply: Spring (after soil warms) and fall (after first frost)
– Keep Away: Leave 1-2 inches of space around plant stems and tree trunks
– Benefits: Suppresses weeds, retains moisture, regulates soil temperature, adds nutrients (organic mulches)
– Materials: Organic options (bark, compost, leaves, straw) or inorganic options (stone, rubber, landscape fabric)
Mulching might not seem glamorous, but it’s truly one of the most effective steps you can take for a healthier garden. As a gardener once told me, “Mulch is like a blanket for your soil – it protects everything underneath and helps your garden thrive with less effort from you.”
Think of mulch as mimicking the natural forest floor, where fallen leaves and organic matter create a protective layer that nourishes the soil while suppressing weeds. By adding mulch to your garden beds, you’re essentially working with nature rather than against it.
I’m Tommy Randall, owner of Randall Landscaping, and I’ve seen how proper garden bed mulching transforms struggling landscapes into thriving, beautiful outdoor spaces over my 18 years in the landscaping business.
Important Garden bed mulching terms:
– Commercial mulch installation
– Eco-friendly mulch options
Garden Bed Mulching Basics
When it comes to creating a thriving garden that requires less work from you, understanding garden bed mulching is absolutely essential. This simple practice delivers remarkable benefits that transform both your soil health and plant performance.
What Is Garden Bed Mulching?
Think of mulch as a protective blanket for your soil. It’s any material—organic or inorganic—that covers the soil surface around your plants. As one gardening expert beautifully puts it, “Mulch is simply just a layer of something on top of the soil. Mulch is nature’s way of taking care of itself. We just copy it, and it is genius.”
Many people confuse mulch with compost, but they serve different primary purposes:
Compost works as a soil amendment that you typically mix into the soil to boost nutrients. It’s like a vitamin supplement for your garden.
Mulch, on the other hand, is a top-dressing that stays on the soil surface. It creates a protective barrier between your precious soil and harsh environmental elements.
Both are valuable garden allies, but mulch specifically focuses on protection rather than direct nutrition (though organic mulches do break down to feed your soil over time).
Why Garden Bed Mulching Works So Well
The magic of garden bed mulching happens because it creates a beneficial microclimate for your plants’ root systems. Here’s why gardeners and landscapers swear by it:
Moisture retention is perhaps mulch’s superpower. A properly mulched garden can reduce water needs by up to 70%! The protective layer shields soil from sun and wind, dramatically slowing evaporation. This means less watering for you and happier plants even during dry spells.
Weed suppression is another huge benefit. Mulch blocks light from reaching weed seeds, preventing them from germinating in the first place. As one straight-talking gardener puts it, “Who likes weeding the garden? You do?? Don’t lie, you do not.” With good mulch, you’ll spend far less time pulling weeds.
Temperature regulation happens naturally under mulch. It insulates soil like a thermal blanket, keeping roots cooler during hot summers and warmer during freezing winters. This moderation of extreme temperature swings reduces plant stress significantly.
Soil health improves dramatically with organic mulches. As they gradually decompose, they feed the soil food web—that amazing community of microorganisms, fungi, worms and insects that create living, healthy soil. Your plants will thank you with stronger growth and better resistance to disease.
Erosion control is an often overlooked benefit. Mulch absorbs the impact of heavy rain, preventing soil compaction and runoff that can wash away your valuable topsoil.
I’ve seen these benefits with our clients. A family in North Andover watched their water usage drop by nearly 40% after we implemented proper garden bed mulching throughout their property. Their plants not only survived but thrived during a particularly harsh summer drought, and they were thrilled with both the water savings and the dramatic reduction in garden maintenance.
When you understand these basics, it becomes clear why mulch is truly nature’s secret weapon for gardeners. At Randall Landscaping, we’ve seen time and again how this simple practice transforms struggling gardens into lush, low-maintenance landscapes.
Selecting the Right Mulch Material
With so many mulch options available, choosing the right one for your specific garden needs can seem overwhelming. Let’s break down your choices.
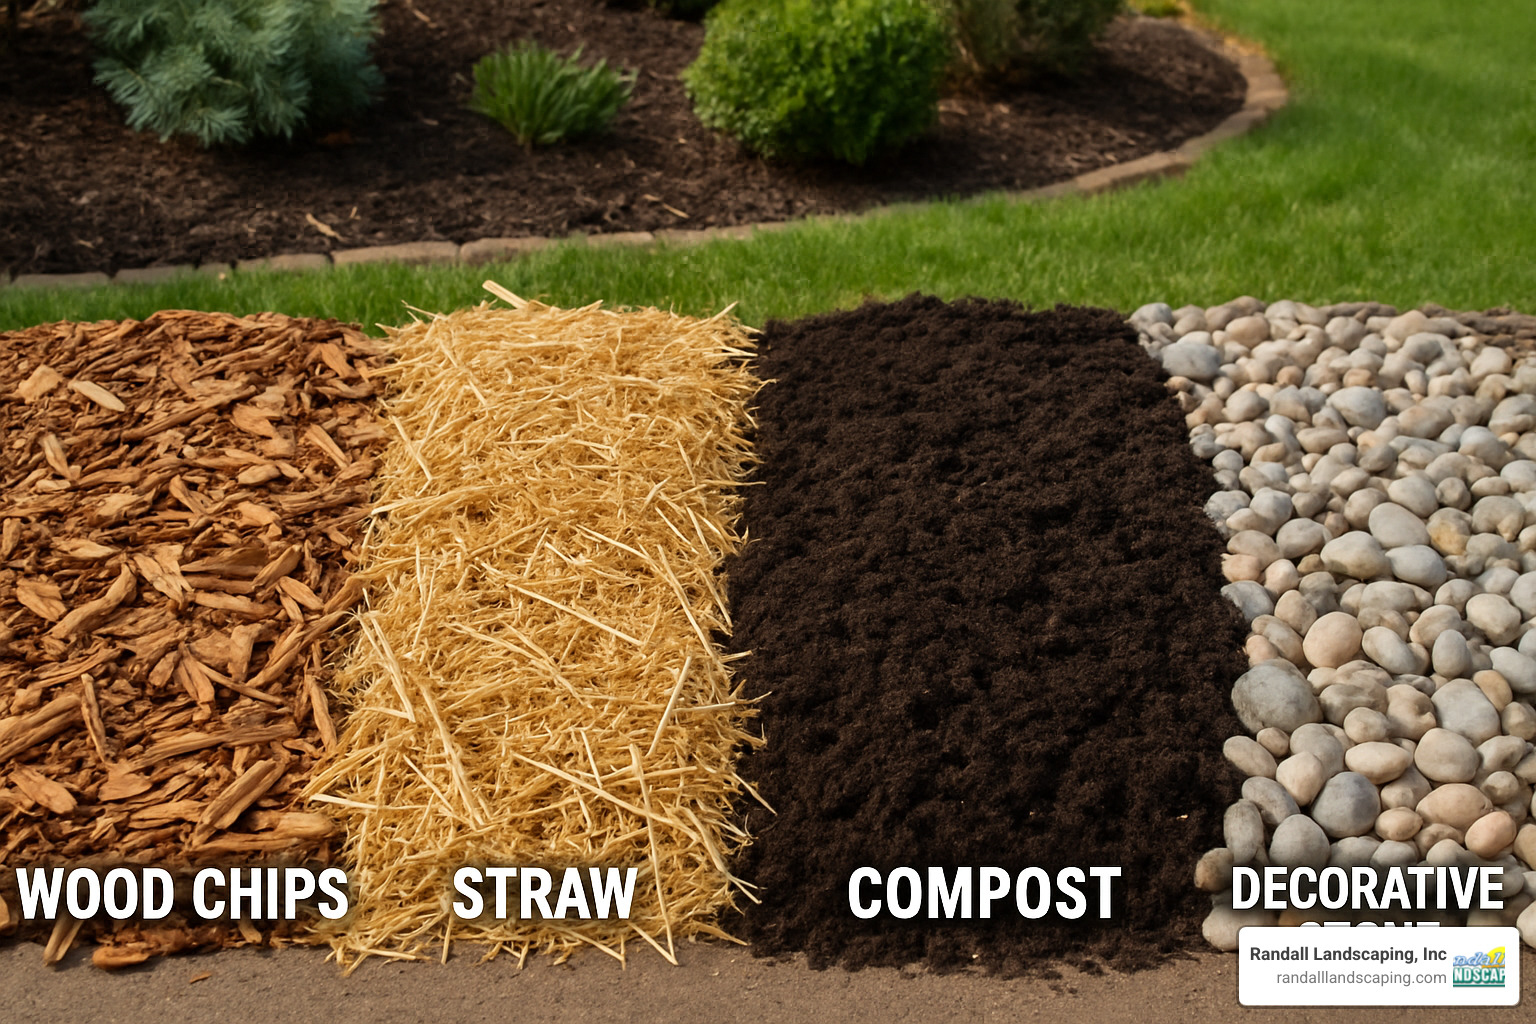
Organic Mulches: Feed the Soil While You Garden
Organic mulches are like a two-for-one deal for your garden—they protect your soil while gradually breaking down to feed your plants. It’s nature’s way of multitasking!
Wood chips and bark are the workhorses of the mulch world. They look great, last a long time, and create that polished landscape look we all love. Cedar and cypress varieties have the added bonus of naturally keeping certain bugs at bay. I’ve seen wood chip mulch transform tired-looking garden beds into showcase features that neighbors can’t stop complimenting.
Shredded leaves might be the best-kept secret in gardening. As one client told me after trying them, “I can’t believe I used to bag these up and put them on the curb!” They’re completely free if you have deciduous trees, and they break down into what gardeners affectionately call “gardener’s gold” because they improve your soil so dramatically.
Compost works wonders in vegetable gardens. It’s like giving your plants a slow-release multivitamin, packed with nutrients and beneficial microorganisms. It breaks down quickly, which means you’ll need to reapply it more often, but your vegetables will thank you with bigger harvests.
Straw (not hay—an important distinction!) is perfect for vegetable gardens. It’s lightweight enough that tender seedlings can push through it, and it keeps your vegetables clean by preventing soil splash during rainstorms. Just make sure you’re getting seed-free straw to avoid accidentally planting a wheat field!
Grass clippings and pine needles can also make excellent mulch in the right situations. Grass clippings are free and readily available if you mow your own lawn (just make sure they’re from an untreated lawn). Pine needles work beautifully around acid-loving plants like blueberries and azaleas, and they tend to stay put even on slopes.
Inorganic & Specialty Mulches: When Durability Matters
Sometimes you need a mulch that stands the test of time, and that’s where inorganic options shine.
Stone and gravel mulches are virtually permanent solutions. They’re perfect for rock gardens, xeriscapes, and areas with drainage concerns. While they won’t feed your soil like organic options, they provide excellent weed control and never need replacing. In the Merrimack Valley, we often use decorative stone around foundation plantings where a polished, low-maintenance look is desired.
Landscape fabric works best as a partner to other mulches, providing an extra barrier against those persistent weeds that seem determined to take over. Just be sure to choose permeable options that allow water to reach your plants’ roots.
Rubber mulch might not be everyone’s first choice, but it has its place. Made from recycled tires, it’s extremely durable and doesn’t fade like organic mulches. It’s particularly useful in playgrounds or high-traffic areas where longevity matters most.
Plastic film is primarily used in commercial vegetable production. It’s great for warming soil and controlling weeds, but it’s better for temporary use as it can degrade over time and doesn’t allow water to penetrate naturally.
Matching Mulch to Bed Type
Different garden areas have unique mulching needs, just like different rooms in your home need different types of flooring.
For vegetable gardens, lightweight options like straw, compost, or shredded leaves work best. Apply them at a modest 1-2 inches deep so tender seedlings can emerge easily. These materials break down quickly, adding valuable nutrients right where your hungry veggies need them.
Perennial flower beds benefit from wood chips, bark mulch, or pine straw applied 2-3 inches deep. This provides good protection without overwhelming smaller plants. I’ve found that a fresh application in spring really makes the colors of your perennials pop against the rich, dark background.
When mulching around trees, think “donut, not volcano.” Apply 3-4 inches of wood chips or bark in a circle around trees, but keep the mulch at least 6 inches away from the trunk to prevent rot. Those “mulch volcanoes” you sometimes see piled high against tree trunks are actually harmful to trees!
Shrub borders do well with bark, wood chips, or pine straw at 2-3 inches deep. These materials suppress weeds while allowing established shrubs to thrive. In the Merrimack Valley area, we’ve found that locally sourced hardwood mulch performs exceptionally well in most landscape beds.
For raised beds, compost, straw, or shredded leaves at 1-2 inches create an ideal growing environment while allowing for easy planting and harvesting. The sides of raised beds help keep mulch contained, making them particularly tidy additions to your landscape.
Even containers benefit from mulching! A thin layer (about 1 inch) of compost, small wood chips, or decorative stone helps retain moisture in potted plants and gives them a finished look. It’s like the perfect accessory that completes your container garden outfit.
In our experience serving the Merrimack Valley, pine bark works beautifully around acid-loving plants that thrive in our region. The natural acidity of the pine complements our native soil conditions and helps these special plants flourish.
Garden bed mulching doesn’t have to be complicated. With a little knowledge about which materials work best for your specific garden areas, you can create a landscape that’s both beautiful and easier to maintain.
How & When to Mulch Like a Pro
Timing and technique matter when it comes to garden bed mulching. Following professional practices ensures you’ll get the maximum benefit from your efforts.

Spring, Summer, Fall, Winter: Seasonal Strategies
Each season offers unique opportunities for mulching your garden beds, and knowing when to apply can make all the difference.
In spring, patience is key. Wait until the soil has properly warmed up, usually by mid to late May in our New England climate. Mulching too early can actually slow soil warming and delay plant growth. Once seedlings have emerged and spring planting is complete, it’s the perfect time to refresh your beds. As one of our clients in Andover likes to say, “Fresh spring mulch is like getting a new haircut for your garden – everything just looks sharper!”
During the summer months, mulch becomes your garden’s best defense against drought. If you notice areas where soil is becoming exposed, a light refresh layer can help maintain moisture during those hot July and August days. I’ve seen gardens in Salem survive week-long heat waves with minimal watering thanks to proper mulch coverage.
When fall arrives, mulching takes on a protective role. Apply after the first hard frost to insulate perennial roots for winter. This timing helps reduce spring weed germination and prevents soil erosion during winter’s freeze-thaw cycles. Many of our Merrimack Valley clients find fall mulching creates a clean, tidy look that lasts through winter.
Winter mulching is often overlooked but incredibly valuable. Once the ground has frozen, adding mulch around tender perennials keeps the soil consistently frozen, preventing the damaging freeze-thaw cycle that can push plants out of the ground (frost heaving). It’s also a great time to plan ahead by ordering materials for spring.
Step-by-Step Application Technique for Garden Bed Mulching
For truly professional results, follow these straightforward steps:
Start by thoroughly preparing your bed. Remove all existing weeds completely, including their roots. For stubborn weed areas, consider laying down cardboard or newspaper first as an additional barrier. One of our North Andover clients battled invasive bishop’s weed for years until we implemented this approach.
Create clean, defined edges between your lawn and garden beds. This crisp boundary not only looks professional but also helps contain mulch and prevents grass from creeping into your beds.
Before applying mulch, water the soil thoroughly. This is especially important during dry periods, as mulch applied to dry soil can actually repel water rather than help retain it.
When spreading mulch, aim for an even layer about 2-3 inches deep for most beds. Use a rake to distribute it uniformly across the surface. Remember the golden rule of garden bed mulching: keep mulch away from plant stems and tree trunks. Maintain a 1-2 inch gap around stems and a 6-12 inch gap around trees to prevent rot and disease. We always remind clients to remember the phrase “bare to the flare” for trees.
Finish with a light watering to help settle the mulch and ensure good soil contact. This final touch helps your mulch start working immediately to conserve moisture.
Our team at Randall Landscaping has refined these techniques across hundreds of properties throughout Southern New Hampshire and the Merrimack Valley. The results speak for themselves in the neat, professional appearance our mulching provides. More info about mulch installation services
Advanced Tips: Irrigation Under Mulch & Living Mulches
For gardeners ready to take their mulching to the next level, consider these professional approaches:
Irrigation Under Mulch creates an incredibly efficient watering system that maximizes the benefits of your mulch layer. Install soaker hoses or drip irrigation lines in a serpentine pattern directly on the soil surface before applying mulch. For even better results, cover the hoses with landscape fabric before adding your mulch. This setup delivers water directly to plant roots with minimal evaporation.
I’ve seen this approach transform gardens in drought-prone areas. A client in Georgetown reduced their water usage by nearly 60% while maintaining lush perennial borders throughout summer heat waves. These hoses complement your mulch
Living Mulches offer a beautiful alternative to traditional materials. These are low-growing plants that serve the same purpose as mulch while adding visual interest and ecological benefits. Try spreading herbs like thyme or oregano between vegetable rows, or plant clover in orchard areas to suppress weeds while fixing nitrogen in the soil. In flower beds, dense plantings of low annuals can crowd out weeds while adding color.
One of my favorite living mulch combinations is creeping thyme around stepping stones, with traditional wood mulch in the surrounding beds. The thyme releases a wonderful fragrance when stepped on, while both mulches work together to suppress weeds and retain moisture.
With these seasonal strategies and professional techniques, you’ll be mulching like a pro in no time. Your plants will thank you with healthier growth, and you’ll enjoy a more beautiful, lower-maintenance landscape.
Calculating Quantity & Ongoing Maintenance
Getting the right amount of mulch for your garden beds might seem tricky, but with a few simple calculations, you’ll avoid those frustrating mid-project supply runs. And once your garden bed mulching is complete, some basic maintenance keeps everything looking fresh year-round.
Use Online Tools to Get It Right the First Time
I still remember the first time I ordered mulch for a large property—I drastically underestimated and had to make an emergency run for more supplies mid-job! Save yourself this headache with this simple formula:
Square footage × depth in inches ÷ 324 = cubic yards needed
For example, if you’re covering a 10′ × 20′ bed with 3″ of mulch, you’d need:
(200 sq ft × 3″) ÷ 324 = 1.85 cubic yards
Most homeowners find it helpful to know that one cubic yard typically covers:
– 100 square feet when spread 3 inches deep
– 150 square feet at 2 inches deep
– 300 square feet at a thin 1-inch layer
Not a math person? No problem! Many retailers offer online calculators that do the work for you. The Home Depot has a particularly user-friendly mulch and top soil calculator that makes planning a breeze.
When it comes to budgeting, mulch prices vary widely based on type, quality, and whether you buy bagged or bulk. Based on internet research, you might expect to pay:
- Bagged mulch: $3-15 per 2 cubic foot bag (which works out to $40-200 per cubic yard)
- Bulk mulch delivery: $25-150 per cubic yard
- Premium colored or specialty mulches: $45-200 per cubic yard
- Professional installation: Additional $40-120 per cubic yard
These are average costs based on internet data and not actual costs for Randall Landscaping.
Replenish, Fluff, Replace: Keeping Mulch Effective Year-Round
Like anything in your garden, mulch needs a bit of attention to keep working its magic. Different materials break down at different rates, affecting your maintenance schedule.
Fast-decomposing mulches like compost, leaves, and straw add nutrients to your soil quickly but need replacement once or twice yearly. These are perfect for vegetable gardens where you’re replanting regularly anyway.
Medium-decomposing mulches including hardwood chips and pine bark strike a nice balance for most homeowners. A yearly top-up keeps them looking fresh, with complete replacement every 2-3 years.
Slow-decomposing mulches such as cedar and cypress offer excellent longevity. You’ll only need to top up every 1-2 years and might go 3-5 years before full replacement. As one client in North Andover told me, “I love cedar mulch—it’s worth the extra cost for how long it lasts and how good it smells!”
Inorganic mulches like stone and rubber rarely need replacement, though they benefit from occasional cleaning or raking to remove debris.
Beyond the replacement schedule, a few simple maintenance tasks keep your mulch performing at its best:
Give compacted mulch a gentle fluffing with a rake periodically to improve air circulation. This prevents it from forming a water-repelling crust and helps prevent fungal growth. Remove fallen leaves, branches, and other debris that can make your beds look untidy and potentially harbor pests.
Check your mulch depth regularly, especially in high-traffic areas or spots exposed to heavy rain. Adding a thin layer to areas that have thinned maintains the protective benefits. And while garden bed mulching dramatically reduces weeds, pull any that do emerge promptly before they establish deep roots.
For busy homeowners in Lawrence, Dracut, or Windham who prefer to leave mulch maintenance to professionals, we offer comprehensive landscape maintenance programs. More info about landscape maintenance
There’s something deeply satisfying about the clean, finished look of freshly mulched garden beds. With proper calculation and maintenance, your landscape will continue to reap the benefits of garden bed mulching throughout the seasons.
Pitfalls, Troubleshooting & Eco-Friendly Hacks
Even with the best intentions, garden bed mulching can sometimes go wrong. I’ve seen plenty of well-meaning gardeners make mistakes that end up causing more problems than they solve. Let’s explore how to avoid these common pitfalls and find some budget-friendly alternatives that are kind to both your wallet and the environment.

Preventing Pests & Disease in Mulched Beds
While mulch offers many benefits, improper application can sometimes create unexpected issues with pests and disease.
That dreaded “mulch volcano” you see in the image above is probably the most common mistake I encounter. As The Old Farmer’s Almanac warns, “Mulch volcanoes will encourage rot at the base of the plant.” When mulch is piled high against tree trunks, it creates the perfect environment for pests and diseases to attack vulnerable bark. Always remember to keep mulch pulled away from trunks to form a donut shape, not a volcano!
Termites can be another concern, especially when wood mulch is placed against home foundations. If you’re worried about these unwanted guests, opt for termite-resistant mulches like cedar or cypress near buildings, and always maintain at least a 6-inch gap between any mulch and your foundation walls.
In shady, damp gardens, slugs and snails often find mulched areas irresistible. I’ve found that keeping mulch thinner in slug-prone areas helps discourage them. You might also consider using coarser materials like wood chips rather than fine mulch, which creates fewer hiding spots. A ring of diatomaceous earth around particularly vulnerable plants can provide additional protection.
Those strange fungal growths that sometimes appear in mulch? Usually nothing to worry about! These are typically beneficial decomposers doing their job breaking down organic matter. If they bother you aesthetically, simply rake to break them up and improve air circulation.
If you’ve ever encountered mulch with an unpleasant, sour smell, you’ve experienced improperly stored material that developed anaerobic conditions. This “sour mulch” can actually harm plants with the compounds it releases. The easy fix is to spread it out to air for a few days before applying, or better yet, purchase from reputable suppliers who properly store their materials.
Lastly, thick mulch near trees can create cozy habitats for voles and mice that might damage bark. Keep mulch pulled back from trunks and consider hardware cloth barriers around young trees if rodents are a problem in your area.
Budget & Green Alternatives That Really Work
You don’t need to spend a fortune on commercial mulch to reap the benefits of garden bed mulching. Mother Nature provides plenty of free alternatives if you know where to look.
Those fall leaves that many people bag and discard? They’re gardening gold! I run mine over with a lawn mower to shred them, making them less likely to mat down. One expert notes, “A simple bladeless electric leaf mulcher can reduce leaf volume by a ratio of 11:1,” making shredded leaves easy to handle and perfect for mulching perennial beds.
Many towns in the Merrimack Valley and Southern NH offer free mulch or compost to residents. It’s worth checking with your local public works department to see what’s available. These municipal programs turn community yard waste into valuable resources rather than filling landfills.
Tree services often have more wood chips than they know what to do with. As one arborist told me, “We often give away arborist wood chips to avoid tipping fees at disposal sites.” You can sign up for services like ChipDrop for free deliveries right to your driveway. The chips might be a mix of materials, but they’re perfect for pathways and around established trees.
The cardboard sheet mulching technique has revolutionized many of my clients’ gardens. Simply flatten boxes, remove tape and labels, and lay them under other mulch materials for superior weed suppression. This two-layer approach smothers existing weeds while preventing new ones from germinating.
Grass clippings (from untreated lawns) make excellent nitrogen-rich mulch when dried first. I recommend applying them in thin layers to prevent matting and unpleasant odors.
The “chop-and-drop” method might sound casual, but it’s surprisingly effective. When pruning or deadheading, simply cut spent plants into pieces and drop them in place to decompose. This mimics natural forest processes and returns nutrients directly to the soil.
Cover crops like clover planted in the off-season can be cut down to create an in-place mulch layer while adding nitrogen to your soil. This “living mulch” approach offers multiple benefits with minimal effort.
One of our clients in Boxford transformed their landscape using primarily on-site materials. They collected fall leaves, composted kitchen scraps, and used cardboard sheet mulching to create beautiful, productive gardens with minimal purchased inputs. Their property now requires less water, fewer fertilizers, and less maintenance than conventional landscapes. It’s a perfect example of working with nature rather than against it.
For those times when you do need to purchase mulch, More info about mulch installation in Haverhill, MA can help you make informed decisions about materials and application.
Frequently Asked Questions about Garden Bed Mulching
How thick should mulch be in different beds?
One of the most common questions I hear from homeowners is about mulch depth. Getting this right makes all the difference between thriving plants and potential problems.
For perennial flower beds, aim for 2-3 inches of wood chips, bark, or pine straw. This provides enough coverage to suppress weeds without smothering your established plants.
Your vegetable garden needs a lighter touch – just 1-2 inches of lightweight mulch like straw or compost works perfectly. Too much can keep soil too cool for heat-loving vegetables and might delay growth.
When mulching around trees, create a 3-4 inch layer in a donut shape, keeping the trunk area clear. I always remind clients to remember “bare to the flare” – you should always see where the trunk widens at the base.
For shrub borders, 2-3 inches of bark or wood chips provides excellent weed suppression while allowing adequate water penetration. Annual flower beds benefit from a thinner 1-2 inch layer of compost or fine mulch that won’t overwhelm these smaller plants.
Even container gardens can benefit from mulching! Just a 1-inch layer of lightweight material helps retain moisture and reduces watering frequency.
Finer materials like compost should be applied more thinly than coarser materials like wood chips. As one of our Haverhill clients finded, “The right mulch depth made all the difference in our perennial garden – fewer weeds and happier plants!”
Will mulch attract insects or rodents to my garden?
Many gardeners worry about mulch attracting unwanted visitors, but with proper application, the benefits far outweigh any potential issues.
To minimize pest concerns, keep mulch at least 6-12 inches away from your home’s foundation. This creates a dry zone that’s less appealing to insects and gives you visibility to spot any problems early. Always maintain that crucial 6-inch gap around tree trunks to prevent bark damage and eliminate hiding spots.
Avoid the temptation to pile on extra-thick layers of mulch. While it might seem like more is better for weed control, overly thick mulch creates perfect hiding places for rodents and can lead to moisture problems. If you’re particularly concerned about insects, consider cedar or cypress mulch, which naturally contains oils that deter many pests.
“Most insects you’ll find in properly applied mulch are actually the good guys,” explains one master gardener. “They’re the decomposers breaking down organic matter and improving your soil structure.” These beneficial organisms far outnumber any potential pests.
One of our North Andover clients was initially worried about attracting termites with wood mulch near their home. By following these guidelines and using cedar mulch in beds close to the foundation, they’ve enjoyed beautiful, pest-free gardens for years.
Should I fertilize before or after applying mulch?
For best results, always fertilize before applying mulch. This sequence ensures your plants get the maximum benefit from both.
Start by testing your soil to understand exactly what nutrients it needs. This simple step prevents over-fertilization and saves money on unnecessary products. Based on your test results, apply the appropriate fertilizer evenly throughout your garden bed. Water thoroughly afterward to help those nutrients begin to incorporate into the soil.
Only then should you apply your mulch layer. This way, the mulch helps retain moisture, allowing those nutrients to dissolve and reach plant roots more effectively. The mulch layer also prevents nutrients from washing away during heavy rain – something we get plenty of in the Merrimack Valley!
If you’re using organic mulches that decompose (like wood chips or leaves), be aware that the microorganisms breaking down this material temporarily use nitrogen from the soil during decomposition. This is especially true for fresh wood chips or sawdust. You might need to add a little extra nitrogen fertilizer to compensate, particularly for heavy feeders like vegetables.
“I always tell my clients to think of it as setting the table before putting on the tablecloth,” says a landscaping professional. “You want those nutrients under the mulch where roots can find them.”
At Randall Landscaping, we’ve found this approach consistently produces healthier, more vibrant gardens throughout Southern New Hampshire and the Merrimack Valley region.
Conclusion
Garden bed mulching is truly one of the most effective and rewarding gardening practices available to homeowners. I’ve seen how this simple technique transforms struggling gardens into thriving landscapes with minimal effort.
When you create this protective layer over your soil, you’re essentially partnering with nature. Your plants will thank you with stronger growth, your water bill will shrink, and you’ll spend far less time pulling weeds. It’s a win all around!
The benefits of proper mulching are remarkable:
– Your garden stays naturally weed-free as the mulch blocks light from reaching weed seeds
– Water remains in the soil where plants need it, reducing irrigation needs by up to 70%
– The soil food web flourishes beneath the protective layer, creating richer soil naturally
– Your plants’ roots stay cooler in summer and warmer in winter
– Your landscape instantly looks more polished and professionally maintained
I love how one of our clients in North Andover described it: “It’s like giving my garden a cozy blanket and a drink of water all at once.” That perfectly captures what mulch does – it nurtures and protects.
Remember those key principles we’ve covered: maintain the right depth for your specific garden areas, always keep mulch pulled back from stems and trunks, choose materials that match each garden’s needs, and refresh periodically to maintain both function and appearance.
Here in the Merrimack Valley and Southern New Hampshire, we face unique gardening challenges – from harsh winters to summer drought periods. Proper garden bed mulching helps address all these issues while reducing the time you spend maintaining your landscape. That’s time you can spend actually enjoying your outdoor space instead!
At Randall Landscaping, Inc., we’ve helped countless homeowners throughout our service area find the transformative power of professional mulching. From Andover to Salem, Methuen to Windham, our clients enjoy beautiful, low-maintenance landscapes that stand up to New England’s challenging seasons.
For those who prefer to leave the heavy lifting to the professionals (mulch is heavy, after all!), our expert installation services provide precise, beautiful results with premium materials. More info about mulch installation in Haverhill, MA
Whether you decide to tackle mulching as a weekend DIY project or call in our team to handle it professionally, implementing proper garden bed mulching will reward you with healthier plants, reduced maintenance, and a landscape that looks beautifully maintained year-round. Your back and your water bill will both thank you!