Is Your Retaining Wall Failing? Here’s What to Do
When you need to repair retaining walls, it can feel like a huge job. These structures hold back tons of soil, so if one starts to lean, crack, or bulge, it’s a clear sign of trouble. The cause is often soggy soil, a weak base, or poor backfill. Spotting these signs early and understanding the cause—usually poor drainage or construction—is the first step.
A failing retaining wall isn’t just an eyesore; it’s a safety risk that can lead to serious property damage. This guide will show you how to assess the damage and tackle minor repairs yourself. For major issues like a significant lean or complex drainage problems, it’s always best to call a professional.
I’m Tommy Randall, owner of Randall Landscaping Business. With nearly two decades of hardscaping experience, my team and I have helped many homeowners with the challenges of repair retaining walls. We’re here to share our knowledge to help you save your wall and your peace of mind.

Why Retaining Walls Fail: Understanding the Root Cause
Understanding why retaining walls fail is the first step to a proper repair. The most common culprits work together to undermine your wall’s stability.
- Hydrostatic Pressure & Poor Drainage: This is the biggest troublemaker. When water from rain or snowmelt soaks the soil behind your wall and has no escape route, it creates immense pressure. Proper drainage systems, like French drains or weep holes, are essential to relieve this force.
- Soil Issues & Erosion: The type of soil behind your wall matters. Clay soils expand when wet, increasing pressure, while sandy soils can wash away, removing support. If the soil wasn’t compacted correctly during installation, it can settle and create stress points. Water can also cause erosion, washing away the soil that supports the wall’s base.
- Poor Construction & Surcharge: A wall is only as good as its foundation. An inadequate footing or poor initial construction can doom a wall from the start. Additionally, extra weight on the soil behind the wall, known as surcharge (from a driveway, patio, or even a pile of materials), adds pressure the wall wasn’t designed to handle.
Catching these problems early and addressing the root cause is key. Once a wall is seriously leaning or sliding, it often needs a complete rebuild. Doing it right the first time saves money in the long run.
To learn more, check out this guide about proper wall design from Rutgers or find more info about soil’s role in wall stability.
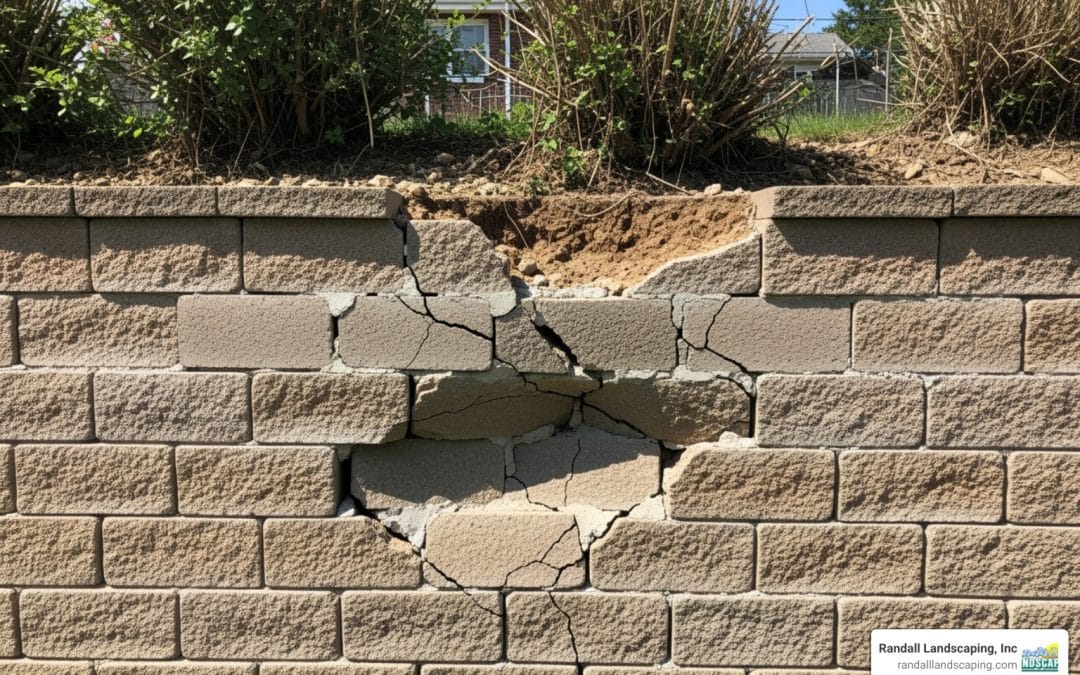
Spotting the Danger Signs: When to Repair Your Wall
Early detection can be the difference between a simple fix and a costly rebuild. Be a detective and look for these clues that your wall needs attention.

- Leaning or Tilting: A wall leaning more than a few inches is struggling under pressure.
- Bulging Sections: Outward bulges indicate immense pressure from the soil behind the wall.
- Cracks: Horizontal or step-like cracks are signs of structural stress, not just cosmetic flaws.
- Separation: Gaps forming between the wall and adjacent structures (patios, driveways) mean the wall is shifting.
- Water Issues: Water pooling at the base or white, chalky deposits (efflorescence) point to drainage problems.
- Soil Washout: Dirt washing out from under or through the wall means its support system is eroding.
The Safety Risks of a Failing Wall
A failing retaining wall is more than an eyesore; it’s a serious hazard. It can cause significant property damage to your patio, driveway, or even your home’s foundation. On sloped properties, a collapse can trigger a landslide. Most importantly, a falling wall poses a real danger to people and pets and can create legal liability if it damages a neighbor’s property. Spotting these danger signs means it’s time to repair retaining walls before a bigger problem occurs. Addressing issues early is always cheaper and safer.
DIY vs. Professional: Making the Right Call for Your Repair
Deciding whether to repair retaining walls yourself or hire a pro is a critical choice. The right decision can save you time, money, and future headaches.
| Factor | DIY Retaining Wall Repair | Professional Retaining Wall Repair |
|---|---|---|
| Cost | Lower upfront costs (save $15–$50 per square foot in labor costs). | Higher upfront costs, but potentially more cost-effective long-term (prevents future failures). |
| Time | Can be time-consuming, especially for larger sections. | Faster completion due to expertise, specialized tools, and workforce. |
| Skill Level | Beginner to intermediate, suitable for minor issues (cosmetic cracks, minor leaning, small walls). | Expert knowledge in geotechnical engineering, soil mechanics, and structural design. Essential for complex issues. |
| Tools Required | Basic hand tools (shovel, level, tamper, mallet) plus rental equipment. | Specialized heavy machinery, advanced drainage systems, and reinforcement tools. |
| Final Outcome Quality | Good for minor repairs if done correctly; higher risk of re-failure if root cause isn’t addressed. | High quality, durable, engineered solutions; addresses root causes for long-term stability. |
DIY makes sense for minor issues on walls under 4 feet high, such as patching small cracks or resetting a few loose blocks. This can save you $15 to $50 per square foot in labor. However, if you don’t fix the underlying cause, the problem will likely return.
Call a professional for any significant structural failure, including walls leaning more than a few inches, large cracks, or bulging. Walls over 4 feet high require engineering expertise to handle the immense pressure safely. Complex drainage issues are also a job for the pros.
Understanding the Costs to Repair Retaining Walls
Please note that these are average costs based on internet data and not actual costs for Randall Landscaping.
The cost to repair or rebuild a retaining wall varies widely based on size, materials, and the extent of the damage. While a minor DIY fix might cost under $100 in materials, professional repairs are more involved. The average cost to rebuild a wall is around $6,072, with a typical range of $3,000 to over $18,000.
- Minor professional repairs (small cracks, block replacement) can run from $200 to $1,000.
- Structural and drainage repairs (fixing leaks, adding drainage, anchoring a bowing wall) are more complex and can cost anywhere from $220 to over $1,200, depending on the specific issue.
- Permits for walls over a certain height (usually 3-5 feet) can cost $50 to $200.
For complex projects, our team of retaining wall construction contractors can help you get it right the first time.
A Step-by-Step Guide to Minor Retaining Wall Repair
For smaller, manageable issues, a DIY approach can be rewarding. This guide covers how to repair retaining walls with minor damage, assuming you’ve deemed it safe to proceed.

Safety First: Always wear heavy-duty gloves, safety goggles, and sturdy work boots. Clear your work area and if the wall seems dangerously unstable, stop and call a professional.
Essential Materials and Tools
Gather your equipment before you start. You’ll need:
- Tools: Shovel, level, rubber mallet, hand tamper, trowel, caulk gun, wheelbarrow, tape measure, utility knife, and a small sledgehammer.
- Materials: Matching replacement blocks/stones, 3/4-inch angular gravel, 4-inch perforated drainage pipe, geotextile (landscape) fabric, and construction adhesive.
Repairing a Leaning or Shifted Section
This process focuses on fixing a localized failure in a block retaining wall.
- Dismantle the Damaged Area: Mark a V-shape around the failed section, including a few stable blocks on each side. Carefully remove the capstones and then the wall blocks, keeping them in order for reassembly.
- Excavate and Fix the Cause: Dig out the backfill behind the removed section. Identify and address the root problem, whether it’s poor drainage or tree roots. Never reuse old sand, dirt, or pea gravel for backfill.
- Rebuild the Base: If the base is compromised, dig down, add a new layer of compacted drainage stone, and ensure it’s perfectly level.
- Rebuild the Wall: Lay the first course of blocks, checking that each is level. Install the perforated drainage pipe behind this course, sloped to drain away from the wall. Cover the pipe with gravel.
- Install Fabric and Backfill: Place geotextile fabric behind the wall to prevent soil from clogging the gravel. Rebuild the wall course by course, staggering joints. After every one or two courses, add and compact clean gravel backfill at least 12 inches deep behind the wall.
- Cap the Wall: Once the wall is rebuilt, secure the capstones with construction adhesive for a finished look.
The key to a successful DIY repair is patience and attention to detail, especially with drainage. For specialized materials like those used by sandstone retaining wall builders, professional expertise is invaluable.
Ensuring Longevity: Drainage, Maintenance, and Aesthetics
A successful repair retaining walls project doesn’t end with the last block. To ensure your wall lasts, focus on drainage, maintenance, and aesthetics.

Drainage Best Practices
Proper drainage is the #1 defense against future failure. Managing hydrostatic (water) pressure is non-negotiable.
- French Drains & Weep Holes: A French drain (a perforated pipe in a gravel-filled trench) redirects water away from the wall. Weep holes at the wall’s base allow trapped water to escape.
- Proper Backfill & Fabric: Use clean, angular gravel for backfill and wrap it in geotextile fabric. The fabric acts as a filter, preventing soil from clogging the drainage system.
- Grading: Ensure the ground above the wall slopes away from it to prevent surface water from pooling.
Long-Term Maintenance Tips
A retaining wall needs regular check-ups to stay healthy.
- Inspect Annually: Each spring, check for new cracks, leaning, or signs of water damage.
- Clear Debris: Keep drainage paths and weep holes clear of leaves and soil.
- Address Minor Issues Promptly: Seal small cracks or reset loose blocks before they become big problems.
- Manage Vegetation: Be mindful of large tree roots, which can damage a wall. Plant shrubs with non-invasive root systems nearby.
Improving the Look of Your Repaired Wall
A strong wall can also be beautiful. For aesthetic integration, try to match new materials to the old; weathering will help them blend over time. Adding capstones provides a polished, finished look and protects the top course. Finally, strategic planting can soften the wall’s appearance and help with erosion control. For expert help with landscape wall construction, our team can create a seamless look.
Frequently Asked Questions about Retaining Wall Repair
Here are answers to common questions we hear from homeowners about how to repair retaining walls.
How can I strengthen an existing retaining wall?
Strengthening a wall means addressing the cause of its weakness. The most effective methods include:
- Improving Drainage: This is the most critical step. Adding a French drain or clearing weep holes reduces the hydrostatic pressure that weakens walls.
- Reducing Surcharge: Lighten the load on the soil behind the wall. This could mean moving a heavy object, rerouting a path, or addressing large tree roots.
- Installing Anchors (Professional Job): For severe leaning, professionals can install tiebacks or helical anchors that brace the wall against the stable soil behind it.
- Making Minor Repairs: Sealing small cracks with masonry adhesive prevents water from getting in and causing more damage.
How long does a properly repaired retaining wall last?
The lifespan depends on the material, quality of the repair, and maintenance. If the root cause of the failure was addressed:
- Concrete Block Walls: Can last 50 to 100 years.
- Timber Walls: Typically last 20 to 40 years due to natural decay.
- Natural Stone Walls: Can last for centuries when built correctly.
A repair that only fixes the symptom (like a crack) but not the cause (like poor drainage) will not last.
What is the most common mistake in DIY retaining wall repair?
The single biggest mistake is ignoring the root cause, which is almost always poor water drainage. Many DIY repairs focus on fixing the visible problem, like a lean or a crack, without addressing the hydrostatic pressure from waterlogged soil that caused it. Without fixing the drainage with proper backfill and systems like French drains, the wall is destined to fail again, wasting your time and money.
Secure Your Landscape for Years to Come
We hope this guide has given you the confidence to tackle your retaining wall challenges. Understanding how to repair retaining walls and what causes them to fail is the first step to protecting your property. Addressing issues early saves you headaches and money, but always prioritize safety and know your limits.
A successful repair secures your property from damage and boosts your home’s curb appeal and value. For larger, more complex projects, or if you prefer the peace of mind that comes with professional work, our team at Randall Landscaping, Inc. is here to help.
We proudly serve homeowners across the Merrimack Valley and Southern New Hampshire, delivering quality work and reliability on every project. We have the experience and equipment to ensure your wall is not just fixed, but built to last.
Ready to secure your landscape? Explore our professional hardscaping and retaining wall services today!