Why Grass Sod Installation Is Your Fast Track to a Perfect Lawn
Grass sod installation is the quickest way to transform a bare or patchy yard into a lush, green lawn. Unlike growing grass from seed, which takes months to establish, sod provides an instant lawn that’s ready for light use in just a few weeks.
Quick Answer: Grass Sod Installation Process
- Prepare the soil: Remove old grass, till 6-8 inches deep, and level the surface.
- Test and amend soil: Aim for a pH of 6.0-7.5, then add compost and starter fertilizer.
- Lay the sod: Start along a straight edge, stagger pieces like bricks, and ensure there are no gaps.
- Water immediately: Soak the sod and underlying soil thoroughly, then water daily for the first week.
- Wait 2-4 weeks before the first mow or any heavy foot traffic.
Homeowners often choose sod over seed for its instant results, natural weed suppression, and excellent erosion control, especially on slopes. While the process requires proper preparation, it can be done from spring through fall in most climates.
About the Author
I’m Tommy Randall, owner of Randall Landscaping. For over 18 years, my team and I have provided professional grass sod installation throughout Massachusetts and New Hampshire. This guide shares our expertise to help you succeed, whether you do it yourself or hire a professional.

Simple grass sod installation word guide:
- average cost of inground sprinkler system
- inground sprinkler system near me
- professional sprinkler installation
Phase 1: Planning and Preparing for Your New Sod
Successful grass sod installation starts with smart planning and thorough preparation. This phase ensures you have the right materials and a perfect foundation for your new lawn.
Choosing Your Grass and the Best Time to Lay Sod
The first step is choosing the right grass type for your climate. In the Merrimack Valley and Southern New Hampshire, we are in cool-season grass territory. Varieties like Kentucky bluegrass, perennial ryegrass, and fescues are ideal for our cold winters and moderate summers. Warm-season grasses like Bermuda or Zoysia will go dormant and turn brown in New England winters.
While sod offers more flexibility than seed, timing is still key. The Sodding: Steps to an Instant Lawn resource confirms that proper timing is crucial.
- Spring installation allows sod to establish strong roots before summer heat arrives, taking advantage of moderate temperatures and rain.
- Fall installation is often ideal for cool-season grasses. Cooler air reduces stress on the sod, and it has months to establish before the next summer.
Avoid installing sod in extreme heat or freezing conditions.
Measuring Your Yard and Ordering Sod
Accurate measurements prevent running out of sod or having costly leftovers. For rectangular areas, simply multiply length by width. For irregular yards, sketch the area and break it into smaller shapes (rectangles, triangles), calculate each one, and add them together.
Always order 5-10% extra sod. This covers cuts, odd shapes, and any damaged pieces. Freshness is critical, as sod is a living product. Schedule your delivery for the day you plan to install it, ensuring it was cut at the farm less than 24 hours prior.
Essential Tools and Materials for Sod Installation
Gather these items before you begin:
- Ground Prep: Sod cutter (rentable), rototiller, garden rake, wheelbarrow.
- Installation: Utility knife, lawn roller, sprinklers or hoses.
- Soil Amendments: Quality topsoil, compost, and a starter fertilizer high in phosphorus.
- Personal Gear: Gloves, sturdy shoes, and optional stakes/string for straight lines.
The Ultimate Soil Preparation Checklist
Proper soil preparation is the most critical factor for a healthy, long-lasting lawn.

- Clear the Area: Remove all existing grass, weeds, rocks, and debris. A sod cutter is highly effective for removing old turf. Avoid using herbicides, as residue can harm new sod.
- Till the Soil: Loosen the soil to a depth of 6-8 inches with a rototiller. This breaks up compaction and allows roots to penetrate easily.
- Test and Amend: A soil test reveals your soil’s pH and nutrient levels. The importance of soil testing cannot be overstated. Turfgrass thrives in a pH between 6.0 and 7.5. Add lime to raise pH (if acidic) or sulfur to lower it (if alkaline). Work a 2-inch layer of compost or a quality topsoil blend into the top 3-4 inches of tilled soil.
- Grade for Drainage: Ensure the ground slopes gently away from your foundation (a 1-inch drop every 4 feet is a good rule). The final grade should be about 1 inch below sidewalks and driveways to accommodate the sod’s thickness.
- Fertilize and Settle: Apply a starter fertilizer high in phosphorus and rake it into the top inch of soil. Lightly water or roll the surface to reveal and fill any low spots before your sod arrives.
This preparation creates the ideal foundation for your new lawn. For complex projects, our team at Randall Landscaping offers comprehensive landscape design and installation services.
Phase 2: The Step-by-Step Grass Sod Installation Guide
With your soil prepped and sod delivered, it’s time to lay down your new lawn. This is where your hard work pays off with instant green results.
Your Guide to a Professional-Level Grass Sod Installation
Before you begin, lightly moisten the prepared soil. This cools the ground and prevents the new sod from drying out too quickly.
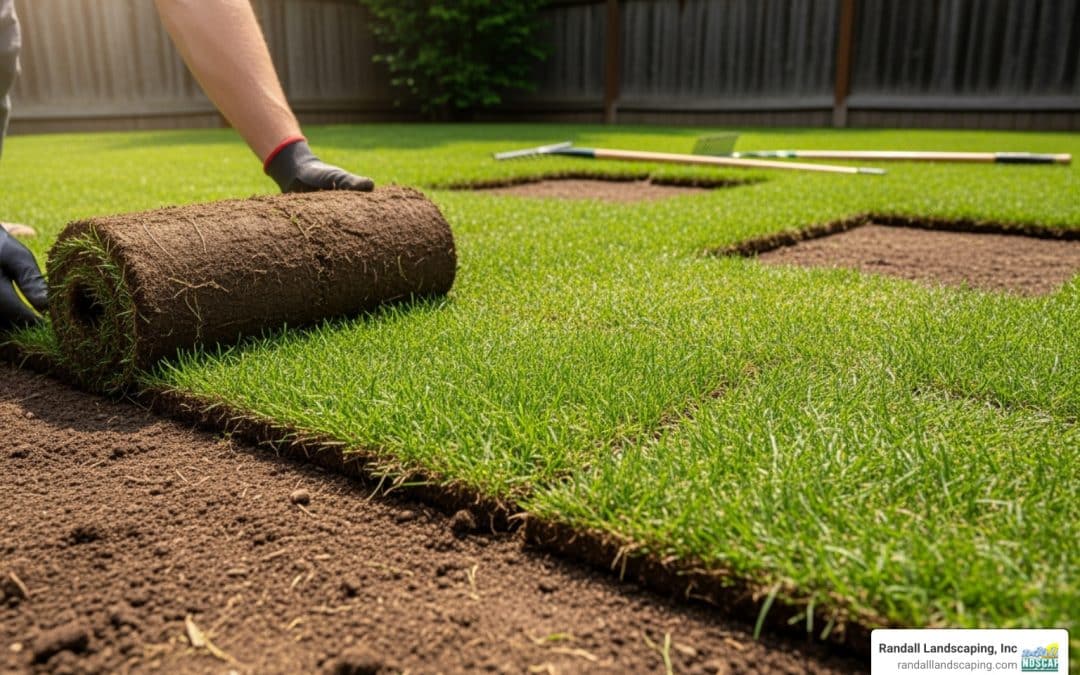
Start along your longest straight edge, like a driveway or sidewalk. This provides a guide for keeping your lines neat. Work from the far end of the lawn toward your exit point to avoid stepping on freshly laid sod.

Follow these key techniques for a professional grass sod installation:
- Use a staggered brick pattern. Never align the short seams of your sod pieces. Offsetting the rows creates a seamless look and prevents water from channeling and drying out the edges.
- Ensure snug seams. Push the edges of the sod pieces tightly together, but don’t let them overlap. Gaps will create brown lines, while overlaps create bumps that interfere with mowing.
- Cut sod carefully. Use a sharp utility knife to trim pieces to fit around curves, trees, or flower beds. Cut from the soil side for a cleaner edge. Keep pieces as large as possible, as small sections dry out quickly.
- Lay sod across slopes. Always lay sod horizontally across a slope, not vertically. Start from the bottom and work your way up to prevent erosion. On steep slopes, you can use wooden stakes to hold the sod in place until it roots.
Finishing Touches for Perfect Sod-to-Soil Contact
Once all the sod is in place, two final steps are critical for success.
First, roll the sod. Use a water-filled lawn roller to go over the entire area, first in one direction and then perpendicularly. This removes air pockets, ensures good root-to-soil contact, and smooths out minor bumps. Without this step, roots may fail to establish.
Second, water immediately and thoroughly. Don’t wait until the entire yard is finished. Start watering the first sections as soon as they are laid, especially on warm days. New sod roots are very shallow and can dry out in minutes. Your goal is to soak the sod and the top 4 inches of soil underneath. Delaying this step is the most common cause of failure for new sod.
Phase 3: Critical Aftercare for a Healthy, Established Lawn
The first few weeks after grass sod installation are crucial. Your new lawn needs consistent care to establish the strong roots necessary for long-term health and beauty.
The Perfect Watering Schedule for New Sod
Water is the most critical element for new sod. The initial roots are very shallow, so the sod is highly vulnerable to drying out.

- First Week: Water daily, and potentially twice on hot, windy days. Each session should be long enough to soak the sod and the top 4 inches of soil below. To check, gently lift a corner of sod; the soil underneath should be damp.
- Weeks Two and Three: Gradually reduce watering. Water every other day in week two, then twice a week in week three. This encourages the roots to grow deeper in search of moisture, building a more drought-resistant lawn.
- After One Month: Once the sod is firmly rooted (you can’t easily lift a corner), switch to a mature lawn watering schedule of one inch per week, applied in one or two deep watering sessions.
Pay extra attention to sod on slopes or in full sun, as these areas dry out faster.
Your First Mow and Beyond: Long-Term Sod Maintenance
Patience is key during the establishment period. Avoid all unnecessary foot traffic for the first 2 to 4 weeks. This means keeping kids and pets off the lawn while the delicate roots knit into the soil.
Your first mow can happen after 3 to 4 weeks, once the grass has grown to about 3 inches. For this first cut, set your mower to its highest setting and ensure the blades are sharp to avoid tearing the grass. Never cut more than one-third of the grass blade at a time—this is the 1/3 rule and applies to all future mowing.
Wait 30 to 60 days before applying any additional fertilizer. The starter fertilizer you applied during preparation is sufficient for the initial rooting phase. After about four mows, you can begin a regular fertilization program suitable for your grass type.
Proper aftercare turns your grass sod installation into a long-term investment. If you prefer professional maintenance, Learn about our New Lawn Installation services to keep your lawn thriving.
DIY vs. Professional Installation and Troubleshooting
Even with careful planning, you might encounter a few issues with your grass sod installation. Most problems are fixable if you know what to look for.
Common Sod Problems and How to Fix Them
Here are the most common issues and their solutions:
- Gaps between sods: Small gaps will fill in as the grass grows. For larger gaps, push the sod pieces together or fill the space with a patch from your leftover sod. Water patches more frequently, as they dry out quickly.
- Brown or yellow patches: This is almost always a watering issue. If the sod feels dry, increase watering frequency and duration. If it feels squishy and you see mushrooms, you may be overwatering; reduce the duration but maintain frequency for the first week.
- Drought shock: Sod can look stressed immediately after installation. This is normal. Consistent, deep watering will help it recover within a week or two.
- Poor rooting: If you can still easily lift sod corners after a few weeks, there may be air pockets underneath. Roll the area again to ensure good soil contact and increase watering to encourage root growth.
- Weeds: Resist using herbicides on new sod for at least 60 days. Hand-pull any weeds that appear. A healthy, thick lawn is the best long-term weed defense.
- Fungus prevention: Water in the morning to allow grass blades to dry before nightfall, which helps prevent fungal diseases.
Cost of DIY vs. Professional Grass Sod Installation
Deciding between a DIY project and hiring a professional comes down to budget, time, and physical ability.
On average, DIY grass sod installation materials cost between $0.30 to $0.95 per square foot. Professional installation, including labor and materials, typically ranges from $0.85 to $2.60 per square foot. Please note these are average costs based on internet data and not actual costs for Randall Landscaping.
For a 1,000-square-foot lawn, this means a DIY cost of roughly $300 to $950 for materials, versus a professional cost of $850 to $2,600.
Consider these factors beyond the initial price:
- Time Commitment: A DIY installation for 1,000 sq. ft. can take 2-3 days for preparation and laying.
- Equipment Needs: You’ll need to rent or buy a sod cutter, rototiller, and lawn roller, which adds to the cost.
- Physical Demand: Preparing soil and moving heavy sod rolls (40-50 lbs each) is backbreaking work.
Hiring a professional offers expertise, efficiency, and quality assurance. A pro crew understands local soil and drainage conditions in the Merrimack Valley and Southern New Hampshire, has all the right equipment, and can often complete the job in a single day. Many professionals also offer warranties on their work.
If you’re considering professional grass sod installation, Get a quote for Professional Sod Installation to see how we can help you achieve your dream lawn without the stress.
Frequently Asked Questions About Sod Installation
After 18 years of professional grass sod installation, I’ve heard every question imaginable. Here are the answers to the most common ones.
How long until I can walk on my new sod?
Patience is essential for establishing a strong lawn. Wait 2 to 4 weeks for any light foot traffic. This gives the roots time to anchor into the soil.
For heavy use, such as kids playing or backyard parties, wait at least 4 to 6 weeks. You can test the sod by gently tugging on a corner. If it holds firm, it’s ready. If it lifts easily, it needs more time.
Keep pets, especially dogs, off the new lawn for this entire period. Their urine can burn the young grass, and digging can ruin your new surface.
Can I just lay new sod over my old, dead grass?
The short answer is no. Laying sod over old grass is a shortcut that leads to failure. New sod roots need direct contact with nutrient-rich soil to thrive. An old layer of grass or thatch acts as a barrier, preventing roots from establishing.
Furthermore, this method creates an uneven, lumpy surface and fails to address the underlying issues that killed your old lawn in the first place (e.g., poor drainage, soil compaction, disease). Proper removal of the old lawn and soil preparation is non-negotiable for a healthy, long-lasting result.
How can I tell if my new sod is getting enough water?
Proper watering is the key to success. Here are a few simple ways to check moisture levels:
- Lift a corner: Gently peel back a corner of a sod piece. The soil underneath should be visibly dark and feel damp several inches down.
- The screwdriver test: A long screwdriver should slide easily 4-6 inches into the soil. If you meet resistance, the ground is too dry.
Signs of underwatering include the sod turning brown or yellow, especially at the seams, and grass blades feeling brittle. If you see this, water immediately.
Signs of overwatering include persistent puddles, a squishy or soggy feel underfoot, and the appearance of mushrooms. If this occurs, reduce the duration of your watering sessions but maintain the daily frequency for the first week.
Conclusion: Enjoy Your Beautiful New Lawn
Grass sod installation is the fastest way to achieve a beautiful lawn that improves your outdoor living space. Success depends on three key factors: thorough soil preparation, careful installation ensuring good sod-to-soil contact, and consistent aftercare, especially daily watering during the first week.
While installing sod can be a rewarding DIY project, it is physically demanding. Removing old turf, tilling soil, and moving heavy sod rolls is a significant workout. For larger yards, or if you simply want a guaranteed professional result without the backache, hiring an expert is an excellent choice.
At Randall Landscaping, we have been providing homeowners with dream lawns for over 18 years throughout the Merrimack Valley and Southern New Hampshire. We understand the local climate and soil conditions and are committed to quality work and 100% reliability.
We proudly serve Amesbury, Andover, Atkinson, Boxford, Dracut, Georgetown, North Andover, North Reading, Pelham, Salem, Windham, Methuen, Lawrence, Plaistow, and the surrounding areas. We are here to transform your yard into a lush, green space you can enjoy for years to come.
Ready to get started? Learn more about our New Lawn Installation services and get a quote today!