
Transform Your Outdoor Space with Backyard Patio Construction
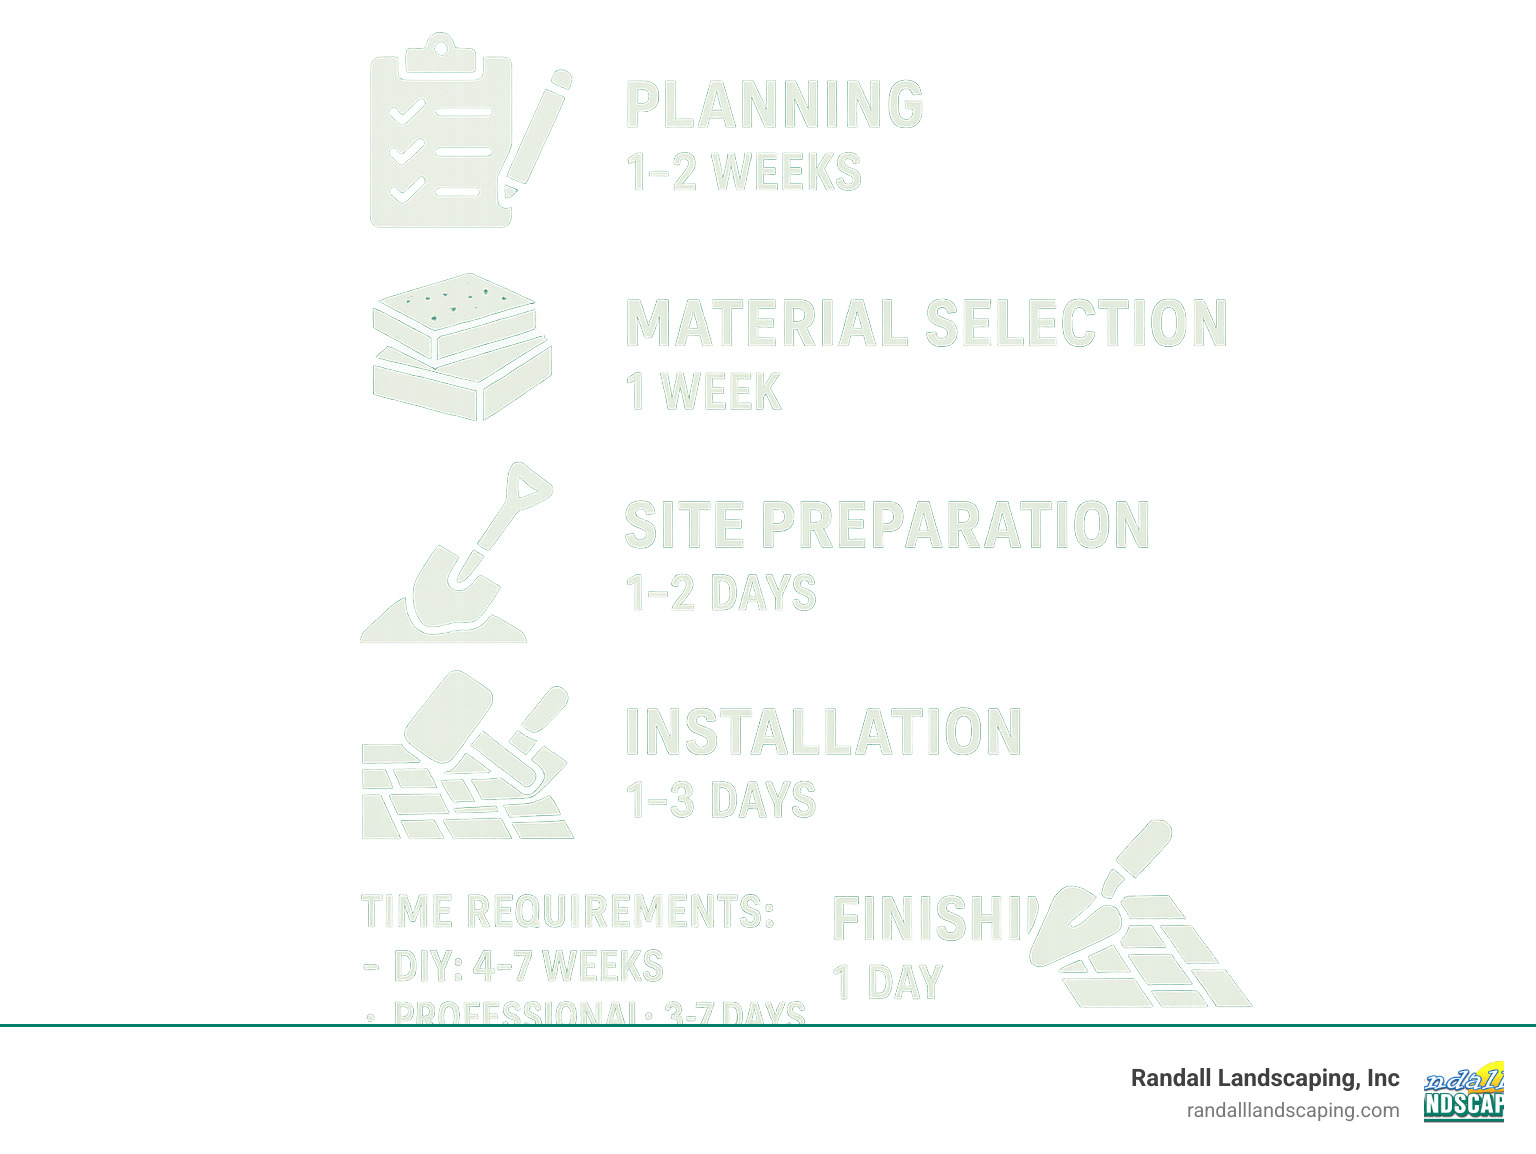
Backyard patio construction is a rewarding DIY project that can dramatically improve your outdoor living space while increasing your property value. For homeowners considering this project, here’s a quick overview of the process:
- Planning: Determine size, location, and purpose (entertaining, relaxing, dining)
- Materials: Choose from concrete ($2-$15/sq ft), pavers ($2.25-$11/sq ft), flagstone ($3-$18/sq ft), or brick ($4-$10/sq ft)
- Base preparation: Excavate 6-8 inches, add landscape fabric, install 4-6 inches of compacted gravel
- Installation: Add 1 inch of sand, lay pavers/stones with proper spacing, add edge restraints
- Finishing: Fill joints with polymeric sand, clean surface, and allow to cure
A well-designed patio can transform an ordinary backyard into your personal outdoor retreat. Whether you’re looking to create a cozy nook for morning coffee or a spacious entertainment area for family gatherings, a patio provides the perfect foundation for outdoor living. With the right planning and materials, this project is achievable for most homeowners over a single weekend or two.
“A patio is a great way to add extra living space and increase your home’s value,” notes a home improvement expert from our research. This sentiment captures why so many homeowners are eager to tackle this project themselves.
I’m Tommy Randall, owner of Randall Landscaping, Inc., where I’ve been specializing in backyard patio construction for over 18 years, changing countless properties throughout Massachusetts and New Hampshire into beautiful outdoor living spaces that families enjoy year-round.
Backyard patio construction word roundup:
– laying a patio on a budget
– paver patio install and design
– outdoor patio design
Dream & Design: Laying the Groundwork
The journey to a beautiful patio begins long before the first shovel hits the dirt. In my 18+ years at Randall Landscaping, I’ve learned that thoughtful planning makes all the difference in backyard patio construction. Before rushing to buy materials, take a moment to envision how this new outdoor space will improve your daily life.
Think about your patio’s purpose. Will it be a quiet reading nook? A busy entertainment hub? Or perhaps a peaceful dining area for family meals under the stars? Your answer shapes everything that follows.
Most homeowners need to consider local permits before breaking ground. While many ground-level patios don’t require permits, regulations vary significantly across the Merrimack Valley and Southern New Hampshire. I’ve seen neighboring towns with completely different requirements, so a quick call to your local building department can save headaches later.
Don’t forget to consider drainage and slope in your planning. A properly built patio should slope away from your home at about 1 inch per 4 feet to prevent water pooling. For eco-conscious homeowners, we’re seeing growing interest in permeable pavers that allow rainwater to naturally filter back into the ground rather than running off into storm drains.
For professional guidance on turning your patio dreams into reality, check out our Patio Design & Installation services.
Choosing the Perfect Spot
Location can make or break your patio experience. House proximity matters more than you might think—patios placed right outside a door get used far more often than those tucked away in distant corners of your yard.
Sun and shade patterns should influence your placement decisions. Track the sun’s movement across your yard for a few days. Morning sun creates a perfect breakfast spot, while afternoon shade offers relief during summer gatherings. In New England’s variable climate, finding that sweet spot makes your patio usable for more months of the year.
Privacy considerations often get overlooked until it’s too late. Before finalizing your location, sit in your proposed patio area and look around. Can neighbors see directly into your space? Strategic placement or natural barriers like trees and shrubs can create a more intimate setting.
Always call 811 before you dig! This free service marks underground utilities and prevents dangerous accidents. I’ve seen too many DIY projects hit unexpected gas or electric lines—a situation that’s both dangerous and expensive to fix.
When planning for furniture, furniture clearance needs to be generous. Allow at least 3 feet around seating areas for comfortable movement. That cozy bistro set in the store takes up much more space once people are seated and moving around it!

Sizing for Function & Flow
One of the most common regrets I hear from DIY patio builders? “I wish I’d made it bigger.” It’s better to go slightly larger initially than to face the hassle of expansion later.
For a comfortable dining zone, plan at least 10×10 feet for four people and 12×12 feet for six. Chairs need to pull out, and people need to walk behind seated guests.
A cozy lounge zone requires minimum 5×8 feet for a basic conversation set with a coffee table. If you’re dreaming of a sectional sofa or multiple seating groups, size up accordingly.
Always maintain 3-4 foot walk paths throughout your design. These pathways ensure comfortable movement and make your patio feel more spacious, even when fully furnished.
When planning multiple zones, consider how they’ll flow together. A natural transition between dining and lounging areas creates a more cohesive outdoor living space. I often suggest using different paver patterns or subtle level changes to define separate functional areas while maintaining visual harmony.
A small 12×20 foot patio might seem adequate on paper, but once you add a grill, dining set, and a few chairs, it can feel surprisingly cramped. As one of my clients wisely noted after expanding their too-small patio: “You won’t regret going a bit bigger, but you’ll definitely regret going too small.”
Smart Material & Tool Selection
Choosing the right materials is crucial for a successful backyard patio construction project. Each option offers distinct advantages in terms of appearance, durability, and ease of installation.
Pros & Cons at a Glance
When I’m helping homeowners choose materials for their patios, I always start by discussing their lifestyle needs and budget expectations. Let’s look at the options side by side:
| Material | Cost Range (per sq ft) | Durability | Maintenance | Climate Fit | DIY Friendly |
|---|---|---|---|---|---|
| Concrete | $2-$15 | 30-50 years | Low | All climates | Moderate |
| Pavers | $2.25-$11 | 50+ years | Low-Medium | All climates | High |
| Brick | $4-$10 | 25-30 years | Medium | All climates | Medium |
| Flagstone | $3-$18 | 50+ years | Medium | All climates | Low-Medium |
| Gravel | $1-$3 | 50+ years (with replenishment) | High | All climates | Very High |
| Permeable Pavers | $5-$15 | 50+ years | Medium | All climates | Medium |
Concrete is often the most budget-friendly choice, and I’ve seen it work beautifully in almost any setting. You can either pour it as a slab (better for professionals) or use precast pavers (great for DIYers). One of my clients put it perfectly: “I love that my concrete patio looks high-end but didn’t break the bank.”
Pavers are my personal favorite for DIY projects. They’re forgiving if you make a mistake, since you can simply lift and reset them. Plus, if one gets damaged years later, you can replace just that piece without redoing the entire patio. They come in countless colors and patterns to match any home style.
Brick brings that timeless, warm charm that many New England homeowners love. While it requires a bit more skill to install properly, the end result has incredible character. I’ve installed brick patios that look even better after 20 years of gentle weathering.
Flagstone creates the most naturally beautiful patios, with each stone offering unique colors and textures. It’s pricier and more challenging to work with, but the organic feel is best. As one of my Merrimack Valley customers said, “My flagstone patio feels like it’s always been part of the landscape.”
Gravel is perfect if you’re on a tight budget or need excellent drainage. It’s incredibly DIY-friendly and gives that satisfying crunch underfoot. Just be prepared to occasionally top it up as it can scatter over time.
Permeable pavers are gaining popularity among my eco-conscious clients. They allow rainwater to filter through rather than run off, which helps prevent erosion and can even help recharge groundwater. They’re a bit more expensive upfront but offer long-term environmental benefits.
Must-Have Tools & Supplies
After 18 years of building patios throughout Massachusetts and New Hampshire, I’ve learned that having the right tools makes all the difference between a weekend project and a month-long headache.
For basic tools, you’ll need a good shovel and spade for digging, a sturdy rake for leveling, and a wheelbarrow for moving materials. A rubber mallet is essential for setting pavers without damaging them. Both a 2-foot and 4-foot level will ensure your surface is properly sloped for drainage. Don’t forget string lines and stakes for marking your layout, a tape measure for precision, and a garden hose for outlining any curved edges.
The specialized equipment might require a trip to the rental store. A plate compactor is worth every penny of the rental fee – trying to properly compact base material by hand is nearly impossible. A tamper (hand or power) helps with smaller areas. PVC pipes make excellent screeding guides for your sand layer, and a 2×4 lumber piece serves as your screed. If you’ll be cutting pavers, a circular saw with masonry blade or a mason’s chisel and hammer will be necessary.
As for materials, you’ll need base material (usually crushed stone or gravel), bedding sand for the layer directly under your pavers, and edge restraints to keep everything in place. Landscape fabric helps prevent weeds from growing up through your patio, while polymeric sand creates solid joints between pavers that resist erosion and ant infestations. And please, don’t skip the safety gear – your eyes, lungs, and hands will thank you!
I always tell my clients what an old mentor told me years ago: “Building a patio is like putting together a giant puzzle – take your time, use the right tools, and the pieces will fall into place.” With proper preparation and the right materials, your backyard patio construction project will result in an outdoor space your family will enjoy for decades.
Backyard Patio Construction: Step-by-Step Blueprint
The planning is done, materials are ready, and now comes the exciting part – actual backyard patio construction. For most homeowners, this process takes about 30-50 hours of hands-on work, so set aside a full weekend or two if you’re going the DIY route. Let me walk you through how we approach this at Randall Landscaping.
Backyard patio construction – Site Prep & Drainage
I always tell my clients that a beautiful patio is built from the ground up. As one of my contractor friends likes to say, “A long-lasting patio is a lot like a smooth paint job—it’s all about the prep work.”
Start by marking your patio outline using stakes and string for straight sections or a garden hose for those lovely curved edges. For rectangular patios, double-check that your corners are square by measuring diagonally from corner to corner – both measurements should be equal.
Next comes excavation – dig down approximately 8 inches plus the thickness of your pavers. So for standard 2-inch thick pavers, you’ll need a 10-inch deep hole. This might seem excessive, but trust me, this depth ensures your patio won’t shift or settle prematurely.
The slope of your patio is crucial for proper drainage. Always slope away from your home’s foundation at a rate of 1 inch drop per 4 feet of patio. I like to use a long straight board with a level on top to check this as I go. This gentle slope will be barely noticeable when walking but will prevent water from pooling or, worse, flowing toward your house.
Once excavated, compact the soil thoroughly using a plate compactor (rentable from most home improvement stores) or a hand tamper for smaller areas. Then roll out landscape fabric across the entire area. While some see this as optional, I’ve found it’s absolutely “worth the small extra effort to control weeds” as one of my clients who skipped this step later told me. Overlap seams by at least 6 inches for complete coverage.
Backyard patio construction – Building the Surface
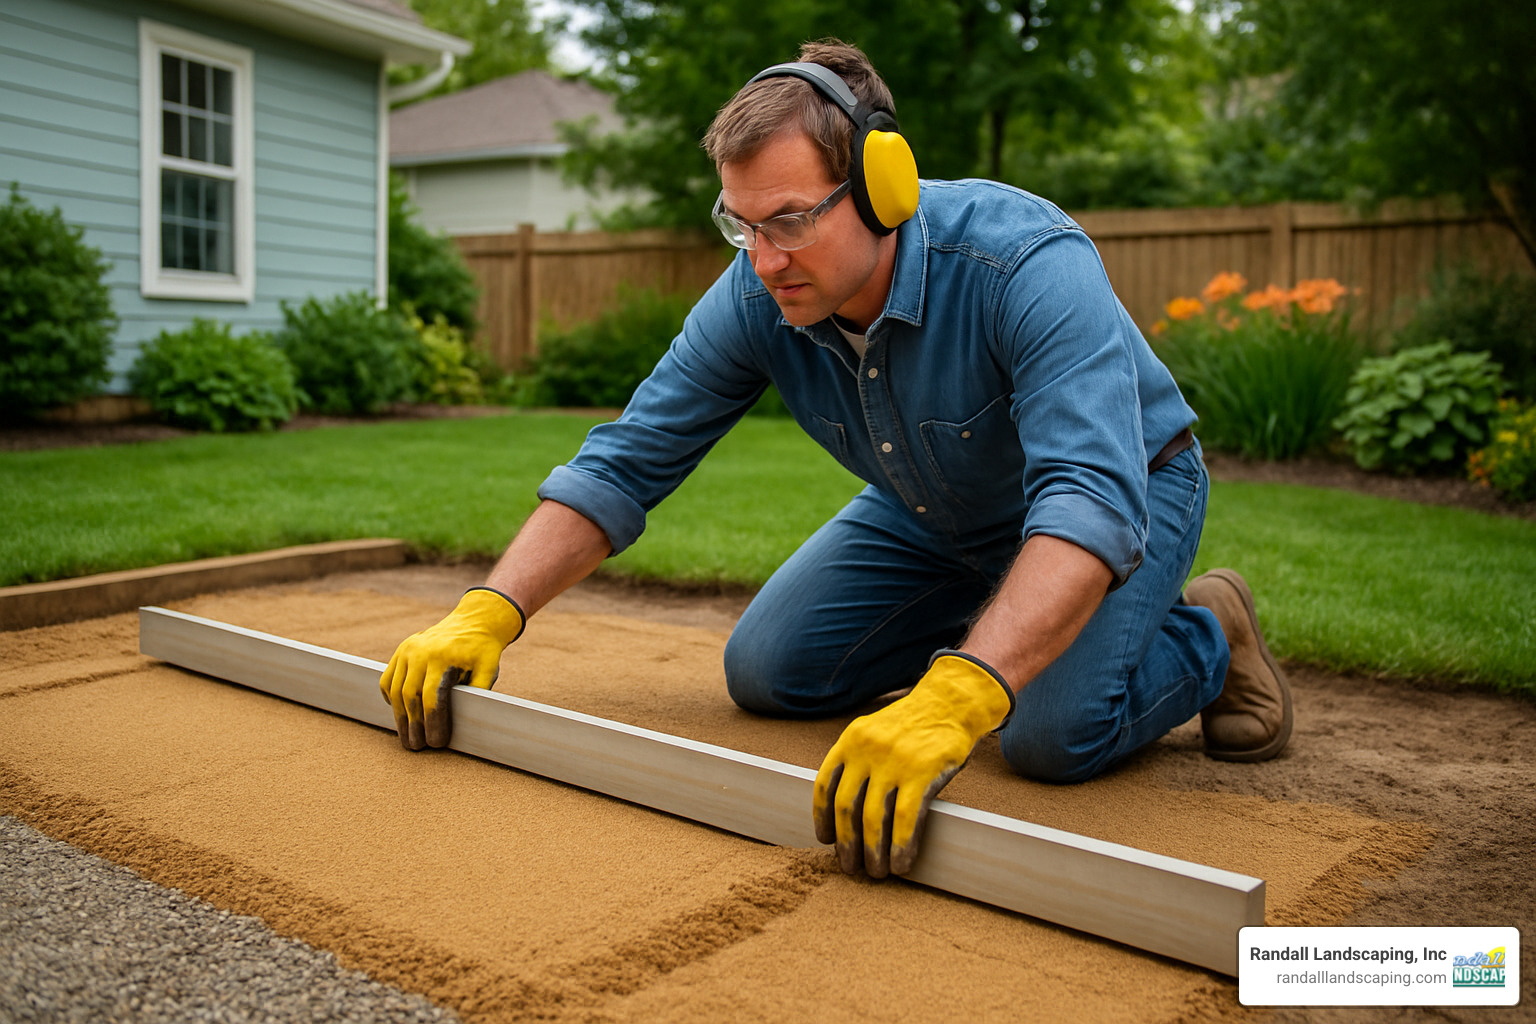
With prep work complete, add your base material – typically 6 inches of crusher run (crushed stone) or gravel. Don’t dump it all at once! Add it in 2-3 inch layers, compacting each layer thoroughly before adding the next. This patience pays dividends in the long-term stability of your patio.
Now comes a step many DIYers rush: the sand layer. Place 1-inch diameter PVC pipes across your compacted base to serve as guides. Spread a 1-inch layer of coarse sand over and between these pipes. Using a straight 2×4, pull (or “screed”) across the pipes to create a perfectly level sand bed. After screeding, carefully remove the pipes and fill in those gaps with additional sand. A light misting with water helps set the sand without washing it away.
When laying your pavers or stones, start from one corner – preferably the lowest point if you have a slope. Work in your chosen pattern, whether that’s herringbone (my personal favorite for visual interest), running bond, or something more creative. Maintain consistent 1/8 to 1/4 inch gaps between pavers for sand later. Use a rubber mallet to gently tap pavers into place, and check for level frequently with a 2-foot level.
For those inevitable cuts around edges, score pavers with a circular saw and masonry blade, then break along the score line with a chisel. If you’re new to this, I recommend choosing a pattern that minimizes cutting or planning your layout to use full pavers in the most visible areas.
Don’t forget to install edge restraints around the perimeter! These plastic, metal, or concrete borders prevent pavers from shifting outward over time – a small detail that makes a huge difference in longevity.
Finishing Touches & First Walk-Through
The final crucial step is applying polymeric sand. This special sand hardens when wet, locking your pavers in place. Ensure pavers are completely dry before sweeping this sand into the joints. Use a plate compactor with a rubber mat to vibrate the sand deeper into the joints, then remove all excess from the surface. Finally, mist lightly with water according to the product instructions and allow it to cure for 24-48 hours before using your new patio.
After curing, take a slow walk across your entire patio. Look for any uneven pavers that need adjustment, areas where sand hasn’t filled completely, edge restraints that need reinforcing, and verify proper drainage with a garden hose test. This thorough inspection catches small issues before they become big problems.
Once everything looks perfect, clean up all debris and give the patio surface a gentle rinse to remove any remaining dust after the polymeric sand has fully cured.
As one of my clients shared after completing their DIY patio, “The first time you sit on your new patio with a cold drink after all that work is incredibly satisfying.” At Randall Landscaping, we couldn’t agree more – whether we build it for you or guide you through the DIY process, that first evening enjoying your new outdoor space makes all the effort worthwhile!
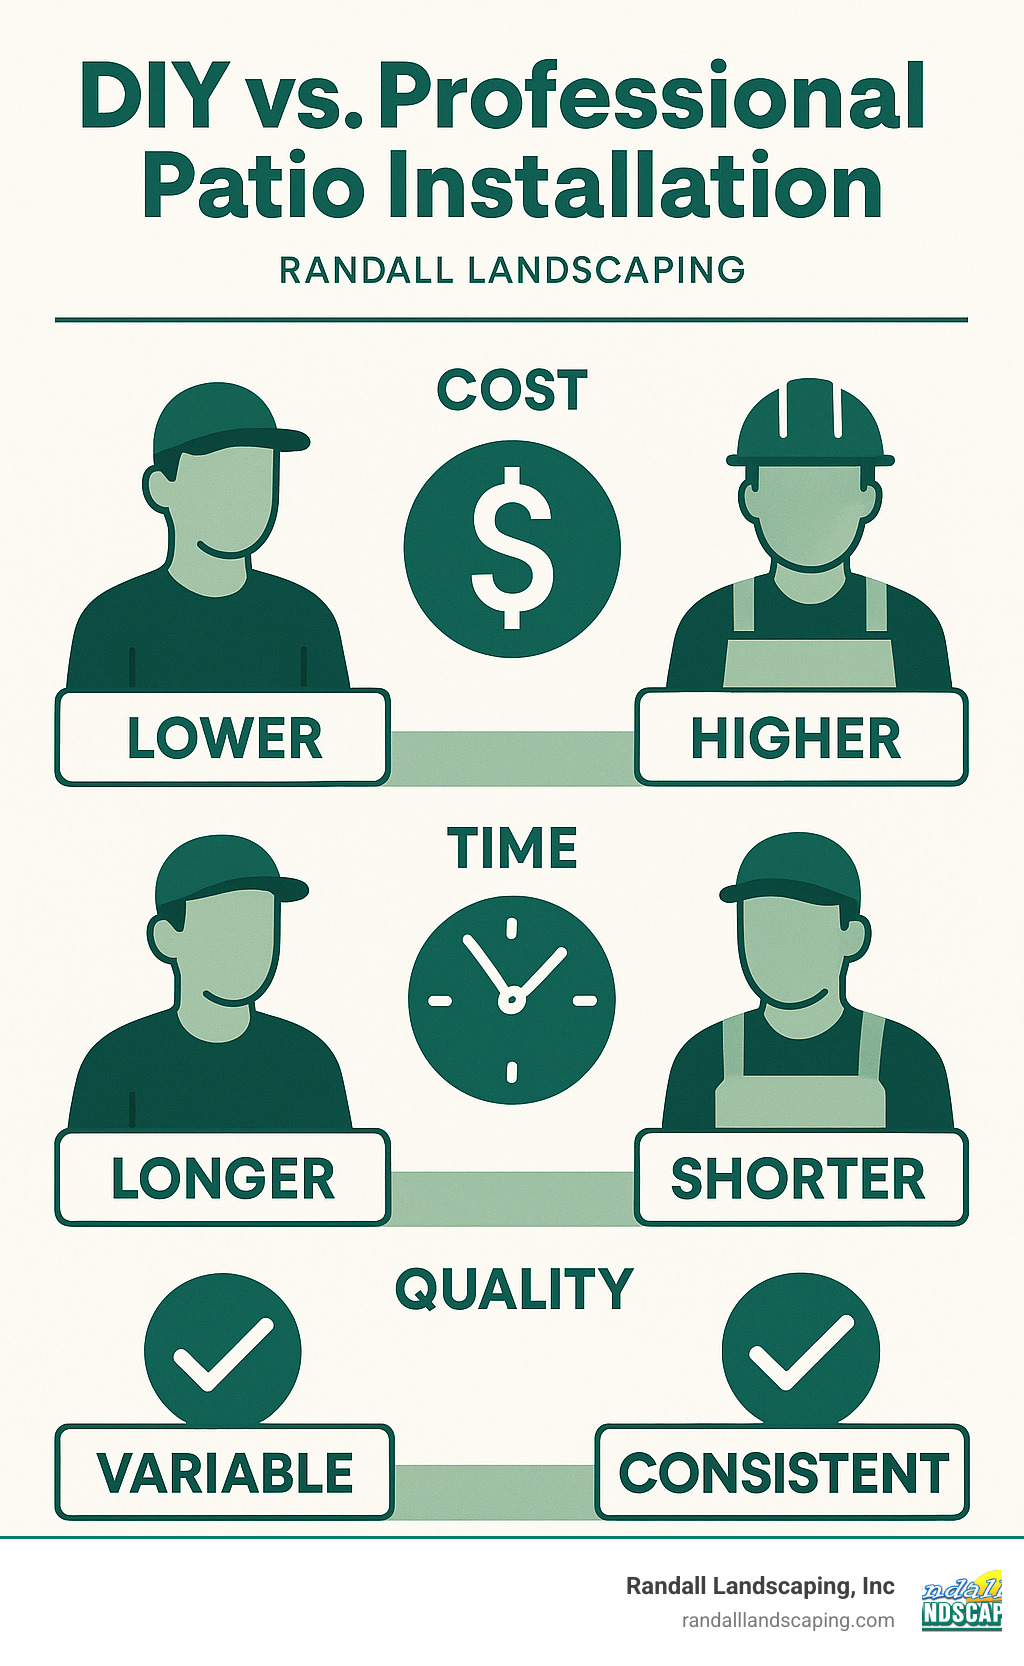
Budget, Timelines & When to Call the Pros
Understanding the financial and time commitments for backyard patio construction helps you decide whether to DIY or hire professionals like Randall Landscaping.
Cost Breakdown
Let’s talk dollars and cents – always the first question on everyone’s mind. Based on our years of experience in the Merrimack Valley and Southern New Hampshire, here’s what your wallet can expect:
If you’re rolling up your sleeves for a DIY project, a small 100-square-foot patio might cost between $800-$3,000. Medium-sized patios around 200 square feet typically run $1,600-$6,000, while larger 400-square-foot spaces can reach $3,200-$12,000. These ranges depend heavily on your material choices – concrete being on the lower end and natural stone commanding premium prices.
For professional installation (these are internet averages, not Randall Landscaping pricing), expect to add about 45% to material costs for labor. Small patios might range from $2,000-$6,000, medium patios from $4,000-$12,000, and large patios anywhere from $8,000-$24,000. Yes, it’s a significant jump, but you’re paying for expertise, proper equipment, and usually a warranty that protects your investment.
Materials vary widely in price, with gravel being the most budget-friendly at $1-$3 per square foot. Standard concrete runs $2-$15 (higher for decorative stamped options), pavers cost $2.25-$11, brick averages $4-$10, and flagstone can range from $3 all the way to $18 per square foot for premium selections.
As one of our satisfied customers once told us, “You can pay now for quality or pay later for repairs.” In New England’s freeze-thaw climate, those words ring especially true.
Sustainable & High-Tech Options
Today’s homeowners increasingly look beyond just aesthetics and price. Many of our clients in towns like Methuen and Andover are asking about eco-friendly options that work with nature, not against it.
Permeable pavers have become a game-changer for environmentally conscious homeowners. Unlike traditional surfaces that create runoff, these special pavers allow water to drain through, recharging groundwater and reducing flooding risks. They’re particularly valuable in low-lying areas of the Merrimack Valley where water management is crucial.
We’ve seen growing interest in recycled materials too. Recycled glass aggregate mixed into concrete creates a stunning, unique surface with environmental benefits. Some homeowners opt for reclaimed brick or stone, which adds instant character while giving materials a second life. For those seeking modern options, composite pavers made from recycled plastics offer excellent durability with a smaller carbon footprint.
Technology is changing patios as well. Solar-powered LED pavers can be integrated directly into your patio design, creating ambient lighting without additional electrical work. These smart options improve both the beauty and functionality of your outdoor space as evening falls.
Professional Help vs. DIY Sweat
There’s something satisfying about building something with your own hands. But there are definitely times when calling in the pros makes sense.
Consider professional installation when your project involves significant elevation changes or complex drainage issues. Throughout our years serving Southern New Hampshire and the Merrimack Valley, we’ve encountered countless properties with challenging terrain that requires expert grading solutions.
Navigating permits and HOA restrictions can be a headache for homeowners but is routine for professional installers. We handle these processes efficiently, saving you time and potential headaches.
Working with heavy or expensive materials like natural stone often requires specialized equipment and techniques. One misplaced flagstone can mean hundreds of dollars wasted – not to mention a sore back!
If you’re looking to maximize property value, professional installation typically offers better returns. A well-executed patio can return 80% or more of its cost in home value, but only if done correctly. As one real estate expert in North Andover told us, “Buyers can spot DIY shortcuts from across the yard.”
Finally, consider your timeline. What might take a professional team a few days could stretch into weeks for a weekend warrior. If you’re planning for a specific event or the summer season is slipping away, professional installation ensures your patio is ready when you need it.
Time is often the biggest hidden cost in DIY projects. A typical 200-square-foot patio requires 30-50 hours of labor – that’s several weekends of your precious free time!
For more information about our patio design expertise, visit our Patio Design & Installation page or check out our selection of Hardscape Products.
Design Ideas & Add-Ons That Wow
The beauty of backyard patio construction is that it creates a foundation for countless design possibilities. After building dozens of patios across the Merrimack Valley, I’ve seen how the right add-ons transform a simple patio into an outdoor oasis that families never want to leave.
Shade Structures & Vertical Elements
There’s nothing worse than a beautiful patio that’s too hot to enjoy on summer afternoons. In our New England climate, adding shade makes your patio usable all day long.
Pergolas are my personal favorite addition – they provide filtered sunlight while creating an architectural focal point. Many of our Andover and North Andover clients love how pergolas support climbing plants like wisteria, creating a living ceiling that changes with the seasons.
Retractable awnings offer more flexibility, allowing you to enjoy full sun on cooler days while providing instant shade when temperatures climb. For a more modern look, sail shades create interesting shadow patterns while blocking harmful UV rays – perfect for families with young children who need sun protection.

Fire Features
Nothing brings people together quite like gathering around a fire. I’ve watched countless families create their most cherished memories around a well-designed fire feature.
Built-in fire pits become natural gathering spots, with permanent stone or concrete designs that complement your patio materials. For smaller spaces or tighter budgets, portable fire bowls offer flexibility to rearrange your layout as needed. More elaborate outdoor fireplaces create a true living room feel and can even include built-in wood storage or seating.
Safety always comes first with fire features. Keep at least 10 feet of clearance from structures, use appropriate fire-resistant materials in the surrounding area, and always check your local fire codes before installation. The U.S. Fire Administration provides excellent guidance on fire-pit safety that I always recommend to our clients.
Water Elements
There’s something magical about the sound of water that instantly makes a space feel more relaxing. Even small fountains can mask neighborhood noise and create a peaceful atmosphere. Pondless waterfalls offer the beauty of moving water without the maintenance of a traditional pond – perfect for busy families or those with small children.
For a truly distinctive look, consider a reflection pool. These shallow water features create beautiful light play, especially when paired with strategic lighting. One of our Salem clients combined a small reflection pool with underwater LEDs for a stunning nighttime display that’s become the talk of their neighborhood.
Pattern Play & Color Palettes
The arrangement of your pavers dramatically impacts your patio’s personality. Herringbone patterns create visual interest and provide excellent structural stability for driveways or high-traffic areas. Running bond patterns (like traditional brick walls) offer a classic look that’s straightforward for DIYers. For something truly special, circular patterns create dramatic focal points, though they require more cutting.
Get creative with your design by incorporating:
– Contrasting borders that define the space with different colors
– Mosaic insets using varied paver colors for a personalized touch
– Decorative medallions at the center of your patio
– Synthetic turf strips between pavers for a modern look with a touch of green
Lighting That Sets the Mood
The right lighting extends your patio enjoyment long after sunset. Path lights guide guests safely while creating a welcoming glow. Up-lighting on trees or architectural features adds drama and dimension. String lights create that magical restaurant patio feel that makes everyone want to linger longer.
For a truly integrated look, consider LED fixtures installed directly into your patio surface. These low-profile lights can outline the perimeter, highlight steps, or create patterns across your patio. As one client told me after we installed integrated lighting, “It’s like having an outdoor room that’s somehow even more beautiful at night than during the day.”
Year-Round Maintenance Made Easy
A well-built patio requires minimal upkeep, but these simple maintenance steps will keep it looking fresh for decades:
Sweep your patio regularly to prevent debris from staining or scratching the surface. For deeper cleaning, pressure wash or scrub your patio each spring and fall. If you notice joints looking sparse, reapply polymeric sand every 2-3 years to keep everything tight and weed-free.
For natural stone and some concrete pavers, apply sealer every few years to protect from stains and weather damage. During our New England winters, be gentle with ice removal – use plastic snow shovels instead of metal to prevent scratching, and choose ice melt products compatible with your specific paver material.
With proper care, the patio you build this summer will be the backdrop for countless family gatherings, quiet morning coffees, and starlit dinners for many years to come. And if you’d rather leave the maintenance to the professionals, our team at Randall Landscaping is always here to help keep your outdoor space looking its best.
Frequently Asked Questions about Backyard Patios
How deep should I dig for the base?
When tackling backyard patio construction in New England’s challenging climate, proper base depth is crucial for longevity. I typically recommend excavating about 8 inches plus the thickness of your chosen paver or stone. This creates room for the essential layers: 6 inches of compacted crushed stone, 1 inch of bedding sand, and your actual paving material.
For our customers throughout the Merrimack Valley, where freeze-thaw cycles can be particularly harsh, I often suggest going a bit deeper—10 to 12 inches total—to provide extra protection against frost heave. This might seem like overkill during summer installation, but you’ll appreciate the extra effort when your patio remains level after several New England winters!
What slope prevents water pooling?
Water pooling is the enemy of any well-built patio. The magic number for proper drainage is a 1-inch drop for every 4 feet of patio surface (¼ inch per foot). This gentle slope ensures water runs off without making your outdoor living space feel like you’re standing on a hill.
Always direct this slope away from your home’s foundation—I’ve seen too many basement water issues caused by improper patio grading. For larger patios, consider creating a subtle high point in the center that slopes gently outward in multiple directions, similar to how roads are crowned. Your guests won’t notice the slope, but your foundation will thank you after heavy rainstorms.
Do I need a permit for a ground-level patio?
In my 18+ years serving towns throughout the Merrimack Valley and Southern New Hampshire, I’ve found permit requirements vary significantly by location. Generally speaking, most municipalities don’t require permits for simple ground-level patios without permanent structures.
However, you’ll likely need permits if you’re pouring concrete, building retaining walls over 18-24 inches, significantly altering drainage patterns, installing electrical components, or building in environmentally sensitive areas. I’ve seen requirements differ substantially between neighboring towns like Andover and North Andover, and homeowner associations often have additional restrictions.
Always check with your local building department before starting any project. A quick phone call can save you from potential fines or having to redo work later.
How long will my patio last?
With proper installation and maintenance, your investment should serve you for decades. Concrete patios typically last 30-50 years, paver patios 50+ years, brick patios 25-30 years, and natural stone 50+ years. Gravel patios can last indefinitely with periodic replenishment.
The secret to longevity isn’t just the material—it’s what lies beneath. Proper base preparation and drainage are absolutely essential. As I sometimes joke with clients, “There are two kinds of concrete: cracked, and will crack.” While this holds some truth, proper installation techniques minimize visible cracking and maximize your patio’s lifespan.
Can I build a fire pit on my paver patio?
Yes! A fire pit is one of my favorite additions to a paver patio, creating a natural gathering spot for family and friends. However, safety must come first. Use fire-resistant materials for both the patio and the pit, and maintain at least 10 feet of clearance from structures and overhanging trees.
Always check local fire codes—some towns in our service area have specific requirements about open flames. I recommend installing a metal fire ring insert to protect your pavers from direct heat, and never build a fire pit directly on a wooden deck.
For safety and longevity, use concrete or stone pavers rated for high heat around fire features. The last thing you want is pavers that crack or spall when exposed to the intense heat of your evening fires.
How much does it cost to build a patio myself vs. hiring professionals?
DIY patio construction typically saves about 45% in labor costs compared to hiring professionals. Based on internet averages (not Randall Landscaping pricing), here’s what you might expect for a 200 sq ft paver patio:
DIY Cost Breakdown:
– Materials: $1,600-$4,000
– Equipment rental: $200-$400
– Total DIY cost: $1,800-$4,400
Professional Installation: (Internet averages, not Randall Landscaping pricing)
– Materials: $1,600-$4,000
– Labor: $1,400-$3,600
– Total professional cost: $3,000-$7,600
While the savings might look tempting, consider what you’re getting with professional installation: warranties, proper equipment, expertise in dealing with unexpected challenges, and the peace of mind that comes from knowing your patio is built to last. At Randall Landscaping, we take pride in delivering quality backyard patio construction with 100% reliability throughout the Merrimack Valley and Southern New Hampshire.
The true cost of a DIY project isn’t just financial—it’s also measured in weekends spent working instead of relaxing on your completed patio!
Conclusion
There’s something magical about stepping onto a patio you’ve built with your own hands. Backyard patio construction transforms unused yard space into an outdoor sanctuary where family gatherings, quiet morning coffees, and starlit evenings become the memories that make a house truly feel like home.
Throughout this guide, we’ve walked through every step of creating your dream patio—from initial sketches and material selection to the satisfying moment when you sweep the last bit of polymeric sand from your finished surface. While the process requires planning, preparation, and a bit of sweat equity, the results can bring joy for decades when done properly.
The beauty of a well-constructed patio lies not just in its appearance but in its longevity. With proper installation techniques and regular maintenance, your outdoor living space will continue to serve as the heart of your backyard oasis through countless seasons. As one of our customers recently shared, “Our patio has become our family’s favorite ‘room’ in the house from April through October.”
Here in New England, we understand the unique challenges our climate presents—from summer heat to winter freeze-thaw cycles. At Randall Landscaping, we’ve spent years perfecting patio installation techniques that stand up to whatever Mother Nature throws at them across the Merrimack Valley and Southern New Hampshire. From Amesbury to Windham, Andover to Salem, we’ve helped countless homeowners create outdoor spaces that improve both their lifestyle and property value.
If you find yourself excited about the possibilities but overwhelmed by the scope of the project, professional help is just a call away. Our team brings not only technical expertise but also design vision that can transform your backyard dreams into concrete (or paver, or flagstone) reality. We pride ourselves on 100% reliability and craftsmanship that speaks for itself long after we’ve packed up our tools.
Whether you choose the DIY route or prefer to partner with professionals, your new patio will provide years of enjoyment while boosting your home’s curb appeal and value. It’s truly one of the most rewarding outdoor projects a homeowner can undertake.
Ready to transform your outdoor space? For expert guidance on material selection, design considerations, or professional installation, explore our Patio Design & Installation services. Your perfect outdoor living space is closer than you think!