
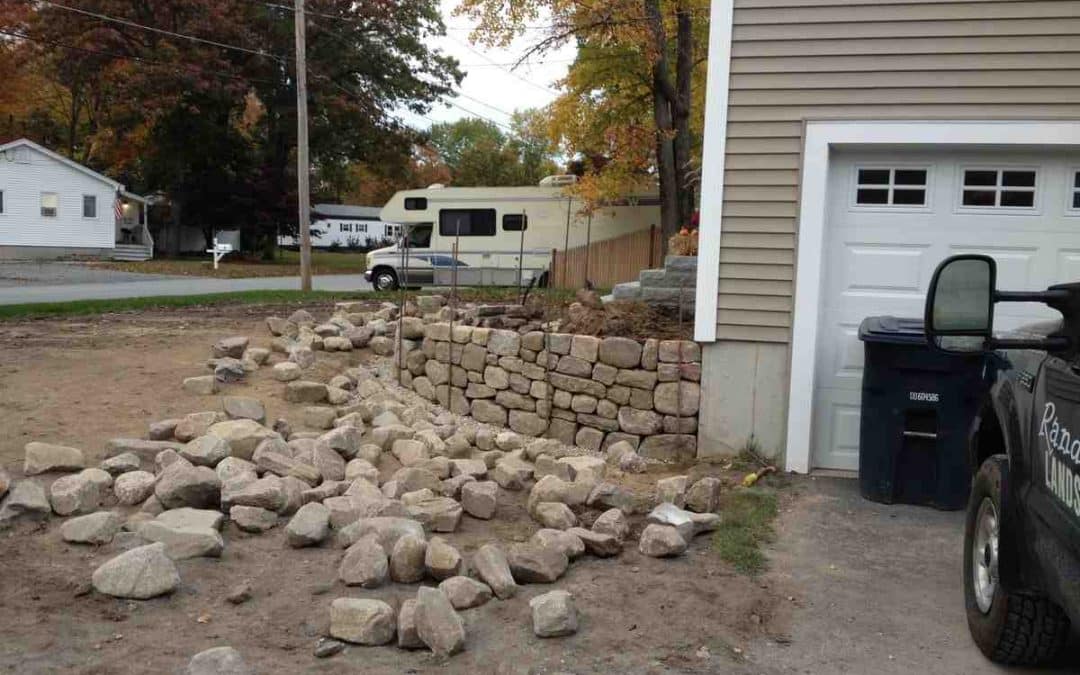
Why a Dry Stack Sandstone Wall Belongs in Your Backyard
A dry stack sandstone wall is one of the most practical and beautiful things you can add to your yard — no mortar, no concrete, just natural stone stacked with skill and intention.
Quick answer for homeowners ready to build:
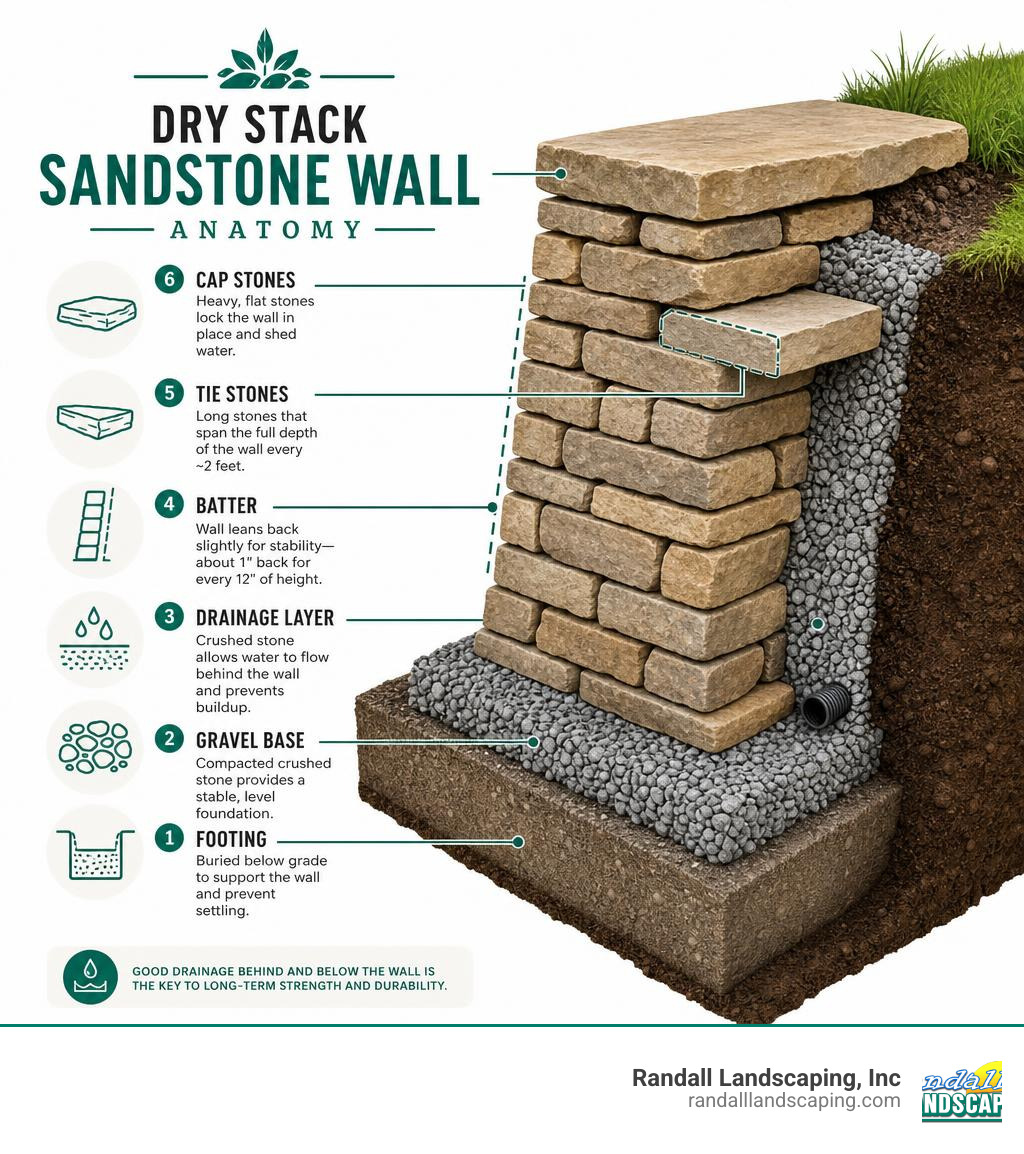
- Choose the right sandstone — flat, angular pieces with at least one level face
- Dig a footing — 3 to 6 inches below grade, at least twice as wide as your stone
- Compact a gravel base — 6 to 12 inches of crushed stone, tamped in layers
- Stack largest stones first — biggest and flattest go on the bottom course
- Stagger every joint — never let vertical seams line up between courses
- Add a slight inward lean (batter) — about 1 inch back for every 12 inches of height
- Install drainage behind the wall — perforated drain tile and clear crushed stone
- Use tie-through stones — one stone spanning the full wall depth, every 2 feet
- Cap the top — heavy flat stones to lock everything in and shed water
- Fill face gaps with stone slivers — this tightens the wall and adds years to its life
Done right, a dry stack sandstone wall can last 100 to 200 years with very little upkeep. That’s not an exaggeration — dry stone walls have been doing exactly that across the UK, Ireland, and rural America for centuries.
But there’s a real difference between a wall that looks good on day one and one that stays solid through New England winters, spring thaws, and heavy rain. That gap comes down to technique.
I’m Tommy Randall, owner of Randall Landscaping, Inc., and since 2006 I’ve designed and built countless dry stack sandstone walls across Massachusetts and Southern New Hampshire — from simple garden borders to load-bearing retaining walls on steep slopes. In the sections below, I’ll walk you through exactly how to build one that lasts.
Understanding Dry Stack Sandstone Walls: History, Materials, and Costs
Before we start swinging a hammer, let’s get clear on what we are building. A dry stack wall is not just “rocks piled up nicely.” It is a gravity structure. It works because stone weight, friction, drainage, interlocking shapes, and proper batter all work together.
Dry stack sandstone walls can be used as:
- Garden borders
- Seat walls
- Low retaining walls
- Terrace walls
- Property or field-style boundary walls
- Natural transitions between lawn, patio, planting beds, and walkways
For retaining walls, especially in the Merrimack Valley and Southern New Hampshire, the hidden work behind the wall matters as much as the visible stone. Our clay-loam soils, freeze-thaw cycles, and spring runoff are not gentle. If water gets trapped behind the wall, even a beautiful face can start to bow.
Dry stone walling has a long history, and the broader craft is explained well in this overview of the history of dry stone walling. The short version: people have used mortarless stone construction for thousands of years because it is durable, repairable, and made from local material.
What is a Dry Stack Sandstone Wall?
A dry stack sandstone wall is a wall built from sandstone without mortar between the joints. Instead of relying on cement, the wall relies on:
- Gravity
- Stone mass
- Friction between stones
- Interlocking shapes
- Through-stones that tie the wall together
- Proper drainage behind and below the wall
Sandstone works especially well when pieces are flat, angular, and bedded naturally. The flat faces give each stone a stable bearing surface. The rough texture adds friction. The warm colors also look right at home in natural landscapes, especially around patios, steps, gardens, and older New England properties.
If you are comparing dry stack walls with other yard retaining options, our DIY yard retaining wall guide is a helpful next read.
| Feature | Dry Stack Sandstone Wall | Mortared Stone Wall |
|---|---|---|
| Joint material | No mortar between most stones | Mortar bonds stones together |
| Drainage | Water can move through open joints if detailed correctly | Needs weeps, drains, and waterproofing |
| Freeze-thaw performance | Very good when built with drainage and batter | Can crack if water freezes behind or inside joints |
| Repairability | Individual stones can be reset | Repairs often require chiseling and repointing |
| Look | Natural, rustic, old-world | Formal, finished, masonry-style |
| Best use | Garden walls, low retaining walls, terraces, boundaries | Veneers, formal walls, engineered masonry structures |
| DIY difficulty | Moderate to hard | Hard, requires masonry skill |
The Pioneer Legacy of Mortarless Stone Construction
Dry stack walls are part of the rural landscape because they solved real problems. Farmers cleared stones from fields and used them to mark boundaries, hold back slopes, create terraces, and protect soil from erosion. In mining, farming, and homestead landscapes, these walls were often built with whatever stone was nearby.
That is one reason they still feel timeless. They belong to the land.
Historic dry stack terrace walls also teach a practical lesson: walls were built slightly above grade, into hillsides, and with attention to erosion. In old rural landscapes, dry stack walls were not decoration first. They were functional engineering with a good-looking side effect.
For more historical context, this article on the pioneer legacy of dry stacking shows how dry stack walls were used to create usable flat ground and control erosion.
Best Types of Sandstone for Dry Stacking
Not every sandstone belongs in a wall. For dry stacking, we look for sandstone with these traits:
- Flat or naturally bedded faces
- Angular edges instead of rounded edges
- Enough thickness to bear weight
- Good weathering resistance
- Minimal flaking, crumbling, or delamination
- A mix of large, medium, and small pieces
- Some long stones that can act as tie-through stones
Avoid overly soft sandstone that powders when struck. Also be cautious with stone that has high iron concentrations. Some sandstone can develop rust-colored staining when exposed to moisture. That is not always a structural problem, but it can affect the finished look.
The best wall stone is not necessarily perfectly cut. In fact, slightly irregular sandstone can lock together beautifully when sorted well. Rounded river stone, however, is much harder to stack without mortar because it wants to roll, not sit. Walls do not enjoy gymnastics.
Cost Estimation and Material Calculations

Important note: the following are average cost ranges based on internet data and general market observations. They are not actual costs for Randall Landscaping, Inc. Every project depends on access, wall height, drainage, soil, stone selection, labor, and whether engineering is required.
Typical dry stack stone wall costs can vary widely:
| Item | Broad Average Internet-Based Range |
|---|---|
| Wall stone material only | $25 to $90+ per square foot of wall face |
| DIY base and drainage materials | $5 to $25+ per square foot |
| Professional installation | $60 to $200+ per square foot |
| Complex retaining wall with drainage, access challenges, or engineering | $100 to $300+ per square foot |
A simple material estimate starts with wall volume:
length x height x depth = cubic feet of stone
Example:
- 20 feet long
- 2 feet high
- 1.5 feet deep
- 20 x 2 x 1.5 = 60 cubic feet of stone
Add 10% to 15% extra for waste, shaping, sorting, and the inevitable “this stone looked better in the pile” moments.
For retaining walls, you also need:
- Crushed stone base
- Drainage stone
- Landscape fabric
- Perforated drain tile
- Cap stones
- Small chips and slivers for packing
10 Rules for Building a Structurally Sound Dry Stack Sandstone Wall
A strong dry stack wall is built from the ground up, not from the face out. The face is what everyone sees. The base, batter, drainage, and stone placement are what keep it standing.
For a broader step-by-step overview, this step-by-step dry stack guide covers many of the same fundamentals.
Rule 1: Dig a Proper Footing Below Grade
Start below grade so the base stones cannot kick out or shift. For many garden and low retaining walls, a footing trench 3 to 6 inches below finished grade is a common minimum. For taller retaining walls or poor soils, you may need deeper excavation.
In our region, frost and water movement matter. If the wall is retaining soil, remove organic material, soft soil, and loose fill until you reach firm subgrade.
Good footing rules:
- Dig wider than the wall
- Remove roots, loam, and soft pockets
- Keep the trench level front to back
- Step the trench on slopes instead of following the slope
- Bury part of the first course for toe stability
A common rule of thumb is to bury about 10% of the wall height, or roughly 1 to 2 inches per foot of exposed wall height.
Rule 2: Ensure a Wide, Compacted Gravel Sub-Base
The base should be wider than the wall itself. A practical target is at least twice the width of the stone, with crushed stone extending beyond the front and back of the wall. If your wall stone is 12 inches deep, a 24-inch-wide base trench is a smart starting point.
Use angular crushed stone, not rounded pea gravel. Angular stone locks together. Rounded stone acts like ball bearings, and unless you are building a tiny stone roller coaster, that is not what we want.
Best practices:
- Install 6 to 12 inches of compacted crushed stone
- Compact in 2 to 3 inch lifts
- Extend the base 6 inches or more beyond the wall face and back
- Use a hand tamper for small walls or plate compactor for larger projects
- Check level constantly
The base is the most boring part of the wall. It is also the part that decides whether the wall lasts.
Rule 3: Lay the First Course with the Largest Stones
The first course carries everything above it. Use the biggest, flattest, heaviest sandstone pieces here.
Look for stones that:
- Sit without rocking
- Have broad bearing surfaces
- Extend deep into the wall
- Lock against neighboring stones
- Can be partially buried
Set each stone firmly into the compacted base. Shim only with flat stone chips, never loose soil. Soil compresses and washes away. Stone chips stay put.
Take your time here. A rushed first course leads to a wall that argues with you the whole way up.
Rule 4: Stagger the Joints (One Over Two, Two Over One)
Vertical joints are weak points. If joints line up from one course to the next, you create a seam where movement can travel straight through the wall.
Instead, build like brickwork:
- One stone over two stones
- Two stones over one stone
- Joints offset at least 4 inches where possible
- Avoid long vertical seams
- Bridge joints with longer stones
This spreads weight across the wall and helps each course lock the one below it.
For sandstone, it is tempting to stack similar rectangular pieces like books. Resist the urge if the joints line up. Books belong on shelves. Wall stones need bonding.
Rule 5: Incorporate a Slight Inward Batter
Batter means the wall leans slightly back into the slope or toward the centerline. This helps the wall resist outward pressure from soil and water.
For many dry stack retaining walls, a common batter is about 1 inch back for every 12 inches of height. Another practical method is to set each course back roughly 1/4 inch, depending on stone thickness and wall design.
Why it matters:
- Soil pressure pushes outward
- Batter directs weight back into the wall
- Gravity helps instead of hurts
- The wall gains a stable trapezoid shape
If you are building a retaining wall rather than a decorative border, it is worth reviewing our retaining wall contractor guide before deciding whether to DIY.
Rule 6: Use Tie-Through Stones for Structural Binding
Tie-through stones, sometimes called tie rocks or through-stones, span from the front face toward the back of the wall. In double-faced freestanding walls, they may span the entire wall width. In retaining walls, they extend deep into the wall and help connect the face to the mass behind it.
Use tie-through stones:
- Every 2 to 4 feet along the wall
- Every few courses vertically
- At corners and ends
- Wherever the wall needs extra binding
These stones prevent the wall face from becoming a thin veneer that peels away. A dry stack wall should be one integrated mass, not two pretty faces with a mystery pile in the middle.
Rule 7: Pitch Stones Inward Toward the Center
Every stone should either sit level or pitch slightly inward. Never allow stones to slope outward toward the face. Outward-pitching stones encourage the stones above them to slide forward over time.
Check each stone as you place it:
- Does it rock?
- Does it slope outward?
- Does it bear solidly on the stones below?
- Does it touch at least two stones under it when possible?
- Does it lock into the course around it?
If a stone does not fit, try it a different way. Experienced wallers often rotate a stone several times before rejecting it. Sometimes the perfect fit is hiding on side number six. Stone has a sense of humor.
Rule 8: Install Dedicated Drainage and Landscape Fabric
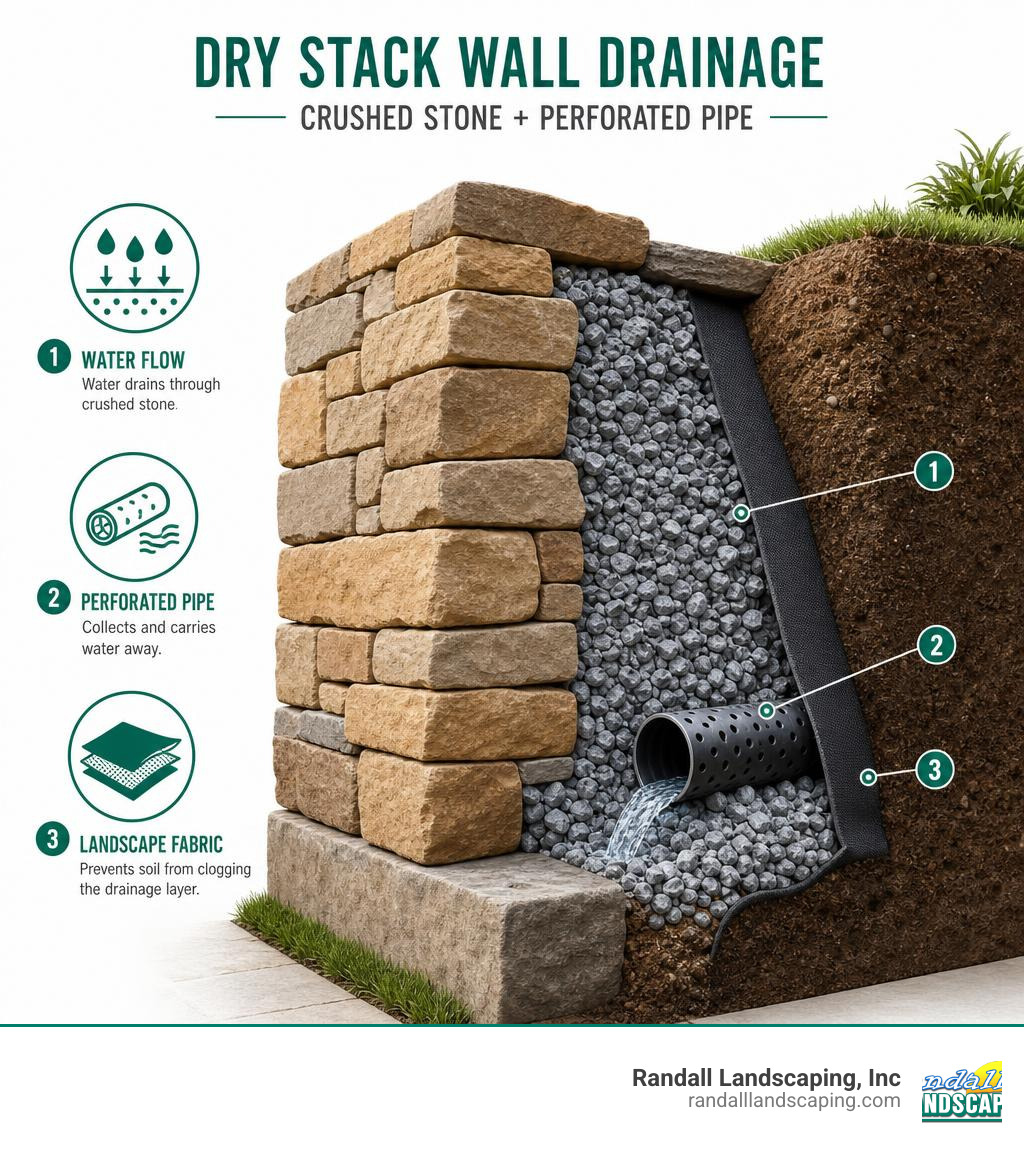
Drainage is not optional for retaining walls in our area. Water trapped behind a wall creates hydrostatic pressure. In winter, that water freezes, expands, and pushes. That is how walls bow, bulge, and fail.
For retaining walls, install:
- 4-inch perforated drain tile behind the first course
- Pipe sloped about 1% to daylight where possible
- 3/4-inch clean crushed stone behind the wall
- Non-woven landscape fabric between drainage stone and soil
- Surface grading that sends water away from the wall
Fabric prevents fine soil from clogging the drainage stone. Clear crushed stone gives water a path to escape. Open dry stack joints can relieve some pressure, but they are not a substitute for proper drainage.
For more wall planning basics, see our retaining wall construction contractors resource.
Rule 9: Secure the Top with Heavy Cap Stones
Cap stones, or coping stones, do several jobs:
- Add weight to lock the wall together
- Help shed rainwater
- Protect the wall core
- Make the wall look finished
- Reduce stone movement at the top course
Choose cap stones that are large, flat, and heavy. Ideally, they should bridge across joints below. On garden walls and seat walls, smoother caps are more comfortable and safer.
Landscape adhesive is sometimes used under cap stones, especially on walls where people may sit or where kids may test whether gravity still works. Use adhesive sparingly and only where appropriate, because one of the advantages of dry stack construction is repairability.
Rule 10: Pack the Crevices with Stone Slivers
After each course, pack gaps with small angular chips, also called hearting or pinning stones. These are not decorative leftovers. They are structural.
Use small stone slivers to:
- Stop wobble
- Tighten face gaps
- Fill voids in the wall core
- Improve load transfer
- Reduce settlement
Do not fill the center with loose soil. Soil holds water, settles, and can wash out. Use tight-fitting stone chips and angular rubble. Small stones should be placed carefully, not dumped like trail mix.
Maintenance, Repairs, and Long-Term Care
A well-built dry stack sandstone wall needs less maintenance than many people expect. That is one reason dry stone walls have survived for generations. Still, “low maintenance” does not mean “ignore forever and hope for the best.”
For another practical look at natural stone wall construction, the same themes come up again and again: base, drainage, batter, and careful stone placement.
Inspecting and Repairing a Dry Stack Sandstone Wall
Inspect your wall at least seasonally, and especially after:
- Heavy rain
- Spring thaw
- Freeze-thaw cycles
- Nearby excavation
- Tree root growth
- Changes in surface drainage
Look for:
- Bulging sections
- Stones tipping outward
- Washed-out soil near the base
- Clogged drainage outlets
- Loose cap stones
- Long cracks or opening joints
- Sinkholes behind the wall
Small repairs are usually straightforward. Remove the loose stones, clean out debris, rebuild that section with proper bonding, and repack gaps with stone chips. If a retaining wall is bulging significantly, do not just shove stones back in. That usually means water, soil pressure, poor base conditions, or missing tie stones are at work.
For taller or load-bearing walls, call a professional before dismantling anything. Walls can shift quickly once stones are removed.
Managing Erosion and Weed Growth
Dry stack walls create little crevices, and nature will try to move in. A bit of moss or small plant growth can look charming. Large roots are another story.
To control erosion and weeds:
- Keep drainage outlets open
- Maintain positive grading above the wall
- Replace washed-out soil behind the wall
- Remove woody weeds before roots enlarge
- Avoid spraying harsh chemicals into wall joints
- Keep mulch and soil from piling against the face
- Redirect downspouts away from the wall
Dry stack walls can also support biodiversity. The small gaps provide habitat for insects and small plants. In rural landscapes, dry stone walls can support more plant and insect species than modern hard boundaries. The trick is allowing small life without allowing roots to become pry bars.
Frequently Asked Questions about Dry Stack Sandstone Walls
Dry stack sandstone wall projects are very doable for careful DIYers, but they are not all the same. A 16-inch garden border and a 4-foot retaining wall holding back a driveway are completely different animals.
For public construction, some municipalities publish technical standards for dry stack rock walls, including material durability, subgrade preparation, and fabric use. This municipal dry stack specification shows how formal wall construction can become when structural permanence is required.
How high can you build a dry stack sandstone wall without engineering?
For many residential landscapes, unreinforced dry stack retaining walls are commonly kept around 3 feet or less. Some guidance allows 3 to 4 feet depending on stone size, wall depth, batter, soil, surcharge loads, and drainage. However, local codes and site conditions matter.
Call a professional or engineer if the wall:
- Exceeds about 3 feet
- Supports a driveway, patio, pool, structure, or steep slope
- Is near a property line
- Has poor drainage
- Is built in heavy clay or unstable fill
- Shows signs of active movement
- Needs geogrid or reinforcement
- May require a guard or safety barrier
Walls over 24 inches can also raise safety concerns depending on location and use. Always check local requirements in your city or town.
Do dry stack stone walls require a concrete foundation?
Not always. Many dry stack sandstone walls perform best on a compacted crushed stone base because it drains well and allows slight movement without cracking.
A concrete footing may be appropriate for certain engineered or formal masonry conditions, but it is not automatically better for a dry stack wall. In freeze-thaw climates, a poorly drained concrete-supported wall can still fail if water is trapped behind it.
For most low garden walls and many properly designed retaining walls, we prefer:
- Excavation to firm subgrade
- Compacted crushed stone base
- Good drainage behind the wall
- Proper batter
- Large base stones
Concrete should be considered when design, code, engineering, or site conditions require it.
How do dry stack walls handle freeze-thaw cycles?
Dry stack walls handle freeze-thaw well because they are flexible and drainable when built correctly. Mortared walls can crack when water enters joints and freezes. Dry stack walls have small gaps that allow some movement and water release.
But freeze-thaw performance depends on the details:
- The base must drain
- Water behind the wall must escape
- The wall should lean inward
- Stone should be durable
- Soil fines should be kept out of drainage stone
- Surface water should be directed away
In Merrimack Valley and Southern New Hampshire winters, drainage is the difference between “historic charm” and “why is my wall leaning like it heard bad news?”
Conclusion
A dry stack sandstone wall is simple in concept but demanding in execution. No mortar means the stone placement has to do the work. Every footing, joint, chip, batter angle, tie stone, and drainage layer matters.
If you are building a small garden wall, take your time, sort your stone, and follow the 10 rules. If you are building a retaining wall, especially on a slope or in clay-heavy soil, be honest about the stakes. A wall that holds back soil is a structure, not just a weekend art project.
At Randall Landscaping, Inc., we build for long-term performance across the Merrimack Valley and Southern New Hampshire, including Amesbury, Andover, Atkinson, Boxford, Dracut, Georgetown, North Andover, North Reading, Pelham, Salem, Windham, Methuen, Lawrence, and Plaistow.
Need help deciding whether to DIY or bring in a crew? Start with our guide to quality retaining walls, or contact us to plan a sandstone wall that looks natural, drains properly, and stays put through New England weather.