

Why Getting Your Paver Base Right Changes Everything
Compacting base for pavers is the single most important step in any paver project — and the one most likely to be rushed or skipped.
Here’s a quick overview of how to do it right:
- Excavate 6–8 inches below your final paver height
- Add sub-base material (crushed stone or 3/4″ minus gravel) in 3–4 inch layers
- Compact each layer with a plate compactor before adding the next
- Check moisture — base material should hold together when squeezed
- Screed a 1-inch sand bedding layer on top (do not compact it)
- Lay pavers, then run the compactor over them with a protective mat — minimum 2 passes at 45-degree angles
Without proper compaction, even a perfectly laid patio will shift, crack, or sink within a few seasons. The base does the real work.
I’m Tommy Randall, owner of Randall Landscaping, Inc., and I’ve been building patios, walkways, and driveways across Massachusetts and New Hampshire since 2006 — with compacting base for pavers being a foundational part of every single hardscape project we take on. In this guide, I’ll walk you through exactly how we do it, so your project lasts for decades.
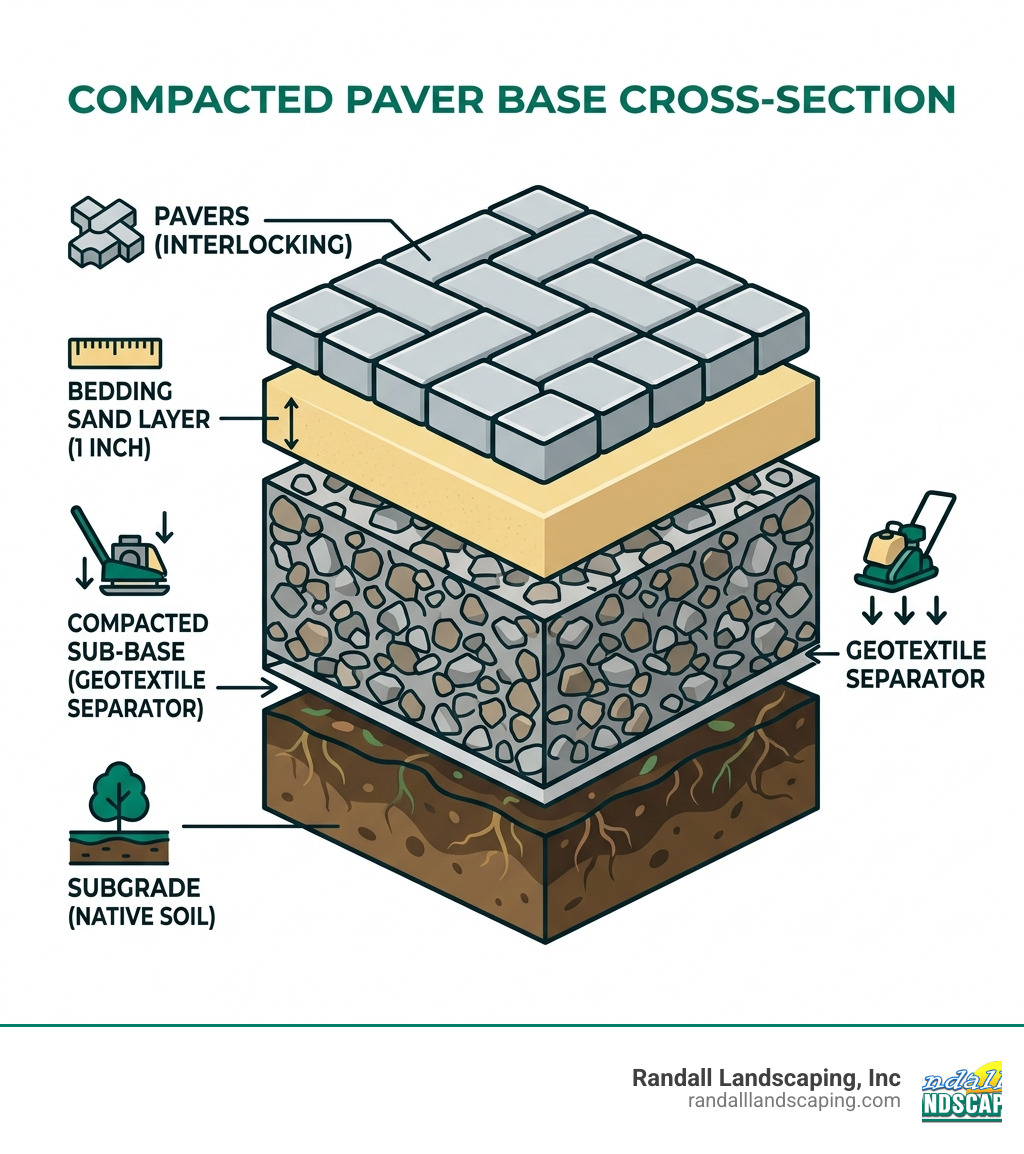
Why Compacting Base for Pavers is Essential for Durability
When we talk about Hardscaping, we often focus on the colors and patterns of the stones. But as of April 2026, the industry standard remains clear: the beauty of your patio is only as deep as its foundation. Compacting base for pavers is essential because it creates structural density.
When you dump loose gravel into a hole, it’s full of tiny air pockets. Over time, gravity, rainwater, and the weight of your patio furniture will force those stones to settle into those gaps. If you haven’t used a compactor, this settling happens unevenly, leading to dips, “birdbaths” (puddles), and tripping hazards.
Proper Patios and Walkway Installations require mechanical vibration to eliminate these voids. This process creates a tight interlock between particles of different sizes, which significantly increases the load-bearing capacity of the surface. Furthermore, in our region — from Dracut, MA to Salem, NH — frost heave is a major enemy. A well-compacted base allows for better drainage efficiency, ensuring water doesn’t sit under your pavers, freeze, and pop them out of place during a New England winter. By following Essential Techniques for Compacting Base Material, you ensure your hardscape stays flat and functional for the long haul.
Essential Equipment and Materials for a Solid Foundation
You can’t achieve professional results with a shovel and a prayer. You need the right tools and the right aggregate. For most residential projects in Southern NH and the Merrimack Valley, we recommend a vibratory plate compactor.
The Right Tools
- Plate Compactor: For areas larger than 50 square feet, a plate compactor is non-negotiable. A 3000lb-force machine is the workhorse of the industry. It uses high-frequency vibration to settle the base.
- Hand Tamper: These are great for tight corners or very small repairs, but they lack the “oomph” needed for a full Backyard Patio Construction.
- Urethane Mat: This is a thick plastic pad that attaches to the bottom of your compactor. It’s vital for the final stage of the project to prevent scuffing or cracking your expensive pavers.
- Moisture Sprayer: A simple garden hose with a spray nozzle works perfectly to adjust the moisture content of your base.
The Right Materials
For the Base for Flagstone Walkway or standard pavers, we use “3/4 inch minus” crushed limestone or processed gravel. This material contains stones up to 3/4″ in size all the way down to fine stone dust. This variety of sizes is what allows the material to “lock” together.
We also frequently use geotextile fabric. This is a heavy-duty landscape fabric placed between the native soil and your new stone base. It prevents the rocks from sinking into the mud over time, effectively doubling the life of your installation.
| Compactor Force (lbs) | Max Lift Thickness (Inches) | Best Use Case |
|---|---|---|
| 1,000 | 1″ | Hand tamping/Small repairs |
| 3,000 | 3″ | Standard Patios & Walkways |
| 5,000+ | 5″ | Driveways & Commercial |
Step-by-Step Guide to Compacting Base for Pavers
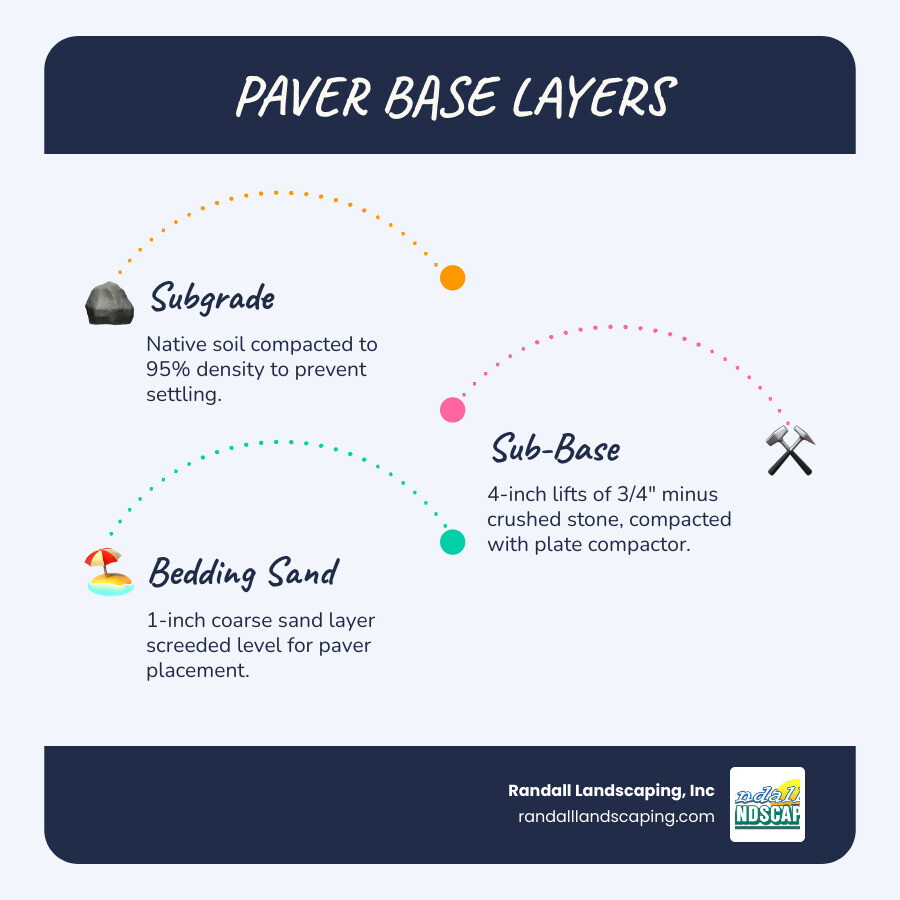
Before you start the engine on that compactor, you need to prepare the site. This starts with excavation. You need to dig deep enough to account for your sub-base (4–12 inches), your bedding sand (1 inch), and the thickness of the paver itself.
One of the most critical steps in Walkway Installation Dracut MA is ensuring a proper slope. We always aim for a minimum 1/4″ drop per linear foot (a 1-2% grade) away from any house foundation or structure. This ensures that when the April rains hit, the water moves away from your basement.
Preparing the Sub-Base: Compacting Base for Pavers in Lifts
The biggest mistake DIYers make is dumping 6 inches of gravel into a hole and running the compactor over the top once. This only compacts the top 2 inches, leaving the bottom 4 inches loose and ready to settle later.
We use the “Lift Method.” According to Proper Compaction Techniques for Base Material, you should apply your material in “lifts” or layers of no more than 3–4 inches at a time.
- The Handful Test: Before compacting, pick up a handful of your base material and squeeze it. It should hold its shape without dripping water. If it crumbles, it’s too dry — add a light mist. If it’s soup, let it dry out. Proper moisture acts as a lubricant, helping the stones slide into a tighter interlock.
- The Rule of 1000: A great rule of thumb is 1 inch of material for every 1000 lbs of compaction force. If you rented a 3000lb compactor, don’t exceed a 3-inch lift.
- The Pattern: Start at the outer edges and work your way toward the center. Overlap each pass by at least one-third of the plate’s width to ensure no spots are missed. We recommend at least two complete passes per lift.
Final Steps: Compacting Base for Pavers After Installation
Once your sub-base is as hard as concrete (you should be able to walk on it without leaving footprints), it’s time for the bedding layer.
For a Custom Paver Patio, we screed exactly 1 inch of coarse sand or High Performance Bedding (HPB). Crucial Tip: Do not compact this sand layer before laying your pavers. The sand needs to stay loose so that when you perform the final compaction, the pavers can “seat” into the sand.
After the pavers are laid and the edge restraints are spiked in:
- Sweep joint sand (or polymeric sand) over the surface.
- Attach your urethane mat to the plate compactor.
- Run the compactor over the pavers. This vibrates the sand up into the joints from below and settles the joint sand from above.
- Make at least two passes at 45-degree angles to the paver lines.
- Expect the pavers to settle about 1/8 to 1/4 inch during this final step. This is normal and is what creates that permanent “interlock.”
Common Mistakes to Avoid During the Compaction Process
Even with the best intentions, things can go wrong. Here are the pitfalls we see most often when homeowners try compacting base for pavers on their own:
- Using Stone Dust: In locations like North Andover, MA, and Atkinson, NH, we have significant freeze-thaw cycles. Stone dust (limestone screenings) contains too many “fines” that trap water. When that water freezes, your patio will heave. Always use a 3/4″ minus crushed stone or concrete sand for bedding.
- Compacting the Bedding Sand: As mentioned, if you compact the sand before laying the stones, the pavers won’t have anywhere to settle. They will simply sit on top, and any slight irregularity in the base will cause the pavers to wobble.
- Insufficient Over-Excavation: Your base should always be wider than your actual paved area. A good rule is to extend the base outward by the same distance as its depth. If you have a 6-inch deep base, it should extend 6 inches past the edge of your pavers. This prevents the edges from “rolling” or shifting outward.
- Skipping Subgrade Compaction: Before you even add your first rock, you must compact the native soil (the subgrade). If the dirt at the bottom of the hole is soft, your stone base will eventually sink into it.
- Over-Saturation: More water is not better. If the base becomes “pumpy” or springy, you’ve added too much water. You’ll need to wait for it to dry or replace the material.
For more detailed tips on walkway specific challenges, check out our Paver Walkway Contractors Ultimate Guide.
Frequently Asked Questions about Compacting Base for Pavers
Do I really need a plate compactor for a small patio?
If the area is larger than a standard 3×3 door landing, yes. A hand tamper simply cannot provide the thousands of pounds of centrifugal force required to reach 95% Proctor density. While you can buy a hand tamper for $50, the physical toll is immense, and the results are rarely flat.
Note: Average rental costs for plate compactors range from $85 to $350 per day based on internet data and are not actual costs for Randall Landscaping. Given that a failed patio can cost thousands to repair, the rental fee is a wise investment.
How deep should I excavate for a driveway vs. a walkway?
The depth depends entirely on the intended load.
- Walkways & Patios: 4–6 inches of compacted base is usually sufficient for pedestrian traffic.
- Driveways: Because vehicles exert much higher pressure, you need 8–12 inches of compacted base.
For projects like Hardscaping: Driveway Pavers, we also look closely at the soil type. If you have heavy clay soil (common in parts of the Merrimack Valley), you may need to go deeper to ensure stability.
How do I know if the moisture content is correct for compaction?
Use the squeeze test! Take a handful of your base material and squeeze it into a ball.
- Too Dry: The ball falls apart immediately. You’ll see dust flying when you run the compactor.
- Too Wet: Water squeezes out between your fingers, or the ball is “slushy.”
- Just Right: The ball holds its shape and leaves your hand slightly damp but not muddy.
Proper moisture reduces friction between the stones, allowing them to slide into the tightest possible configuration. This is the secret to How to Compact Paver Base for Patio Projects that stay flat for twenty years.
Conclusion
At Randall Landscaping, Inc., we believe that a beautiful landscape starts with what you can’t see. Whether we are working in Andover, Boxford, or Windham, our commitment to quality and 100% reliability means we never take shortcuts on base preparation. Compacting base for pavers is a science, but it’s one that rewards patience and the right equipment with a lifetime of enjoyment.
If you’re ready to upgrade your outdoor living space with a professional touch, explore our Patio Paver Installation Services or contact us today for a consultation. We’ve been the trusted name in Merrimack Valley hardscaping for two decades, and we’d love to help you build a foundation that lasts.