What You Need to Know Before Building a 2 ft Retaining Wall
A 2 ft retaining wall is one of the most practical — and manageable — DIY hardscape projects a homeowner can take on. Here’s a quick summary of what’s involved:
- Foundation: No concrete footing needed. A compacted gravel base 4-6 inches deep is sufficient for most materials.
- Trench size: Dig at least 12 inches wide and 8 inches deep.
- Best materials: Interlocking concrete blocks, pressure-treated 6×6 or 8×8 timbers.
- Drainage is critical: Backfill 18-24 inches behind the wall with #57 stone in 6-inch compacted lifts.
- Geo-grid: Not required at 2 feet — but this is the maximum height without it.
- Permits: Usually not required for walls under 2-3 feet, but always check local codes and HOA rules first.
Two feet might not sound like much, but this height is enough to control erosion, create raised planting beds, define outdoor spaces, and add real curb appeal to your yard. Done right, a 2 ft wall can last decades. Done wrong — skipping drainage or a proper base — and it can lean, crack, or fail within a few seasons.
I’m Tommy Randall, owner of Randall Landscaping, Inc., and I’ve been designing and building retaining walls — including countless 2 ft retaining wall projects — across Massachusetts and New Hampshire since 2006. In this guide, I’ll walk you through everything you need to build one that actually holds.

2 ft retaining wall word roundup:
Planning Your 2 ft Retaining Wall: Materials and Codes
Before we grab a shovel and start sweating in the New England sun, we need a plan. Planning a 2 ft retaining wall involves more than just picking a color that matches your shutters. We have to think about the physics of holding back hundreds of pounds of soil, especially in our local clay-heavy or loamy ground.
In the Merrimack Valley and Southern New Hampshire, our soil can be tricky. As we’ve seen in places like Salem or North Andover, the soil often has “slip planes” where water can cause layers of earth to slide. Even a short wall needs to be built to resist that pressure.
Choosing the Right Block System
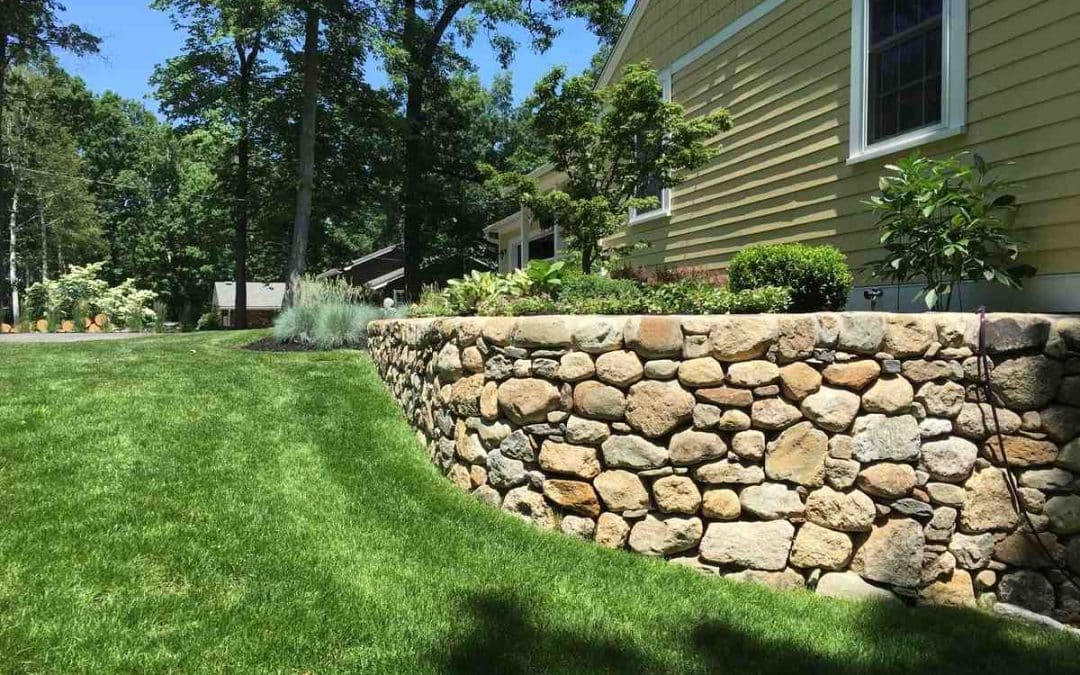
For most of our Residential Retaining Walls, we recommend using high-quality segmental blocks. These aren’t your average “garden blocks” from a big-box store. Professional-grade blocks are designed as gravity walls, meaning their weight and shape do the work.
Many modern systems, like the Belair Wall 2.0 Blocks: Stone Fire Pits, Walls, Columns, Steps, use an interlocking lip or a pin system. This creates a built-in setback (usually about 1 inch per foot of height), which tilts the wall slightly into the hill. This “batter” is what keeps the wall from leaning out over time.

Timber and Railroad Tie Options
If you prefer a more rustic look, a wood wall is a great choice. For a 2-ft tall timber retaining wall, we exclusively use pressure-treated timbers. Look for a UC4B rating, which means the wood is rated for “Heavy Duty Ground Contact.”
We typically use 6×6 or 8×8 timbers. Since pressure treatment only penetrates about an inch into the wood, any time you cut a timber, you must apply a copper-based preservative to the raw end. Without it, the inside of that timber will rot faster than a pumpkin in November.
Comparison: Concrete Blocks vs. Timber Longevity
| Feature | Segmental Concrete Blocks | Pressure-Treated Timber |
|---|---|---|
| Lifespan | 50+ Years | 15–25 Years |
| Maintenance | Minimal | High (Staining/Treating) |
| Difficulty | Moderate (Heavy lifting) | Moderate (Cutting/Drilling) |
| Cost | Higher upfront | Lower upfront |
| Drainage | Excellent (Built-in gaps) | Requires careful pipe placement |
Finally, check your local building codes. In towns like Windham, NH, or Dracut, MA, you generally don’t need a permit for a wall under 3 or 4 feet, but HOA regulations can be stricter. Always call Dig Safe (811) before you break ground. We don’t want to find the neighborhood’s fiber-optic line the hard way!
Essential Tools and Site Preparation
You can’t build a straight wall on a crooked foundation. Site prep is the most boring part of the job, but it’s 90% of why a 2 ft retaining wall stays standing. If you rush this, your wall will look like a roller coaster by next spring.
Required Tools for the Job
Gather your gear before you start. You’ll need:
- Shovels: A square-point for the trench and a round-point for digging.
- Levels: A 4-ft level for the overall run and a torpedo level for individual blocks.
- Compaction Tools: A plate compactor (you can rent these in places like Methuen or Lawrence) is much better than a hand tamper.
- Mallet: A heavy rubber mallet for “persuading” blocks into place.
- Cutting Tools: A circular saw with a diamond blade for blocks or a chainsaw/circular saw for timbers.
- Adhesive: High-quality masonry adhesive.
Digging the Foundation Trench
We start by marking the layout with stakes and string. For a 2 ft retaining wall, we dig a trench at least 12 inches wide (or twice the width of your block). The depth should be about 8 inches. This allows for a 4-inch base of crushed rock and for the first course of blocks to be half-buried.
In our Landscape Wall Construction projects, we emphasize compaction. Once the trench is dug, use your plate compactor on the raw soil. If you have heavy clay (common in the Merrimack Valley), consider laying down a layer of geo-textile fabric first to keep your gravel from sinking into the mud.
For more on the basics of getting started, check out our general guide on Retaining Walls.
Construction Guide and Step-by-Step Instructions
Now for the heavy lifting. Literally. A single retaining wall block can weigh 40 to 80 pounds, so lift with your legs, not your back!
Step-by-Step Instructions for a 2 ft Retaining Wall
- The Base Layer: Fill your trench with 4 inches of clean crushed rock (like #57 stone or “crush and run”). Compact this in 2-inch “lifts” until it’s rock-hard.
- Setting the First Course: This is the most important step. Place your first block and level it perfectly from front-to-back and side-to-side. If the first row is off by even a fraction of an inch, the error will be magnified by the time you reach the top.
- The Half-Buried Rule: At least half of your first block should be below the ground level. This prevents the “toe” of the wall from kicking out under pressure.
- Staggering Joints: When you start the second row, make sure the vertical joints are offset from the row below (like a brick wall). This increases the structural integrity.
- Managing the Setback: If using lipped blocks, pull them forward until the lip engages with the block below. For timbers, we implement a 1/2-inch setback for every row to prevent the wall from appearing to lean forward.
Securing the Wall Structure
If you’re building a timber wall, you’ll need to drill holes and drive 2-foot lengths of rebar through the bottom timbers into the ground. Subsequent rows are secured with 12-inch galvanized spikes or specialized timber screws.
For block walls, we use masonry adhesive on the top two courses. This keeps the “cap” blocks from moving when someone sits on the wall or a lawnmower bumps it. If your blocks have hollow centers, fill them with crushed stone as you go to increase the weight and improve drainage.
Professional Retaining Wall Construction Contractors know that the “glue” of the wall isn’t just the adhesive — it’s the friction and the weight.
Critical Drainage Solutions and Backfill
If you ignore drainage, you aren’t building a wall; you’re building a dam. Water is the #1 killer of retaining walls. When soil gets wet, it expands and becomes incredibly heavy, exerting “hydrostatic pressure” that can push over even a well-built 2 ft retaining wall.
Installing the Drainage System
Behind your first or second course of blocks, you need to install a 4-inch perforated drain pipe. This pipe should be wrapped in a “sock” or filter fabric to keep silt from clogging it.
The pipe needs to “daylight” — meaning it should exit the wall at the ends or through the face so water has somewhere to go. In towns like Plaistow or Atkinson, where we get heavy spring rains, we make sure these outlets are clear of debris.
Proper Backfilling Techniques
Don’t just throw the dirt back behind the wall! You need a “drainage zone” of at least 12 inches (we prefer 18-24 inches) of clean #57 stone directly behind the blocks.
- Lifts: Add the stone in 6-inch layers.
- Compaction: Compact each layer before adding the next. This “consolidation” ensures the wall won’t settle or shift later.
- Fabric: Place a layer of landscape fabric over the top of your stone before adding the final layer of topsoil. This prevents dirt from washing down into your clean gravel.
If your wall is already showing signs of trouble, you might need a Complete Retaining Wall Repair Guide or professional help to Repair Retaining Walls.
Costs, DIY vs. Pro, and Maintenance
So, what’s the bottom line? A 2 ft retaining wall is affordable, but the costs can vary wildly depending on your choice of stone or timber.
Calculating Costs for a 2 ft Retaining Wall
When estimating your project, always buy 10% more material than you think you need. Blocks break, and you’ll inevitably make a wrong cut.
Note: These are average internet costs based on general data and are not actual project costs for Randall Landscaping.
| Material Type | Average Cost per Linear Foot (2 ft high) |
|---|---|
| Wood/Timber | $15 – $45 |
| Basic Concrete Blocks | $25 – $75 |
| Premium Stone/Belgard | $50 – $165+ |
Building a 50-foot wall? A DIYer might spend $1,500 on materials and a weekend of hard labor. A professional crew might charge more, but they bring the heavy machinery and the guarantee that the wall won’t move for the next thirty years. If you’re on the fence, our Retaining Wall Builders Hiring Guide can help you decide.
Maintenance and Longevity
To ensure your Quality Retaining Walls last:
- Check the Outlets: Make sure your drain pipes aren’t clogged with leaves or rodent nests.
- Inspect for Shifting: A little settling is normal, but large cracks mean a drainage failure.
- Timber Care: If you have a wood wall, re-apply sealer every 3–5 years to fight off the New Hampshire winters.
Frequently Asked Questions about a 2-Foot Retaining Wall
Does a 2-foot retaining wall need a concrete footing?
In most cases, no. For a 2 ft retaining wall, a 4-6 inch base of compacted crushed rock is perfectly sufficient. However, if you are building with traditional cinder blocks and mortar, you must have a poured concrete footing that extends below the frost line (which is about 48 inches in our region) to prevent heaving.
What is the maximum height for a wall without geo-grid?
Typically, 24 to 36 inches is the limit for a standard gravity wall. At exactly 2 feet, you are well within the safety zone. If you go much higher, you’ll need to start looking at Retaining Wall Anchors or soil reinforcement.
Can a beginner DIY a 2-foot retaining wall?
Absolutely! It’s a great “weekend warrior” project. It requires more “brawn” than “brain,” but you do need to be meticulous with your leveling. If the idea of moving 5,000 pounds of stone sounds like a nightmare, you can always search for Retaining Walls Builders Near Me and let us handle the heavy lifting.
Conclusion
Building a 2 ft retaining wall is one of the most rewarding ways to transform your landscape. Whether you’re terracing a slope in Pelham or creating a raised garden bed in Georgetown, the key is all in the foundation and the drainage. By following these steps — digging a proper trench, leveling your base, and managing water — you’ll create a feature that adds value and beauty to your home for years to come.
At Randall Landscaping, Inc., we’ve built our reputation on quality work and 100% reliability across the Merrimack Valley and Southern New Hampshire. We know the local soils, we know the local codes, and we know how to build walls that stand the test of time.
Ready to build? Explore our Retaining Walls services and let’s get your project started!