The Ultimate Guide to Installing Rubber Mulch and Chippings

Why Laying Rubber Mulch the Right Way Makes All the Difference
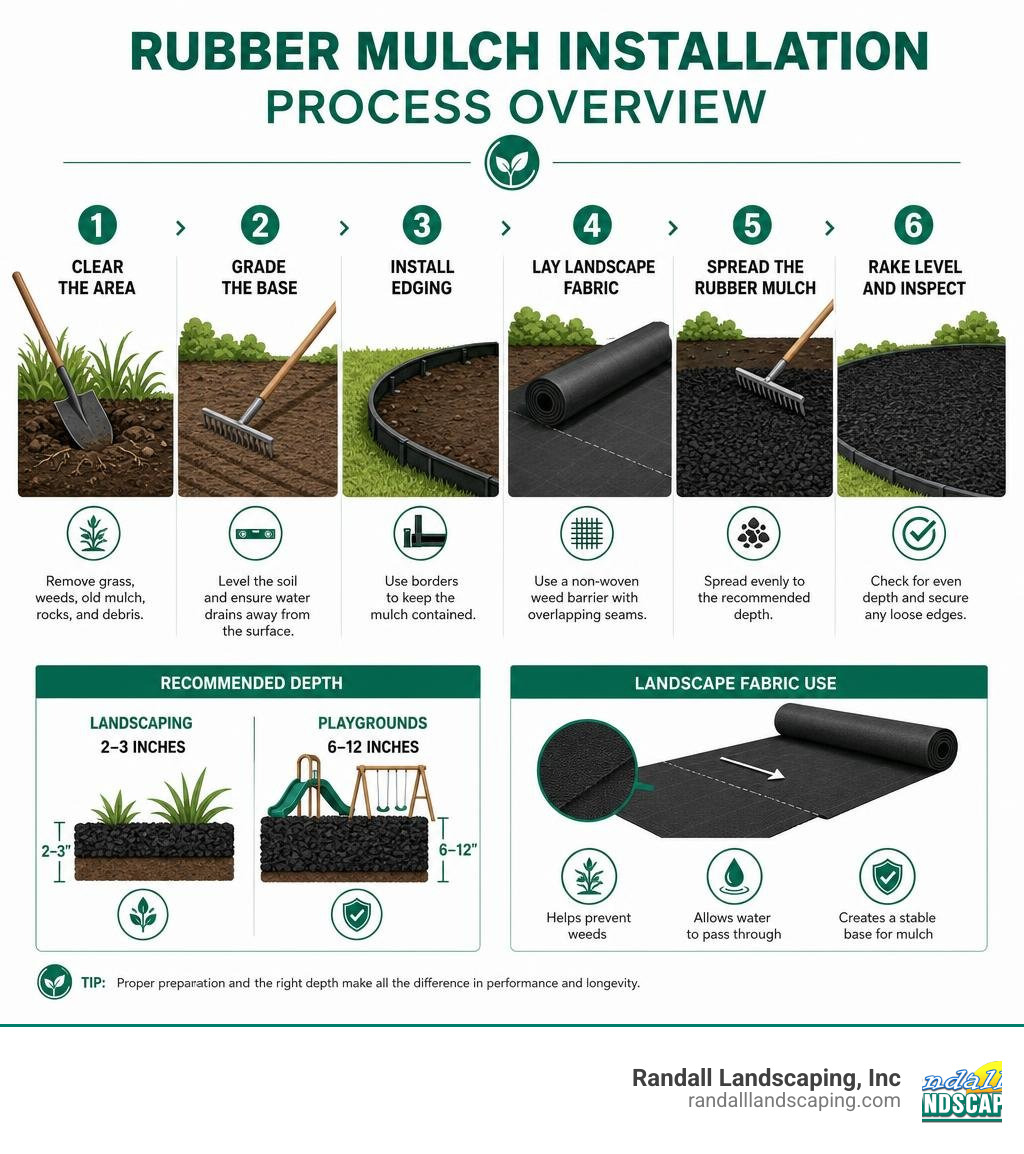
Laying rubber mulch correctly is the difference between a surface that lasts a decade and one that causes headaches within a season. Here's a quick overview of what the process involves:
How to lay rubber mulch, at a glance:
- Clear the area, remove grass, weeds, old wood mulch, rocks, and debris
- Grade the base, level the soil and ensure water drains away from the surface
- Install edging, use borders to keep the mulch contained
- Lay landscape fabric, use a non-woven weed barrier with overlapping seams
- Spread the rubber mulch, 2-3 inches deep for landscaping; 6-12 inches for playgrounds
- Rake level and inspect, check for even depth and secure any loose edges
Rubber mulch has become a popular choice for homeowners who want a ground cover that doesn't need replacing every year. Made from shredded recycled tires, it resists decomposition, suppresses weeds, and provides real cushioning underfoot, making it well-suited for both garden beds and play areas. Unlike wood mulch, which breaks down and needs topping up annually, rubber mulch can last 5-10 years or more with the right installation.
But here's the catch: the installation steps matter a lot. Skip proper drainage, use the wrong fabric, or install it over old wood mulch, and you'll run into pooling water, weed breakthrough, or uneven surfaces that are hard to fix after the fact.
This guide walks you through every step, from site prep to long-term maintenance, so you get it right the first time.
I'm Tommy Randall, owner of Randall Landscaping, and since 2006 I've been installing all types of mulch across Southern New Hampshire and Massachusetts, including laying rubber mulch for residential playgrounds, garden beds, and low-maintenance border zones. In this guide, I'll share exactly what works, and what to avoid, based on nearly two decades of hands-on experience.
Laying rubber mulch further reading:
- cost of installing mulch
- installing mulch beds
- mulch installation
What Rubber Mulch Is and When It Makes Sense
Before hauling bags or ordering bulk delivery to your home in Windham or Andover, it helps to understand what rubber mulch actually is.
Often sold as rubber chippings, shredded rubber, or rubber nuggets, this material is manufactured primarily from recycled passenger car and truck tires. During the manufacturing process, the tires are shredded, the steel wire reinforcement is magnetically removed, and the remaining rubber is cleaned and dyed in various earth-toned colors like dark brown, redwood, and charcoal black.
As a low-maintenance ground cover, it serves two main purposes: high-durability decorative landscape beds and high-impact playground surfacing. However, because it behaves very differently than organic materials, it is not a one-size-fits-all solution for every yard in the Merrimack Valley.
Rubber Mulch vs. Wood Mulch and Organic Mulches
The most significant material difference between rubber and wood is decomposition. Organic mulches decompose over time, which means they must be topped up every spring to maintain their color and depth. Rubber mulch, on the other hand, is a long-lasting mulch option that easily maintains its color for 10+ years and can easily provide a 5-10 year lifespan without requiring frequent top-ups.
However, this lack of decomposition is a double-edged sword. While wood mulch slowly breaks down and provides valuable soil enrichment, rubber mulch does not decompose and offers zero nutritional value to the underlying soil.
Moisture behavior is another key difference. Organic mulch acts like a sponge, absorbing water and slowly releasing it. Rubber is completely non-absorbent; water passes straight through it to the soil below.
Additionally, because rubber does not rot, it is highly pest-resistant and does not attract termites, carpenter ants, or fungal growth. If you are considering this material for your home, you can read our detailed breakdown on rubber mulch for flower beds and learn more about the broader mulch environmental impact.
Benefits and Drawbacks to Weigh Before Installation
Like any home improvement project, laying rubber mulch comes with distinct trade-offs:
The Benefits:
- Exceptional Longevity: You won't have to re-mulch every spring, saving you backbreaking labor.
- Excellent Weed Suppression: Combined with a heavy-duty fabric, it blocks sunlight and prevents weed seeds from contacting the soil.
- Superior Cushioning: It provides excellent shock absorption for playground safety applications.
- Pest and Rot Resistance: It won't attract wood-boring insects or grow mold.
The Drawbacks:
- Higher Upfront Cost: The initial investment is significantly higher than wood mulch.
- Heat Retention: It absorbs and retains heat under direct summer sunlight, which can stress sensitive plant roots.
- Odor: It can emit a mild tire smell during hot summer days, especially right after installation.
- Flammability: Once ignited, rubber fires burn hotter and are much harder to extinguish than wood fires.
- No Soil Benefits: It does not contribute organic matter to build soil health.
Where Rubber Mulch Works Best
To help you decide if rubber mulch is right for your project, here is a quick comparison of how it performs in different areas of your property:
| Application Area | Recommended Use | Key Benefits | Limitations | Depth Considerations |
|---|---|---|---|---|
| Decorative Landscape Beds | Around established shrubs and evergreen trees | Exceptional color retention; zero rot | Not ideal for delicate annuals; gets hot | 2 to 3 inches |
| Tree Rings | Around mature, deep-rooted shade trees | Keeps weeds down; won't rot against bark | Can restrict oxygen if piled too high | 2 to 3 inches |
| Walkways & Paths | High-use residential footpaths | Excellent drainage; comfortable cushioning | Nuggets can shift under heavy foot traffic | 2 to 4 inches |
| Play Areas | Under swings, slides, and climbing frames | Superior shock absorption; dry surface | Requires deep excavation and borders | 6 to 12 inches |
| Low-Maintenance Borders | Along property lines or fence lines | Keeps weeds away for years; stays put | Hard to remove if you change your mind | 2 to 3 inches |
Planning for Laying Rubber Mulch: Site Prep, Depth, and Materials
A successful project starts long before the first bag of mulch is opened. Proper site analysis is critical. You must evaluate the purpose of the area, its shape, the existing soil condition, the slope of the land, and the local drainage patterns.
For properties in the Merrimack Valley and Southern New Hampshire, planning for freeze-thaw cycles and heavy rain is vital. If you want to understand the full scope of professional prep, check out our mulch installation complete guide.
Recommended Rubber Mulch Depth by Application
How deep you install your mulch depends entirely on what you plan to do with the space:
- Landscape Beds: A depth of 2 to 3 inches is the industry standard. This is deep enough to block light from weed seeds without choking your plants.
- Pathways: We recommend 2 to 4 inches to handle foot traffic without exposing the underlying fabric.
- Playgrounds and Safety Zones: For backyard play areas, a minimum of 6 inches is recommended. For commercial settings, depths of 6 to 12 inches are required to provide adequate cushioning for critical fall heights ranging from 10cm up to 30cm depending on the equipment.
Tools and Materials Needed
To avoid mid-project trips to the hardware store in Salem or Methuen, gather these essential tools and materials before you begin:
- Premium recycled rubber mulch (shredded or nuggets)
- Heavy-duty landscape fabric (geotextile membrane)
- Landscape staples or pegs
- Retaining borders or edging materials
- Wheelbarrow, shovel, and garden rake
- Utility knife (for cutting fabric)
- Tape measure and level
- Hand tamper (for compacting the soil base)
- Gardening gloves and a dust mask (rubber mulch can be dusty during installation)
- Garden hose with a spray nozzle
To learn more about beginner-friendly tools and setups, you can consult this helpful resource: Will a Rubber Mulch Installation Guide for Garden Beds and Walkways be Helpful to Beginners? - Conserv-A-Store.
Should You Use Landscape Fabric Under Rubber Mulch?
Yes, using a high-quality weed barrier is highly recommended. Because rubber mulch does not decompose, it will slowly sink and mix with the soil over time if there is no separation layer. Once rubber mixes with soil, it is nearly impossible to separate, creating a messy, muddy look that ruins the installation.
We recommend using a 3oz non-woven spunbond black fabric for strength, durability, water permeability, and extra UV stabilization. Avoid cheap, thin woven fabrics that tear easily, and never use solid plastic sheeting, which traps water, causes root rot, and creates pooling issues.
When laying the fabric, ensure you overlap the seams by at least 4 to 6 inches (and up to 12 to 18 inches in weed-prone areas) and secure them tightly with landscape staples every 12 to 18 inches.
How to Calculate Rubber Mulch Quantity
To calculate how much mulch you need, you must determine the square footage of your project area and multiply it by your desired depth:
- Square or Rectangular Beds: Multiply length (feet) x width (feet) x desired depth (converted to feet; e.g., 3 inches is 0.25 feet).
- Circular Beds: Measure the diameter, divide it in half to get the radius, square the radius, multiply by 3.14, and then multiply by the depth in feet.
- Oval Beds: Multiply depth (feet) x length (feet) x width (feet) x 3.14, then divide by 4.
Always add a 10% overage to account for settling and uneven ground. If you are doing a DIY playground, you can find a handy step-by-step calculator and guide here: Laying Rubber Mulch: A Step-By-Step DIY Guide + Calculator.
If you are researching average internet costs to budget your project, material prices typically range from $5 to $15 per bag, or approximately $5 to $20 per cubic foot. For large-scale commercial playground projects with extensive site prep, drainage systems, and premium borders, total project averages can range from $45 to $60+ per cubic foot when professionally installed.
Please note: these are average costs based on internet data and do not represent actual pricing for Randall Landscaping.
Step-by-Step Instructions for Laying Rubber Mulch

Now that you have your materials, it's time to start the physical work. Proper ground preparation is the secret to a professional-looking, long-lasting installation. For a deeper look at general bed prep, read our guide on garden bed mulching.
Step 1: Mark, Clear, and Excavate the Area
Begin by outlining your project area using stakes and string or landscape spray paint. Once marked, clear the entire area of existing grass, weeds, rocks, tree roots, and stumps.
If you are transitioning an existing garden bed, you must remove all pre-existing wood mulch. Never install rubber mulch over existing wood mulch. The wood will decompose underneath, creating a messy, sawdust-like layer that retains water, grows mold, and causes the rubber mulch to sink unevenly. Excavate the soil to your desired depth (usually 2 to 3 inches for gardens, or 6 inches for in-ground playgrounds) to create a clean, flat installation base.
Step 2: Grade the Base for Drainage
Because rubber mulch does not absorb water, proper drainage is critical. Use a rake to level the soil, ensuring a slight slope away from building foundations or play equipment to prevent water pooling. Compact the soil firmly using a hand tamper or lawn roller. In areas prone to heavy rain or poor drainage, incorporating a thin sand or gravel sub-base beneath your fabric will help prevent water from trapping under the mulch.
Step 3: Install Borders and Edging
Rubber mulch is lightweight and can migrate if not properly contained. Install a sturdy retaining border around the perimeter of your project. You can use plastic, metal, pressure-treated wood, concrete curbing, or heavy-duty playground timbers.
For the best results, ensure the top of your border sits 1 to 2 inches above the final depth of the rubber mulch to contain the material during heavy rains or active play.
Step 4: Lay and Secure the Weed Barrier
Roll out your 3oz non-woven landscape fabric over the compacted soil. Overlap all seams by at least 6 inches and secure them with landscape staples spaced every 12 to 18 inches.
When working around existing plants, cut clean "X" shapes in the fabric to slip over the foliage, and wrap the fabric tightly around playground posts or fence borders to prevent soil from mixing with your rubber chippings. For beginners looking for a simple guide, you can review these 3 tips on how to install rubber mulch so you won't mulch again for 12 years.
Step 5: Spread, Rake, and Level the Rubber Mulch
Carefully dump your rubber mulch into the prepared area using a wheelbarrow or by cutting open bags in small sections. Use a garden rake to spread the material evenly to your target depth.
Be careful not to pile the mulch directly against plant stems or tree trunks (avoid "mulch volcanoes"), as this can trap heat and restrict oxygen. For a complete look at proper spreading techniques, check out our garden bed mulching complete guide. You can also find more garden-specific tips here: How Do You Properly Install Rubber Mulch in Your Garden?.
Step 6: Add Wear Mats in High-Traffic Play Areas
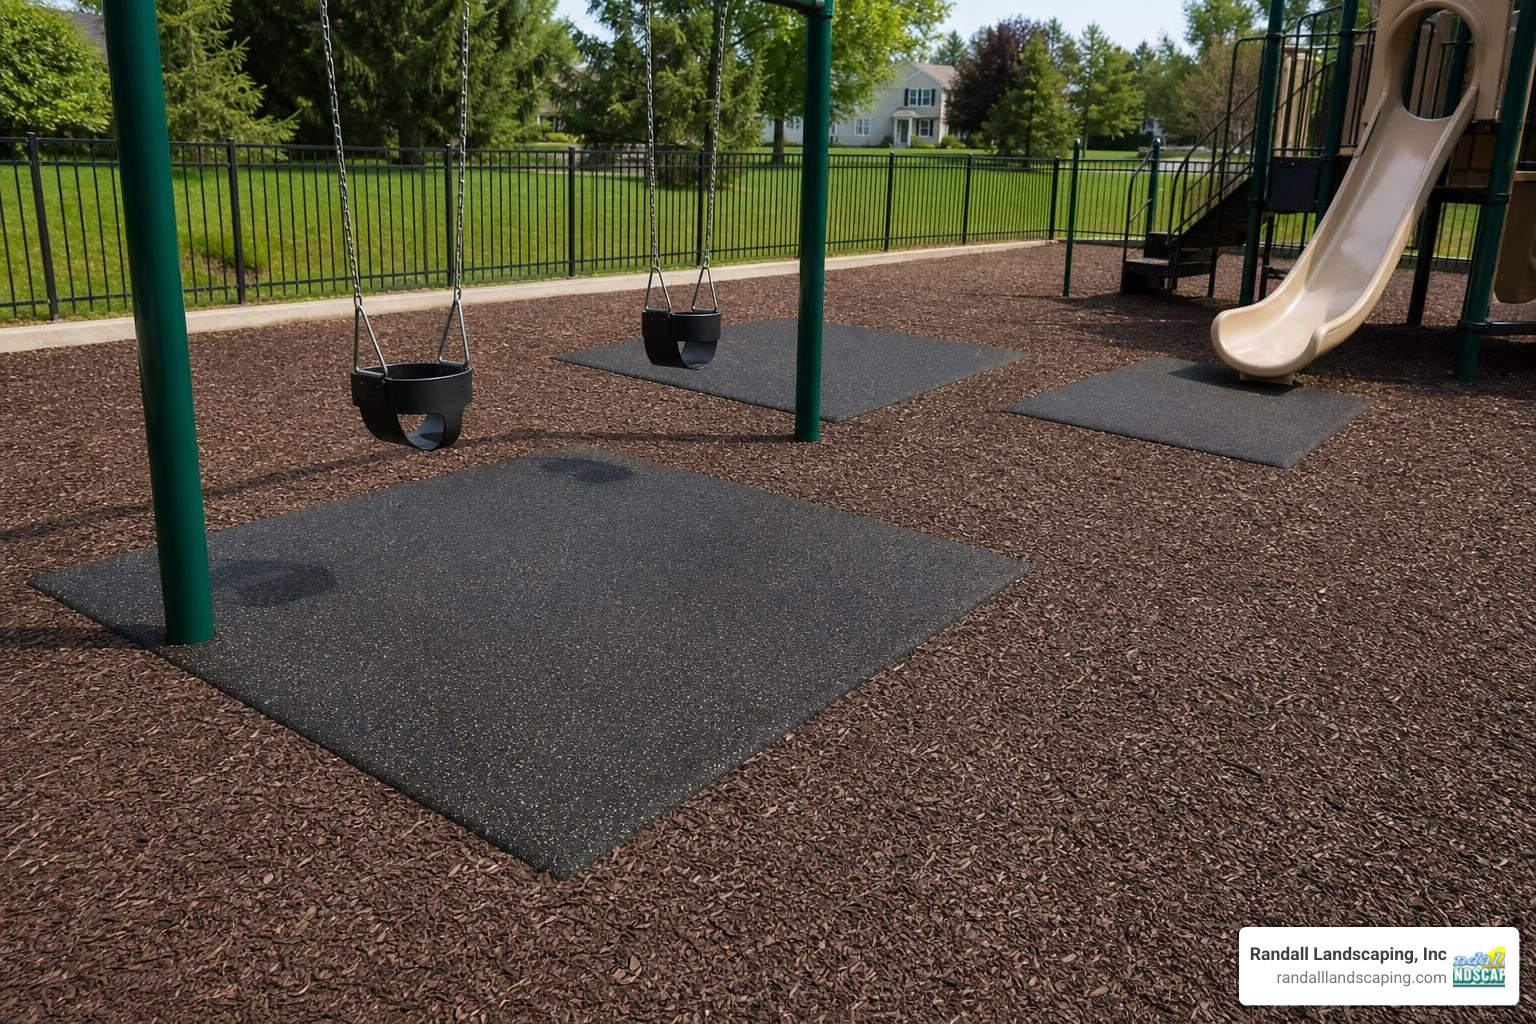
If you are installing rubber mulch for a playground, you must protect high-traffic "wear zones" under swings and at slide exits. Active play will quickly displace loose-fill mulch, exposing the landscape fabric and compromising fall safety.
To prevent this, install heavy-duty rubber wear mats midway through the depth of your rubber mulch in these zones. These mats help maintain a constant safety depth and prevent deep depressions. For more information on commercial safety standards, read this guide: Mulch It Right: Installing Rubber Mulch for Playgrounds - Replay Surfacing.
Maintaining Rubber Mulch for Longevity, Safety, and Appearance
While rubber mulch is incredibly low-maintenance compared to wood, it is not completely "set-it-and-forget-it." Regular care is required to keep it looking clean and performing safely. To understand how this fits into overall weed management and moisture retention, read our articles on mulch for weed control and moisture retaining mulch.
Routine Maintenance Schedule
To maximize your investment, follow this simple seasonal care routine:
- Spring: Inspect your borders for shifting or damage caused by winter freeze-thaw cycles. Use a rake to redistribute any mulch that shifted during the winter.
- Summer: Check high-traffic areas weekly and rake the mulch back to its proper depth.
- Fall: Remove fallen leaves and twigs. A leaf blower on a low setting is the easiest way to clear debris without blowing the lightweight rubber nuggets away.
- Winter: Avoid shoveling snow directly off rubber mulch beds, as you will accidentally scoop up the rubber chippings.
For more professional maintenance tips, refer to this guide: Rubber Mulch Installation and Maintenance Tips.
Safety Checks for Playgrounds and High-Use Areas
If your rubber mulch is used as a safety surface, regular safety checks are essential:
- Check the Depth: Use a measuring tape to ensure you maintain the minimum required safety depth (6 to 12 inches) in all areas, especially under swings and slides.
- Inspect for Debris: Check for foreign objects, sharp stones, or metal fragments that may have found their way into the play zone.
- Monitor Wear Mats: Ensure your rubber wear mats remain flat and covered by a light layer of loose-fill mulch.
Cleaning and Troubleshooting Common Issues
Over time, dust and dirt can settle on your mulch, making it look dull. A quick rinse with a garden hose on a gentle spray setting will wash away dust and restore its vibrant color. Never use a pressure washer, as the high-velocity water will blast the mulch out of the beds.
If you spot weeds growing, they are likely growing in organic debris (like soil or decomposed leaves) that blew into the mulch from above. Simply pull them by hand; they are easy to remove because their roots cannot penetrate the heavy-duty landscape fabric below.
Safety, Environmental Concerns, and Common Installation Mistakes
As with any synthetic product, it is important to address safety and environmental questions, especially if you have children or pets playing on the surface.
Safety and Environmental Considerations
Because rubber mulch is made from recycled tires, it contains zinc and trace heavy metals. While premium brands treat their products to minimize chemical leaching, we do not recommend using rubber mulch in edible vegetable gardens or near sensitive local waterways.
Additionally, rubber absorbs heat. On hot summer days, the surface can become significantly warmer than organic wood mulch, so it's a good idea to provide shading over play areas or wear shoes during peak afternoon heat.
If you are deciding on the best options for growing food, read our guides on the best mulch for vegetable garden and the ultimate guide to mulching your raised garden beds.
Common Mistakes to Avoid When Laying Rubber Mulch
To ensure your project is a success, avoid these common pitfalls:
- Installing over old wood mulch: This is the #1 cause of sinking and mold issues.
- Skipping landscape fabric: Without a 3oz non-woven barrier, your rubber will slowly sink into the dirt.
- Using cheap plastic sheeting: This traps water, kills beneficial soil microbes, and creates drainage issues.
- Insufficient depth: Spreading the mulch too thin will expose the fabric and allow weeds to break through.
- Neglecting sturdy borders: Without proper edging, your mulch will quickly migrate into your lawn.
Where Rubber Mulch May Not Be the Best Choice
While we love the durability of rubber, it isn't the right choice for every landscape. Avoid using rubber mulch in vegetable gardens, pollinator beds, or steep slopes where heavy rains can wash the lightweight nuggets away. If your primary landscaping goal is to build rich, organic soil over time, traditional wood mulch is a far better option.
For a complete guide on designing and building beautiful, healthy beds, read our comprehensive guide: from lawn to lush the complete guide to building beautiful mulch beds.
Frequently Asked Questions About Laying Rubber Mulch
How deep should rubber mulch be for playgrounds?
For home playgrounds, we recommend a minimum depth of 6 inches. For commercial or public play areas, a depth of 6 to 12 inches is required to meet ASTM safety standards and provide adequate shock absorption for equipment fall heights.
Do you put anything under rubber mulch?
Yes, you should always install a heavy-duty, 3oz non-woven landscape fabric. This acts as a barrier to prevent the rubber from mixing with the soil, blocks weeds, and allows water to drain freely.
Can you lay rubber mulch over existing mulch, grass, concrete, or soil?
No. You must remove all existing grass, weeds, and old wood mulch before installation. Laying rubber over concrete or asphalt is also not recommended, as the hard surface can trap moisture and cause the color dyes on the rubber to break down prematurely.
How long does rubber mulch last?
With proper installation and minimal maintenance, premium rubber mulch can easily last 10 to 12 years without losing its color or structural integrity.
Is rubber mulch good for flower beds?
It can be used in decorative flower beds around established, deep-rooted shrubs and trees. However, because it retains heat and does not enrich the soil, it is not recommended for delicate annuals or shallow-rooted flowers. For more details, see our guide on rubber mulch for flower beds.
Conclusion
Laying rubber mulch is an excellent way to create a durable, ultra-low-maintenance landscape or a safe, highly cushioned play area for your family. By following the proper steps, clearing the site completely, grading for drainage, installing sturdy borders, and laying a premium 3oz non-woven fabric, you can ensure your project looks great and performs safely for over a decade.
If you live in the Merrimack Valley or Southern New Hampshire, including communities like Windham, Pelham, Salem, Andover, or North Reading, and want to ensure your next mulching project is handled with 100% reliability and quality craftsmanship, we are here to help.
Whether you need professional landscape design, site preparation, or complete bulk mulch installation, our team at Randall Landscaping is committed to your complete satisfaction. Contact us today to discuss your project and schedule your professional installation!